
If you've ever wanted a cake that tastes like your favourite coffee order in dessert form - this Chocolate Espresso Cake is it!

Chocolate Espresso Cake Recipe Snapshot
What it is: Rich mocha cake stacked with espresso buttercream frosting.
Why you'll love it: Easy recipe with stunning results and a perfect balance of coffee and chocolate flavor.
How to make it: Mix wet ingredients into the dry, then add espresso powder and bake. Add espresso into the simple frosting recipe and frost.
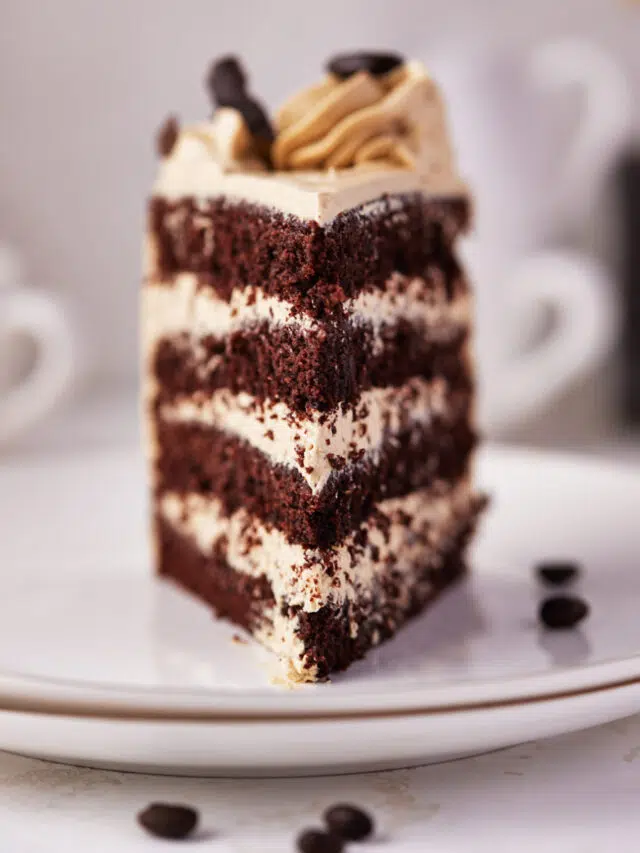
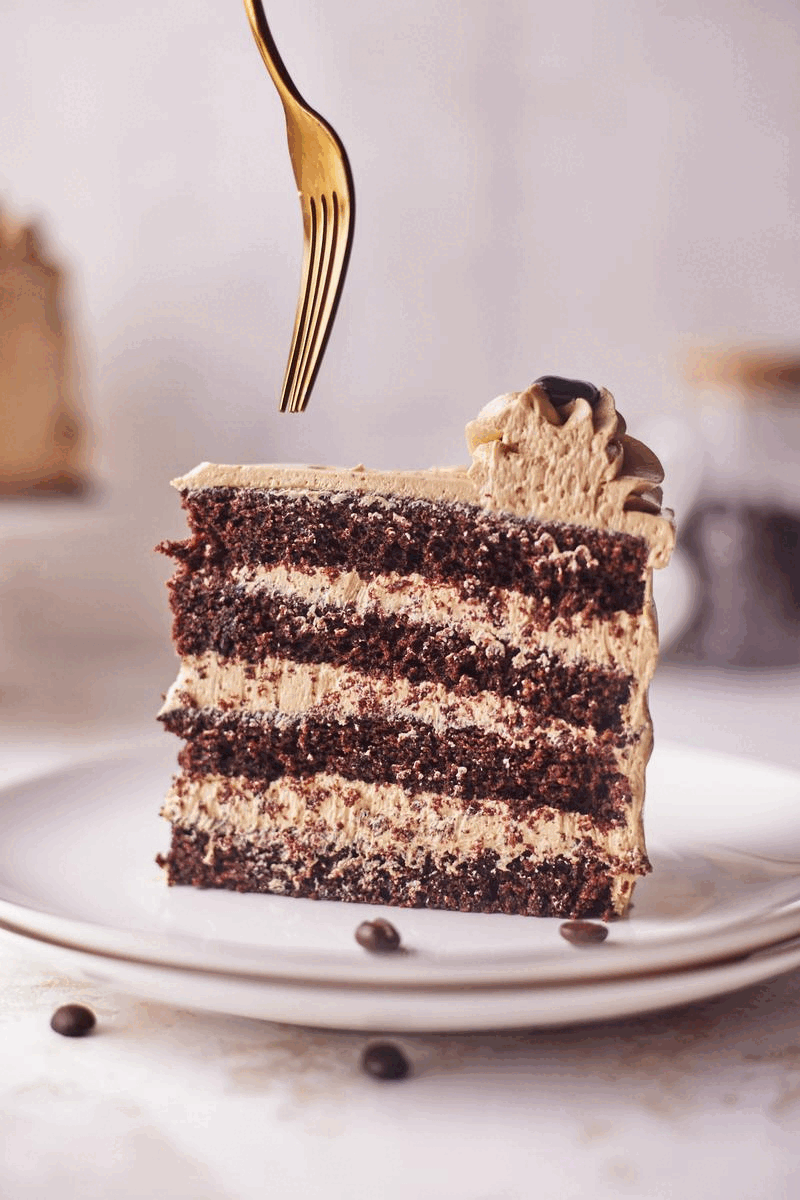
This chocolate espresso cake is what my husband requests for his birthday every year. It's rich, moist, and deeply flavourful, with espresso powder baked straight into the cake to intensify the chocolate without overpowering it.
The layers are stacked with silky espresso buttercream that's simple, smooth, and actually tastes like real espresso (no artificial coffee flavouring here). I've tested this recipe carefully to make sure the coffee flavour is strong enough for coffee lovers to notice immediately, yet still chocolate-forward, so everyone will reach for a second slice.
Reader Review:
This cake and the frosting came out beautifully! I made it for Mother's Day and it was perfect. Thank you so much for this wonderful recipe! We love it and plan to make again!
⭐⭐⭐⭐⭐ - Clarissa
Jump to:
Ingredients
This chocolate espresso cake recipe uses my classic chocolate cake as a base layer, then adds in espresso powder to turn it into a mocha cake.
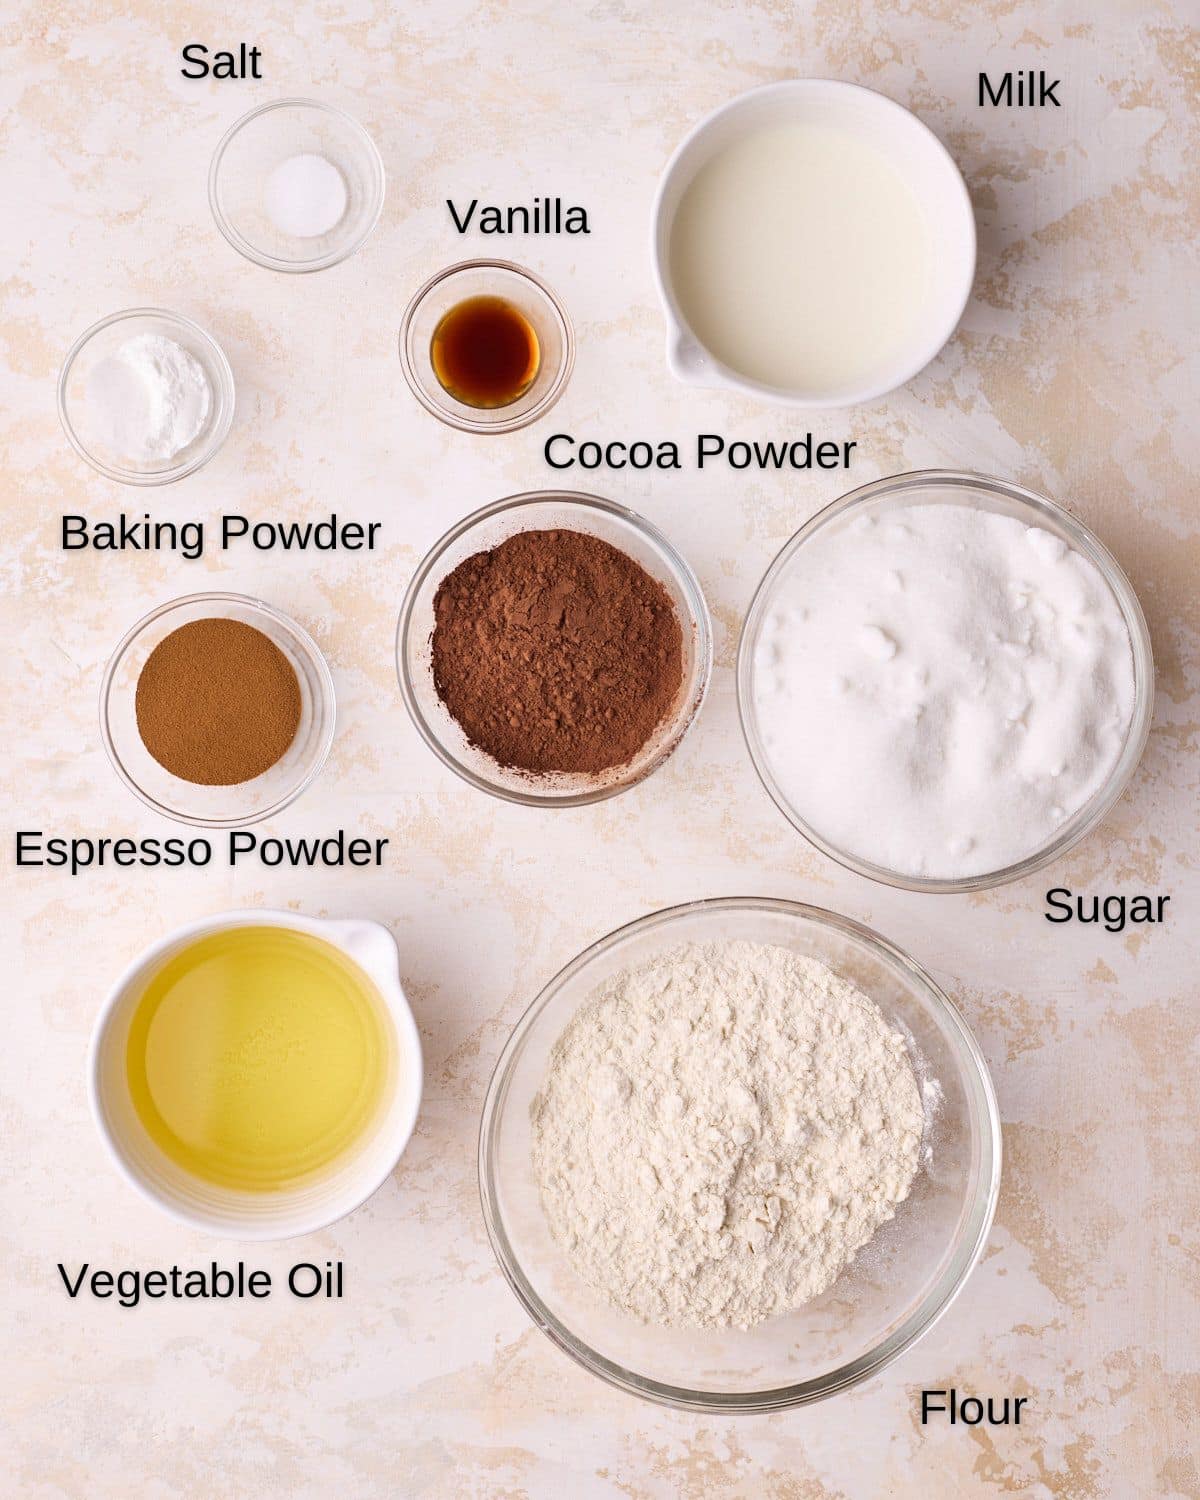
- Flour - All-purpose flour (plain flour) will give the best structure.
- White Sugar - Use granulated sugar (caster sugar in the UK).
- Eggs - Use large eggs; make sure they are at room temperature.
- Cocoa Powder - Dutch-processed cocoa powder will give you the best results. Natural cocoa powder will work too, but can often create a denser cake.
- Vegetable Oil - Using oil instead of butter keeps the cake moist.
- Fresh Milk - Whole milk is best, but you can use whatever kind of milk you have.
- Espresso Powder - This is different than regular instant coffee granules. Though the packaging looks similar, the coffee is super fine, like a powder. Look for anything that says espresso powder or instant espresso powder.
- Vanilla - Use a high-quality vanilla extract or vanilla bean paste.
- Condensed Milk - This is for the frosting. Be sure to choose sweetened condensed milk and not evaporated milk, which can look similar.
- Butter - For the glossy coffee buttercream. It's best to use unsalted butter, and it's essential that it's room temperature before you begin whisking it.
See the recipe card for measurements in both grams and cups (though I always recommend using a kitchen scale).
Equipment
- Stand Mixer - You definitely want to use a stand mixer to make the espresso Russian buttercream, as it will be very tiring to do by hand.
- Cake Pans - I used 8-inch cake pans, but the recipe would also work with 9-inch pans.
- Palette Knife - This will help you spread the espresso frosting on nice and smoothly. You can also use a pastry scraper.
- Piping bag - An optional tool, but it's great for taking your decoration to the next level.
How to Make Chocolate Espresso Cake
There are two components to this delicious coffee dessert: the chocolate mocha cake and the coffee-flavored buttercream. They are both super easy recipes with just a few minutes of prep time.
Make The Mocha Cake
This espresso chocolate cake recipe is incredibly easy to make and will take just a few minutes to prepare the batter. You can add more espresso powder if you would like an even stronger coffee flavor in your mocha cake.
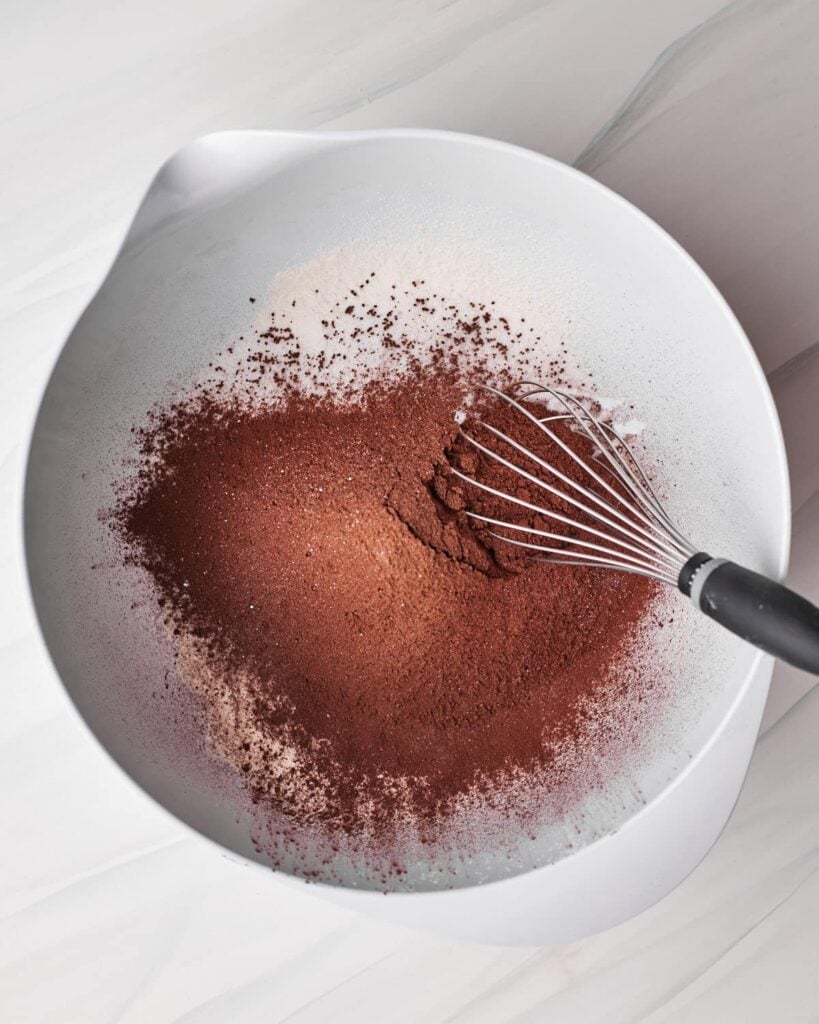
Mix Dry Ingredients
Preheat the oven to 350°F / 180°C (160° fan) and grease two 8-inch cake pans.
Put the flour, sugar, cocoa powder, baking powder, and salt in a large bowl and combine.
Add Wet Ingredients
Whisk the eggs, vegetable oil, fresh milk, and vanilla together in a jug or bowl, then add to the dry ingredients and whisk until combined and free from lumps.
You can use a mixer if you want, but it's super easy to do by hand with a whisk.
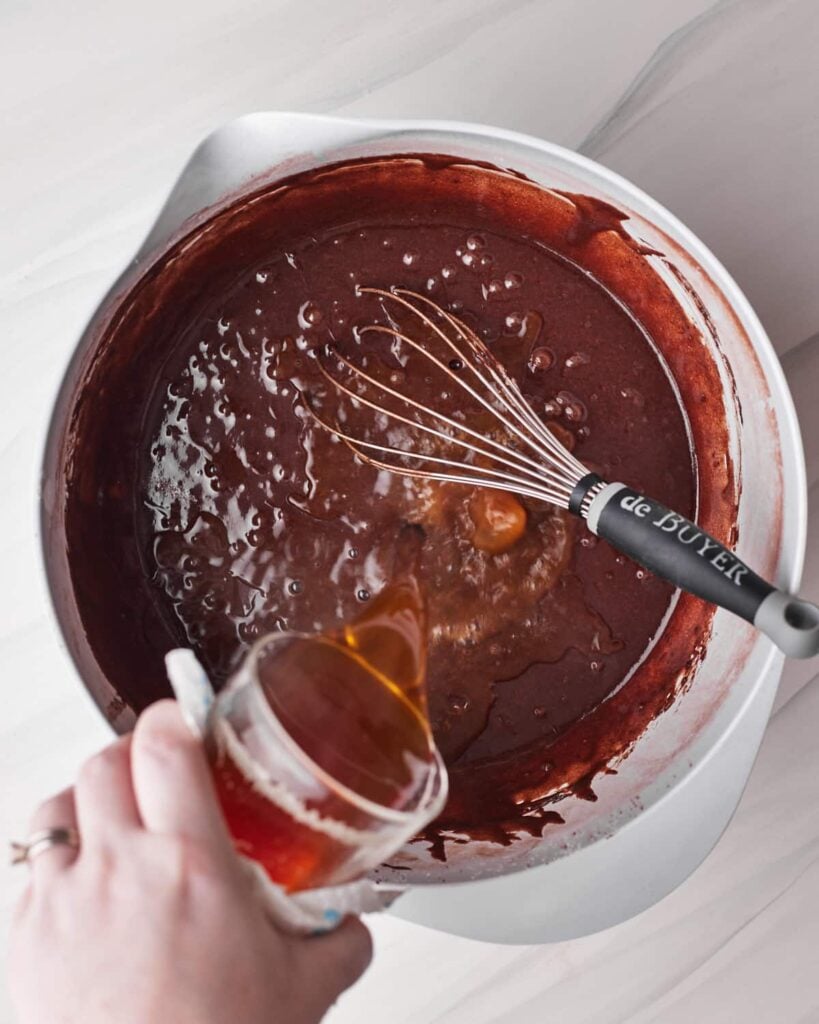
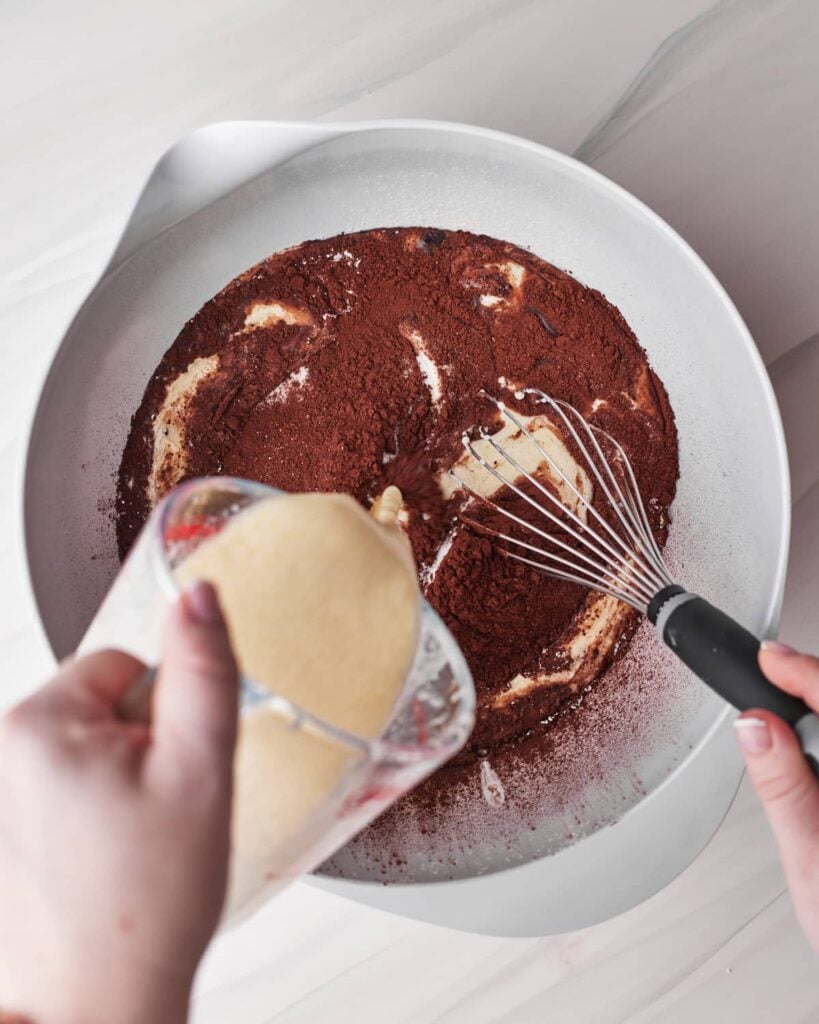
Add Hot Coffee
Scrape down the sides and bottom of the bowl with a spatula or wooden spoon to ensure there are no dry ingredients stuck there.
Now, dissolve the espresso powder in the hot water and add to the cake batter. Stir until combined.
Bake
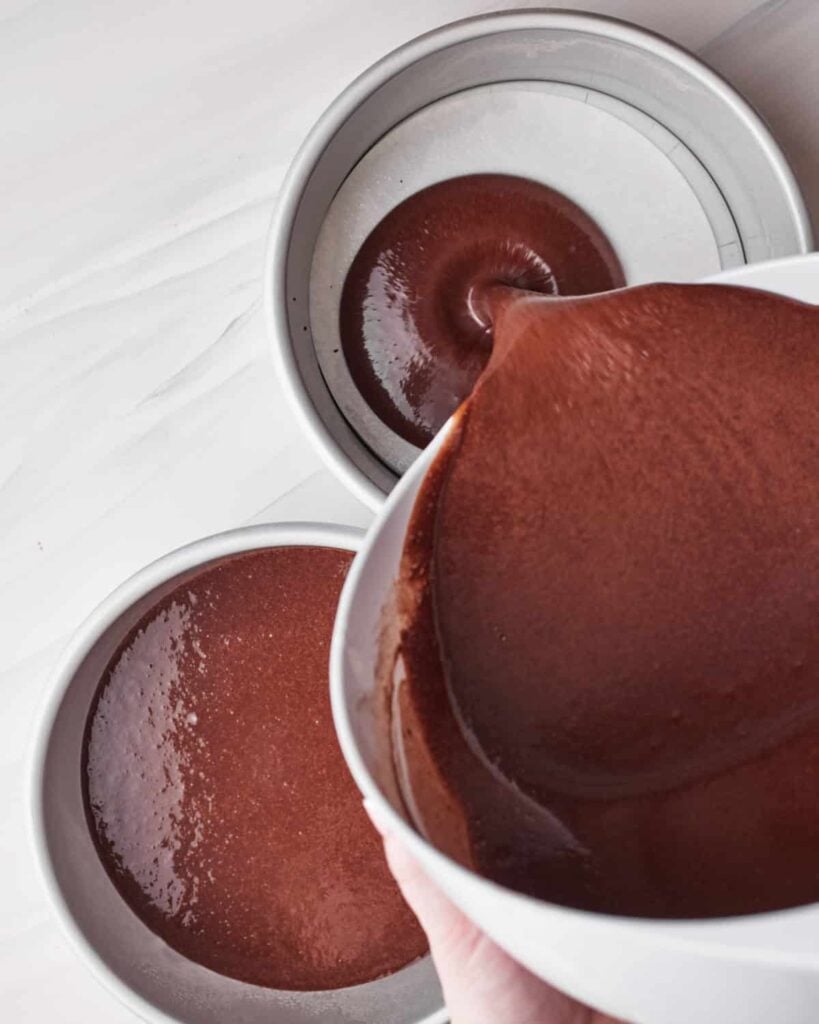
Pour the batter evenly between your two prepared cake pans and bake for 30-40 minutes or until a toothpick comes out clean. The bake time will vary greatly depending on your oven, so make sure to keep an eye on it once you reach the 20-minute mark.
Leave the sponges to cool in the cake pans for at least 30 minutes before transferring to a wire rack to cool completely.
Make The Espresso Buttercream
This silky espresso buttercream is a coffee-infused version of my Russian buttercream. The great thing about Russian buttercream is that it is incredibly easy to make and tastes amazing.
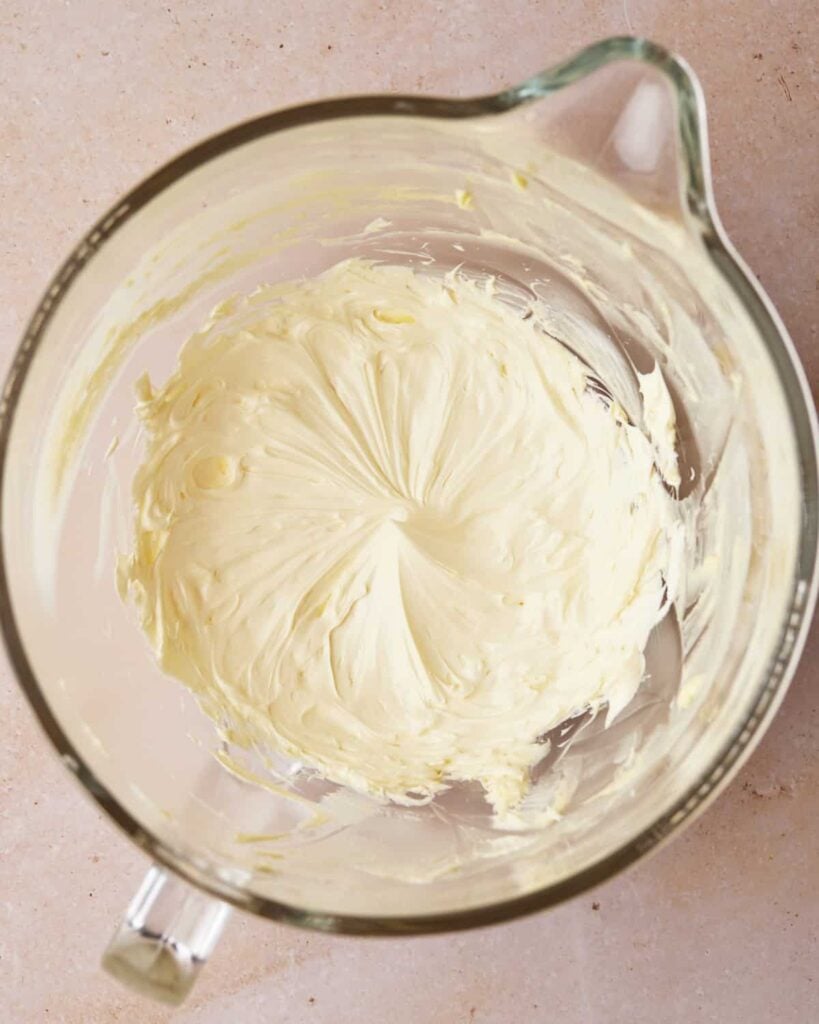
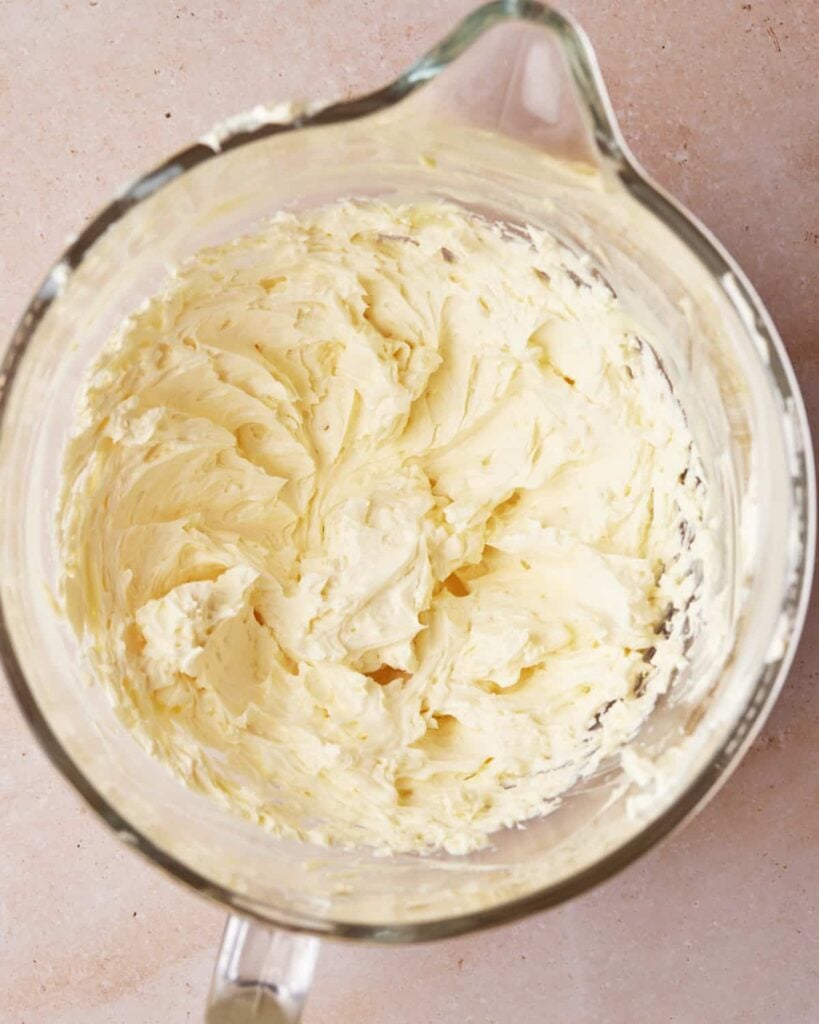
Whip the Butter
Start by making sure your butter is at room temperature. The butter temperature is super important so the buttercream doesn't split. I find the best results when I remove my butter from the fridge about an hour to an hour and a half before using it.
Place the butter in the bowl of a stand mixer and whip with a whisk attachment at high speed for 5 full minutes, regularly scraping down the sides of the bowl.
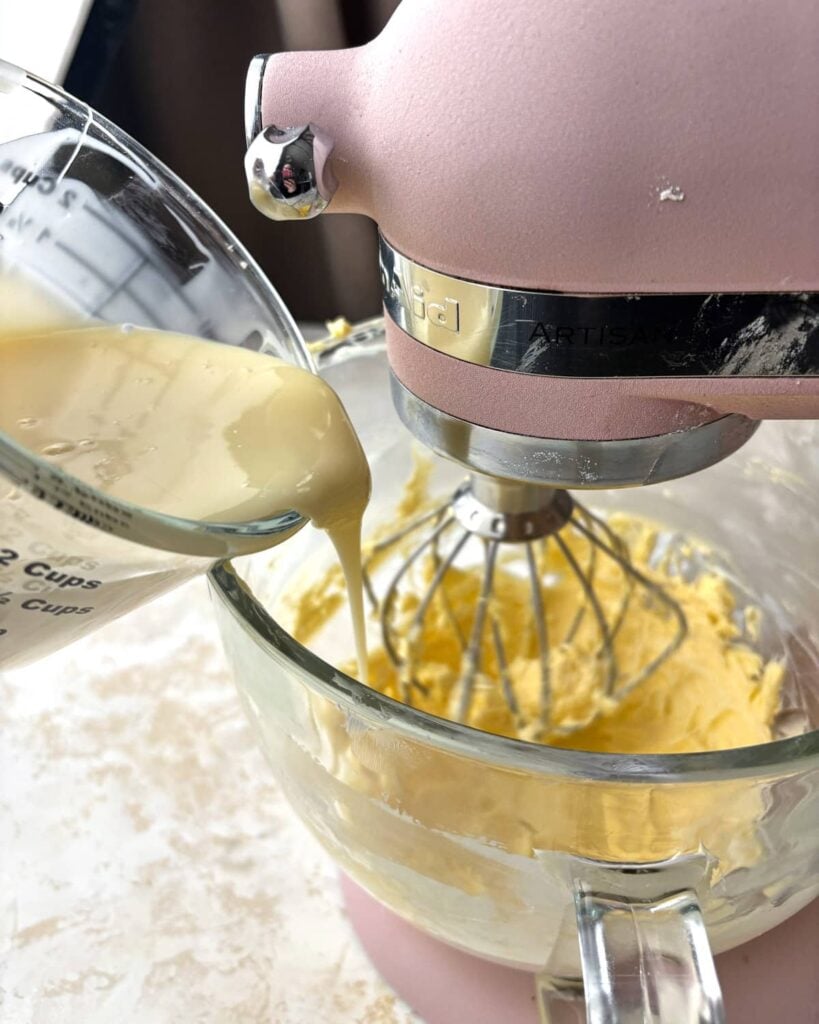
Add in Condensed Milk
After 5 minutes, the butter should be super pale and creamy. Turn the mixer down to a medium speed and very gradually drizzle in the condensed milk.
Let it mix and incorporate as you go to avoid splitting.
Keep Mixing
Once all the condensed milk is incorporated, turn the mixer back up to high speed and whip for another minute.
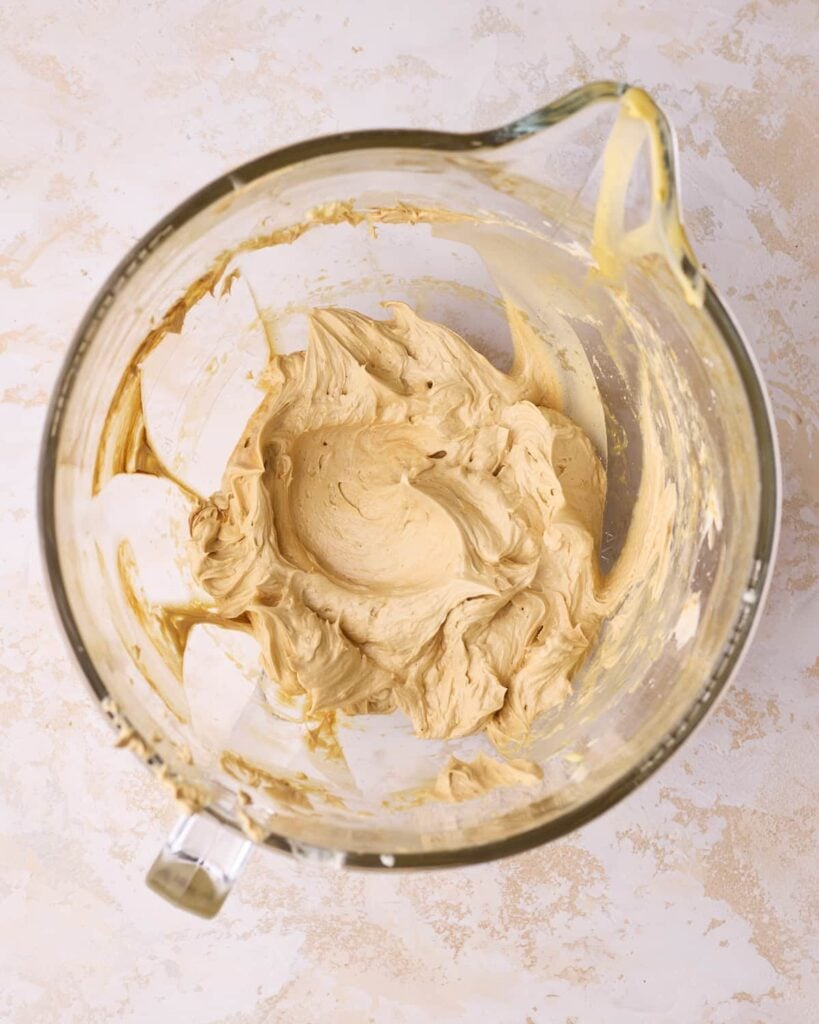
Incorporate Espresso
In a separate small bowl, add the espresso powder and 1-2 tablespoons of hot water, and stir until totally dissolved.
Add the espresso mix to your frosting along with a teaspoon of vanilla and a pinch of salt, then continue to whip the espresso Russian buttercream for a further minute on maximum speed.
It should be thick, glossy, and a spreadable consistency.
Troubleshooting
Cake - If your cake sinks in the middle or seems underbaked, check out my guide on why cakes sink to troubleshoot and find out how to prevent it.
Frosting - If your buttercream doesn't look silky smooth or thick, see my guide on how to fix broken buttercream. If your frosting looks like it became too aerated in the whipping process, you can mix it on low speed with a paddle attachment for one minute to make it smoother.
Assemble and Decorate
Stack and Fill
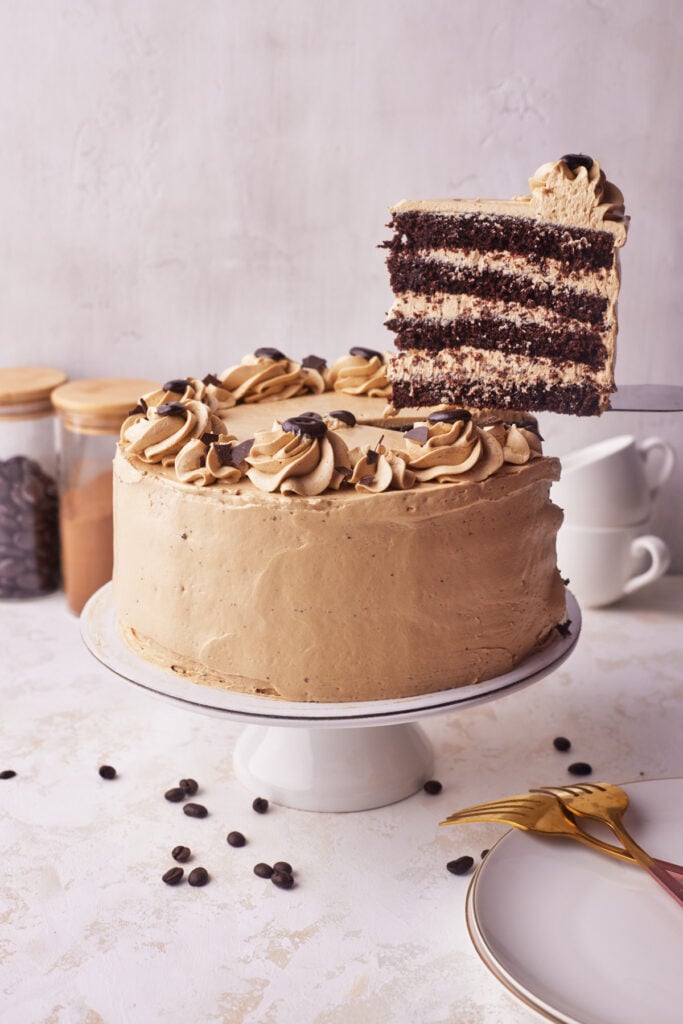
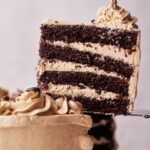
Once the cakes have completely cooled, cut them in half to form four thinner cake layers instead of two. I like to use a cake leveler, but a serrated knife will work too.
Start with a layer of mocha cake on your serving plate or turntable, and top with a generous helping of the coffee buttercream and spread evenly with an offset spatula. Place another layer of cake on top of this, and repeat until you have all four cake layers.
Decorate
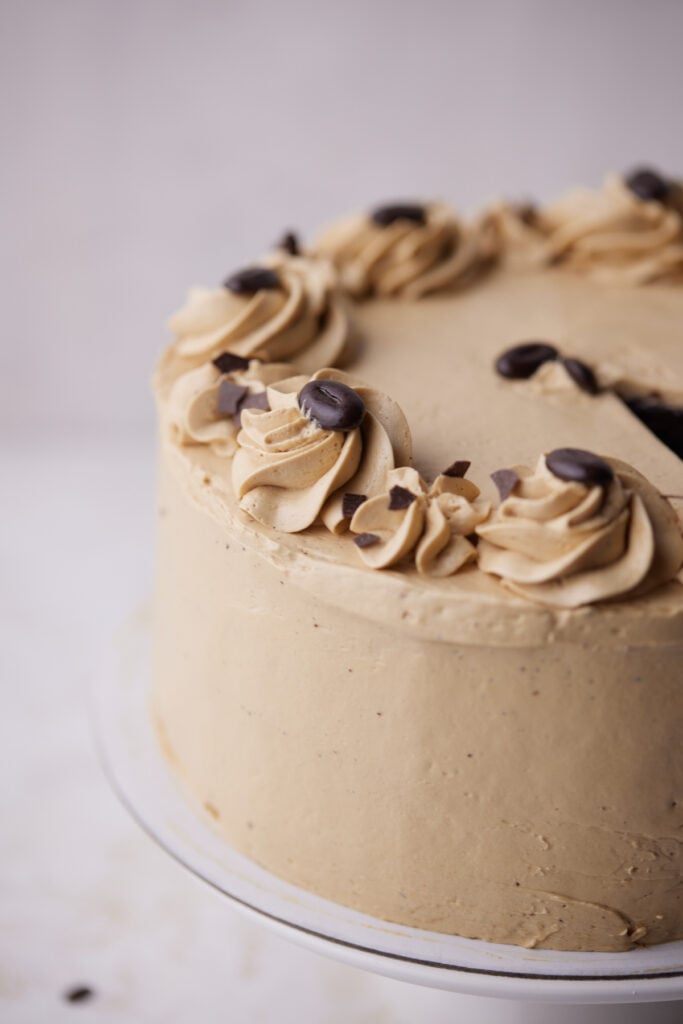
If you want to leave it as a 'naked' cake, you can leave the sides bare and just pipe or spread some frosting on top of the cake. For the look I've created, spread a thin layer of frosting all over the top and sides of the cake as a crumb coat. Let sit for 15 minutes before spreading a thicker layer of frosting all over the cake and smoothing it out with a pastry scraper or palette knife.
Grab a piping bag, and pipe some rosettes on top of the cake and decorate with chocolate shavings and/or curls or chocolate-covered espresso beans to create the ultimate chocolatey coffee cake.
Storage
Store your chocolate espresso cake in an airtight container. It is best kept at room temperature as the fridge will dry it out. Eat within 3-5 days of baking.
FAQs
If you have a question about this recipe that isn't answered here, feel free to write it in the comment section and I will get back to you as soon as I can.
I have experimented a lot with using freshly brewed espresso in my baking, and although it has a delicious and strong coffee flavor, it requires too much liquid to be added to the mixture to achieve the level of flavor we want.
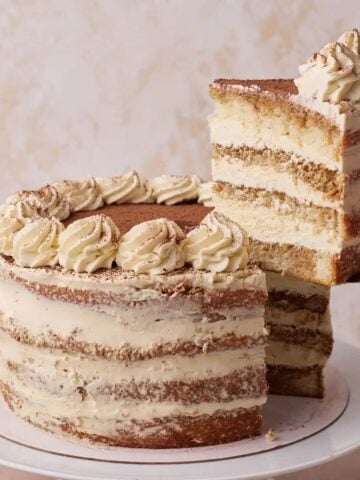
That's why espresso powder is a perfect option for baking; you can get the incredible espresso flavor without having to water down your batter too much. If you'd like a recipe that does use real espresso, check out my Tiramisu Cake.
Show Me Your Bakes!
If you make this recipe, please tag @bonni_bakery on Instagram or send me a photo - I love seeing all your creations.
Want your bake featured on the blog? You can also upload a photo here.
More Coffee Desserts
If you love getting your caffeine and sugar fix together, you might enjoy some of these other coffee dessert recipes:
Watch How To Make It (Video)
Watch a full video tutorial of exactly how to make this delicious mocha cake:
P.S. Subscribe to my YouTube channel for future video updates!
Recipe

Chocolate Espresso Cake
Ingredients
- 240 g (2 cups) All-purpose Flour (plain flour)
- 400 g (2 cups ) Granulated Sugar (caster sugar)
- 2 teaspoon Baking Powder
- ½ teaspoon Baking Soda
- ½ teaspoon Salt
- 2 Large Eggs
- 50 g (½ cup) Dutch Processed Cocoa Powder
- 120 ml (½ cup) Vegetable Oil
- 120 ml (½ cup) Whole Milk
- 1 teaspoon Vanilla Extract
- 3 tablespoon Espresso Powder
- 120 ml (½ cup) Hot Water
- 790 g (28 oz) Sweetened Condensed Milk
- 452 g (4 sticks) Unsalted Butter
- 1 teaspoon Vanilla Extract
- ½ teaspoon Salt
- 3 tablespoon Espresso Powder
Equipment
- Stand Mixer for frosting
Instructions
- Preheat oven to 350°F / 180°C (160° fan-assisted) and grease and line two 9-inch cake pans.
- Sift the dry ingredients (except the espresso powder) into a large bowl and mix together.240 g (2 cups) All-purpose Flour, 400 g (2 cups ) Granulated Sugar, 2 teaspoon Baking Powder, ½ teaspoon Salt, 50 g (½ cup) Dutch Processed Cocoa Powder, ½ teaspoon Baking Soda
- Stir the wet ingredients (except the hot water) together in a separate bowl until combined, then pour them into the dry ingredients and whisk gently until combined and free from lumps. Make sure to scrape down the bottom of the bowl. You can use a stand mixer for this if you want, but it's very easy to do with just a bowl and a hand whisk.2 Large Eggs, 120 ml (½ cup) Vegetable Oil, 120 ml (½ cup) Whole Milk, 1 teaspoon Vanilla Extract
- Stir the espresso powder into a cup of recently boiled water, then add it to the cake batter and mix it in. The batter will be VERY runny, don't worry, this is how it's supposed to be!3 tablespoon Espresso Powder, 120 ml (½ cup) Hot Water
- Divide cake batter evenly between cake pans and bake for 30 - 40 minutes, or until a skewer inserted into the middle of the cake comes out clean. Bake time may vary depending on your oven, so always test with a skewer before taking it out of the oven.
- Whip butter with a whisk attachment on high speed for 5 full minutes until pale and creamy. Make sure to pause periodically to scrape down the sides of the bowl.452 g (4 sticks) Unsalted Butter
- Turn the mixer down to medium-high speed and drizzle in the condensed milk very slowly and gradually, a little at a time, whipping in between additions. It is important not to add the condensed milk too quickly, or it won't emulsify and the buttercream will split.790 g (28 oz) Sweetened Condensed Milk
- Add the vanilla and salt and whip on high speed for a minute. The frosting should be smooth, thick and glossy.½ teaspoon Salt, 1 teaspoon Vanilla Extract
- Mix the espresso powder in 1 tablespoon of hot water and add it to the buttercream, whip until combined.3 tablespoon Espresso Powder
- Check my Russian Buttercream recipe post for more details on this buttercream and a troubleshooting guide.
- Once the chocolate cakes have completely cooled, use a cake leveler or serrated knife to cut off the tops to make them level. If you'd like four thinner cake layers like I have in the pictures, slice each cake in half. You can also just keep it as two thicker layers.
- Put one layer of your cake onto a cake plate or board and add an even layer of coffee buttercream, then add the next layer and repeat until all your layers are used.
- Cover the cake with the remaining buttercream and decorate as desired.


Barbara Nettles
I am making for granddaughter’s birthday you said mix thin. Mine is so thick couldn’t hardly stir. Added bit more milk and oil hoping it works. Where did I go wrong?
Janice
I made this a while back for a fundraiser dinner and everyone wanted the recipe. It was very good. I thought it was easy to follow instructions and I used the cup measurements not the grams. I did use the mixer for the batter, but used it on low and was very careful not to over mix as I know that can cause a cake not to rise. The frosting is delicious, one of the best I've had. Im making it again tomorrow for a club mtg.