
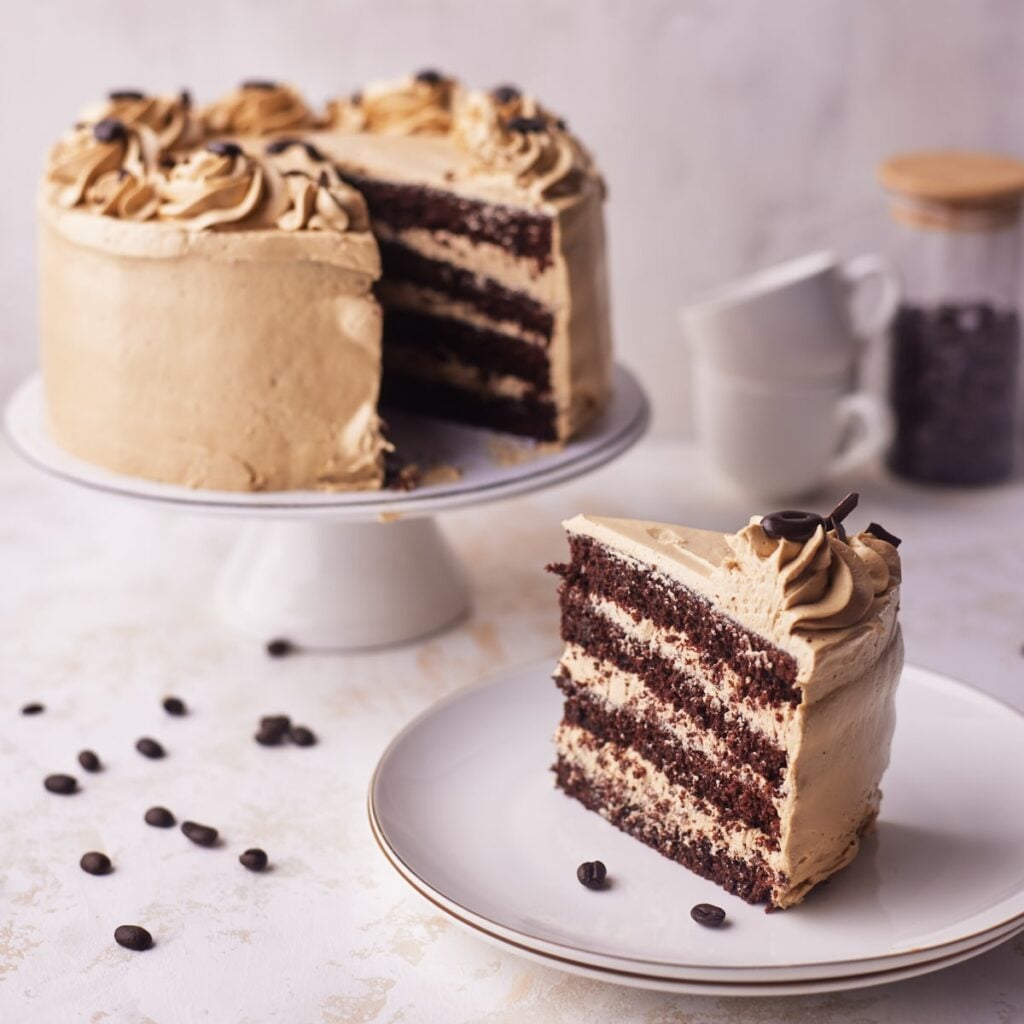
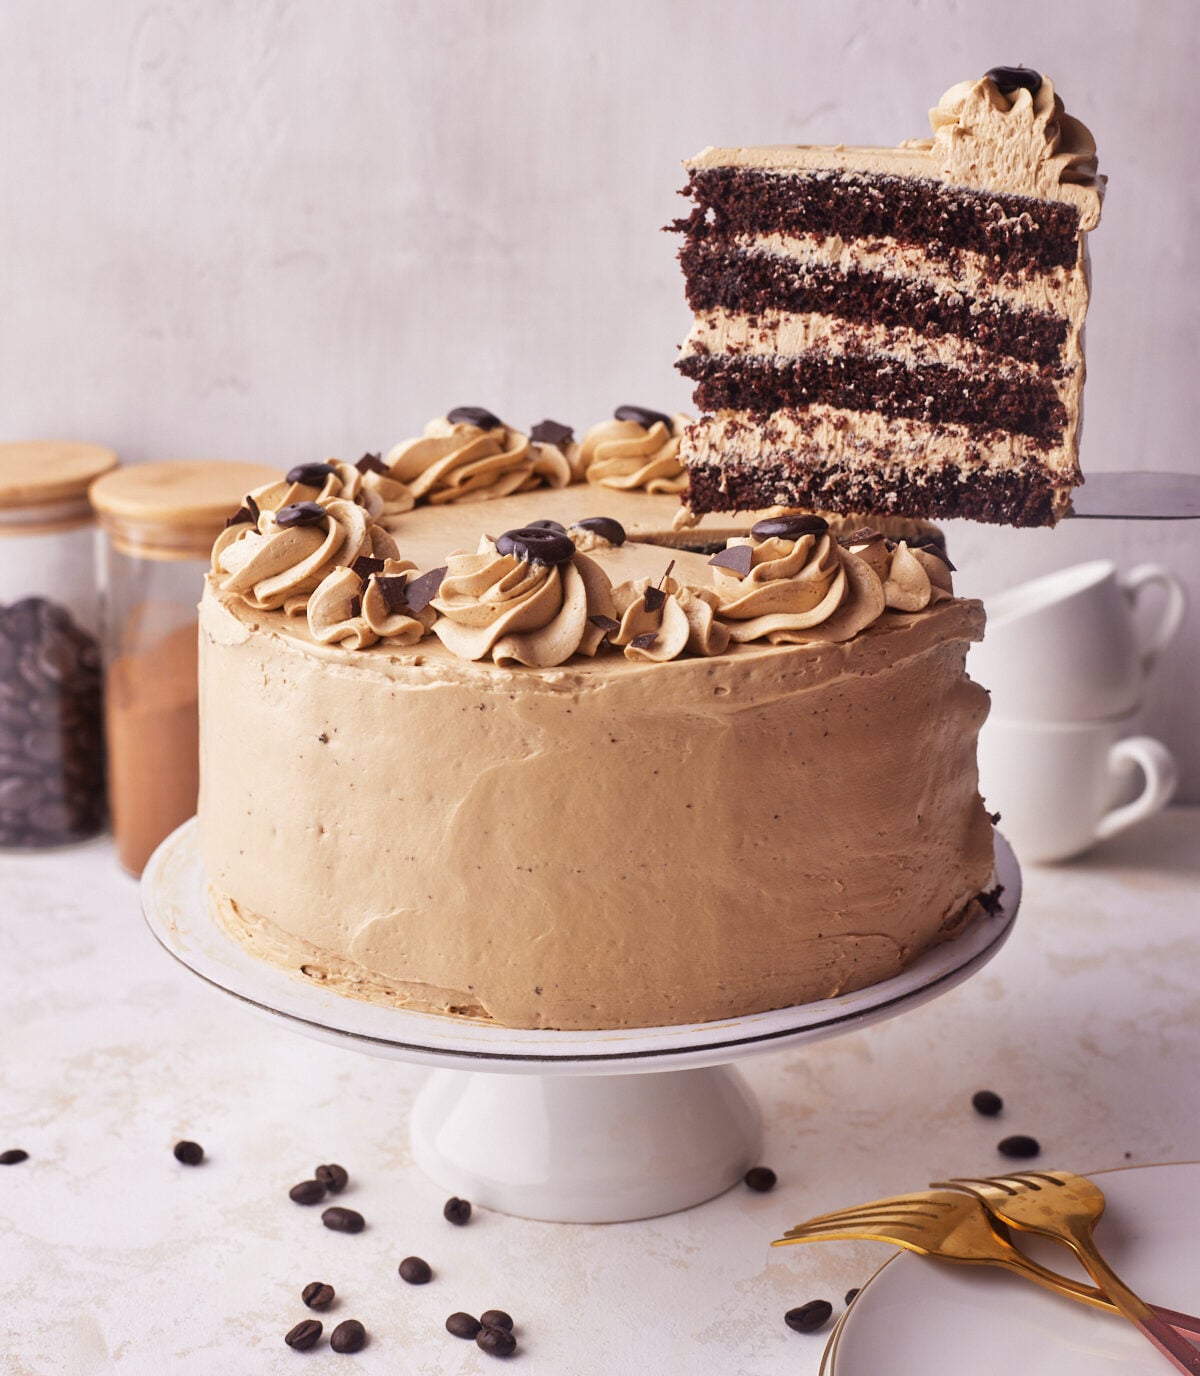
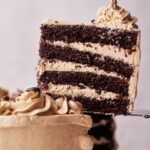
Chocolate Espresso Cake that actually tastes like coffee - not just chocolate with a hint of it! Moist mocha cake stacked with silky coffee buttercream.
Chocolate Espresso Cake Recipe Snapshot
What it is: Rich mocha cake filled with espresso buttercream frosting.
Why you'll love it: Easy recipe with stunning results and a perfect balance of coffee and chocolate flavor.
How to make it: Mix wet ingredients into the dry, then add espresso powder and bake. Add espresso into the simple frosting recipe and frost.
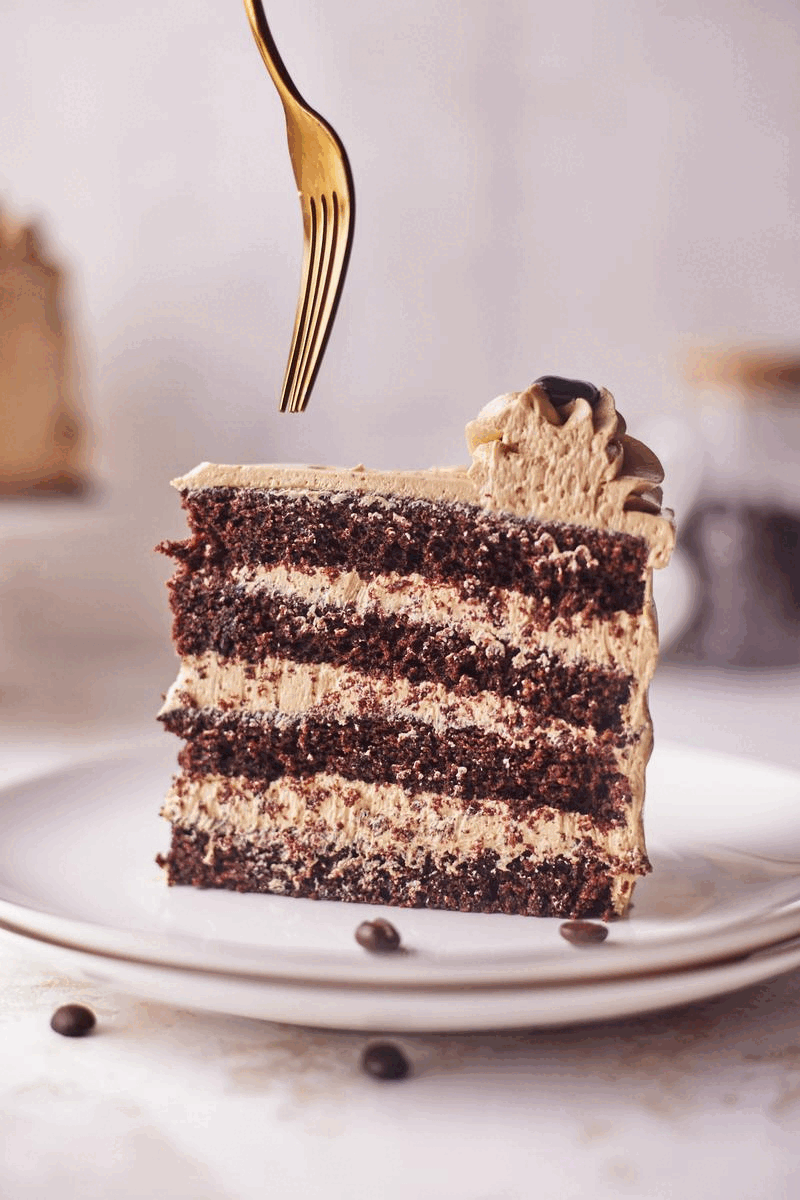
This chocolate espresso cake is what my husband requests for his birthday every year. It's rich, moist, and deeply flavourful, with espresso powder baked straight into the cake to intensify the chocolate without overpowering it.
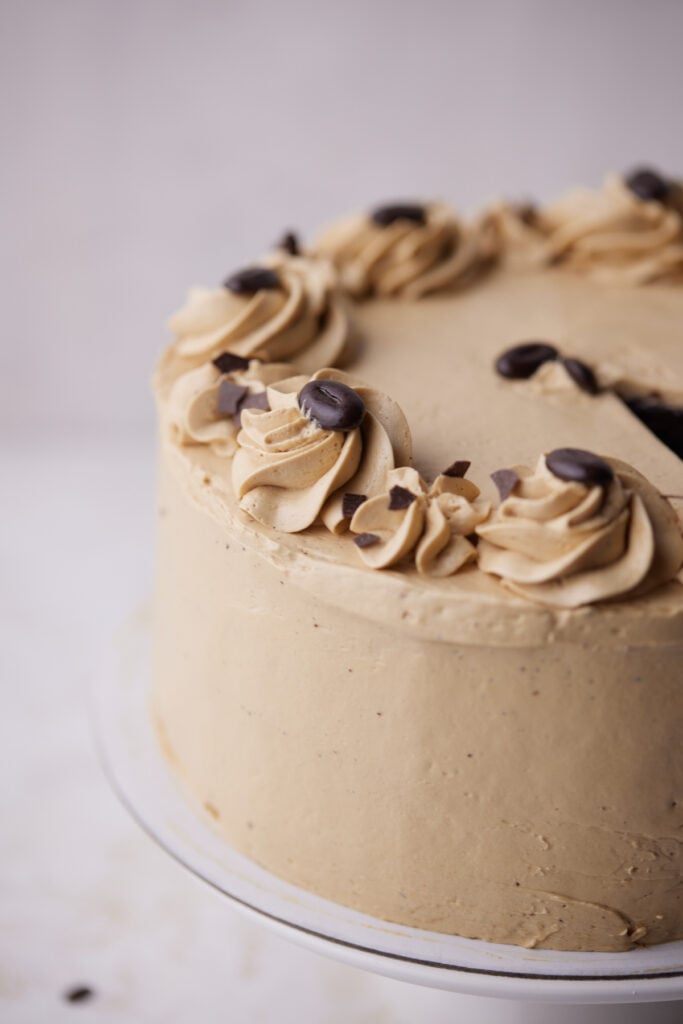
The layers are stacked with silky espresso buttercream that's simple, smooth, and actually tastes like real espresso (no artificial coffee flavouring here). I've tested this recipe carefully to make sure the coffee flavour is strong enough for coffee lovers to notice immediately, yet still chocolate-forward, so everyone will reach for a second slice.
Why This Recipe Works
- Espresso powder is used in both the cake batter and the frosting to give a strong coffee flavor without messing up the consistency.
- The chocolate cake uses oil instead of butter for a soft crumb that stays moist for days.
- Hot water is mixed into the cake batter at the end to dissolve the espresso powder and bloom the cocoa powder for a richer flavor.
Reader Review:
This cake and the frosting came out beautifully! I made it for Mother's Day and it was perfect. Thank you so much for this wonderful recipe! We love it and plan to make again!
⭐⭐⭐⭐⭐ - Clarissa
Jump to:
Ingredients
This chocolate espresso cake recipe uses my classic chocolate cake as a base layer, then adds in espresso powder to turn it into a mocha cake.
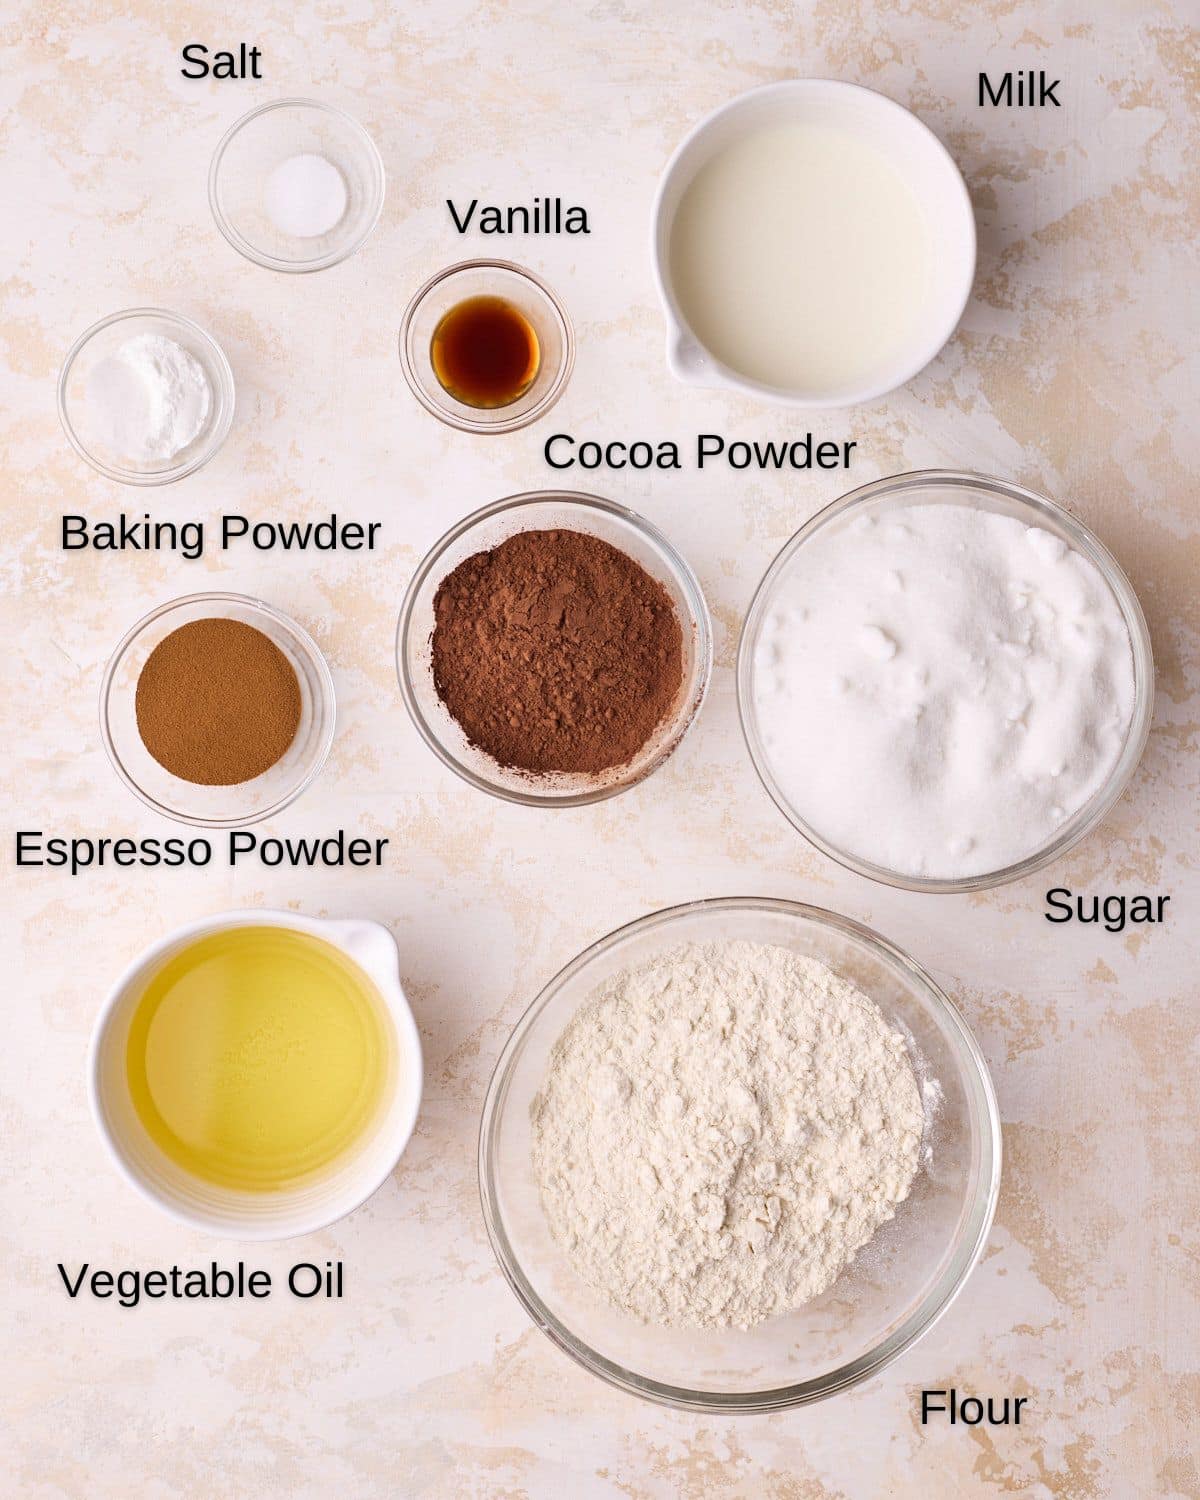
- Flour - All-purpose flour (plain flour) will give the best structure.
- White Sugar - Use granulated sugar (caster sugar in the UK).
- Eggs - Use large eggs; make sure they are at room temperature.
- Cocoa Powder - Dutch-processed cocoa powder will give you the best results. Natural cocoa powder will work too, but can often create a denser cake.
- Vegetable Oil - Using oil instead of butter keeps the cake moist.
- Fresh Milk - Whole milk is best, but you can use whatever kind of milk you have.
- Espresso Powder - This is different than regular instant coffee granules. Though the packaging looks similar, the coffee is super fine, like a powder. Look for anything that says espresso powder or instant espresso powder.
- Vanilla - Use a high-quality vanilla extract or vanilla bean paste.
- Condensed Milk - This is for the frosting. Be sure to choose sweetened condensed milk and not evaporated milk, which can look similar.
- Butter - For the glossy coffee buttercream. It's best to use unsalted butter, and it's essential that it's room temperature before you begin whisking it.
See the recipe card for measurements in both grams and cups (though I always recommend using a kitchen scale).
Things You'll Need
- Stand Mixer - You definitely want to use a stand mixer to make the espresso Russian buttercream, as it will be very tiring to do by hand.
- Cake Pans - I used 8-inch cake pans, but the recipe would also work with 9-inch pans.
- Palette Knife - This will help you spread the espresso frosting on nice and smoothly. You can also use a pastry scraper.
- Piping bag - An optional tool, but it's great for taking your decoration to the next level.
How to Make Chocolate Espresso Cake
There are two components to this delicious coffee dessert: the chocolate mocha cake and the coffee-flavored buttercream. They are both super easy recipes with just a few minutes of prep time.
Make The Mocha Cake
This espresso chocolate cake recipe is incredibly easy to make and will take just a few minutes to prepare the batter. You can add more espresso powder if you would like an even stronger coffee flavor in your mocha cake.
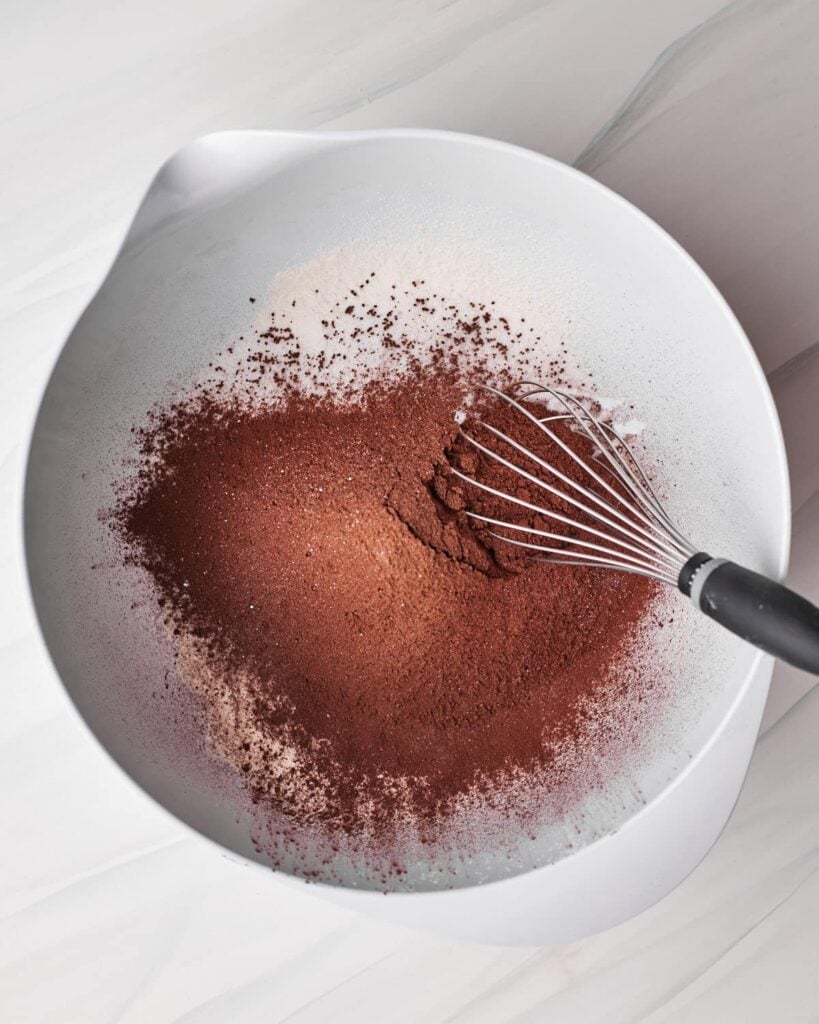
Mix Dry Ingredients
Preheat the oven to 350°F / 180°C (160° fan) and grease two 8-inch cake pans.
Put the flour, sugar, cocoa powder, baking powder, and salt in a large bowl and combine.
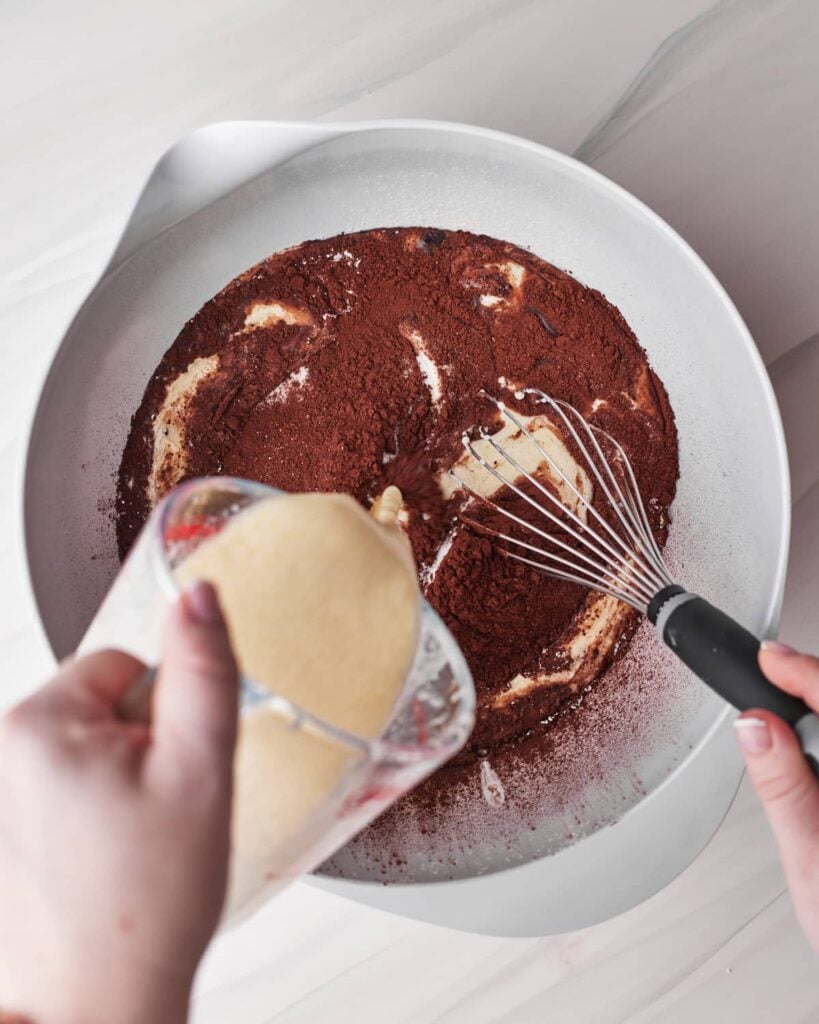
Add Wet Ingredients
Whisk the eggs, vegetable oil, fresh milk, and vanilla together in a jug or bowl, then add to the dry ingredients and whisk until combined and free from lumps.
You can use a mixer if you want, but it's super easy to do by hand with a whisk.
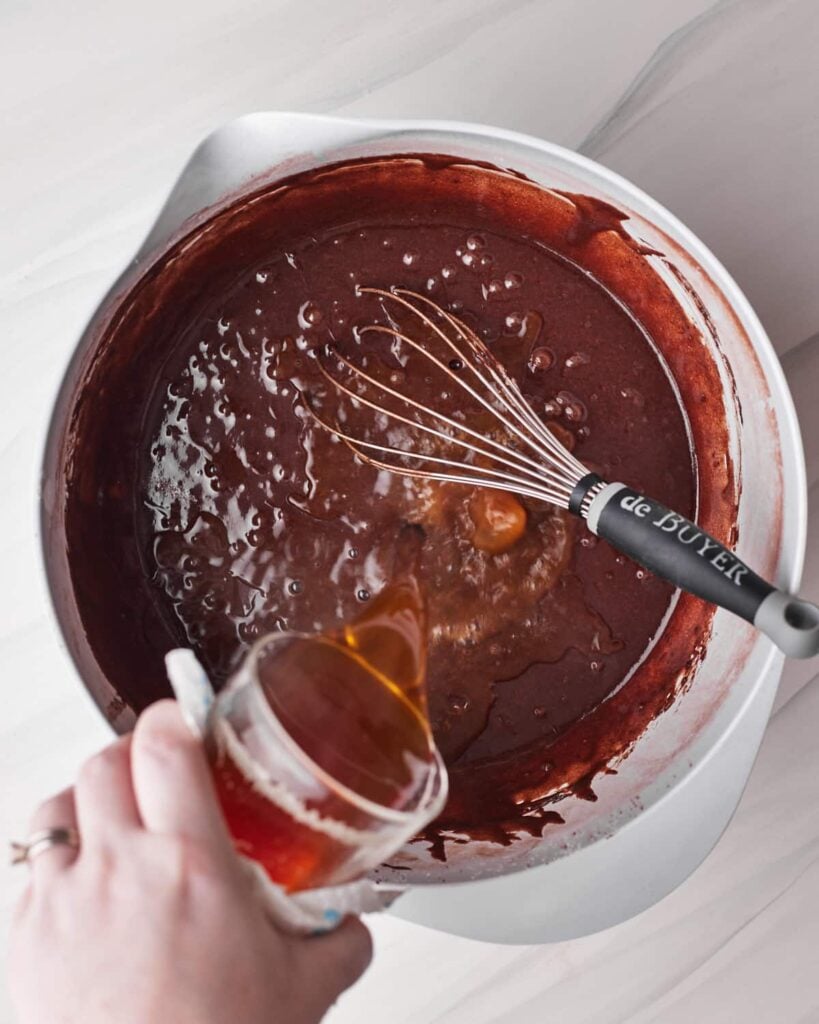
Add Hot Coffee
Scrape down the sides and bottom of the bowl with a spatula or wooden spoon to ensure there are no dry ingredients stuck there.
Now, dissolve the espresso powder in the hot water and add to the cake batter. Stir until combined.
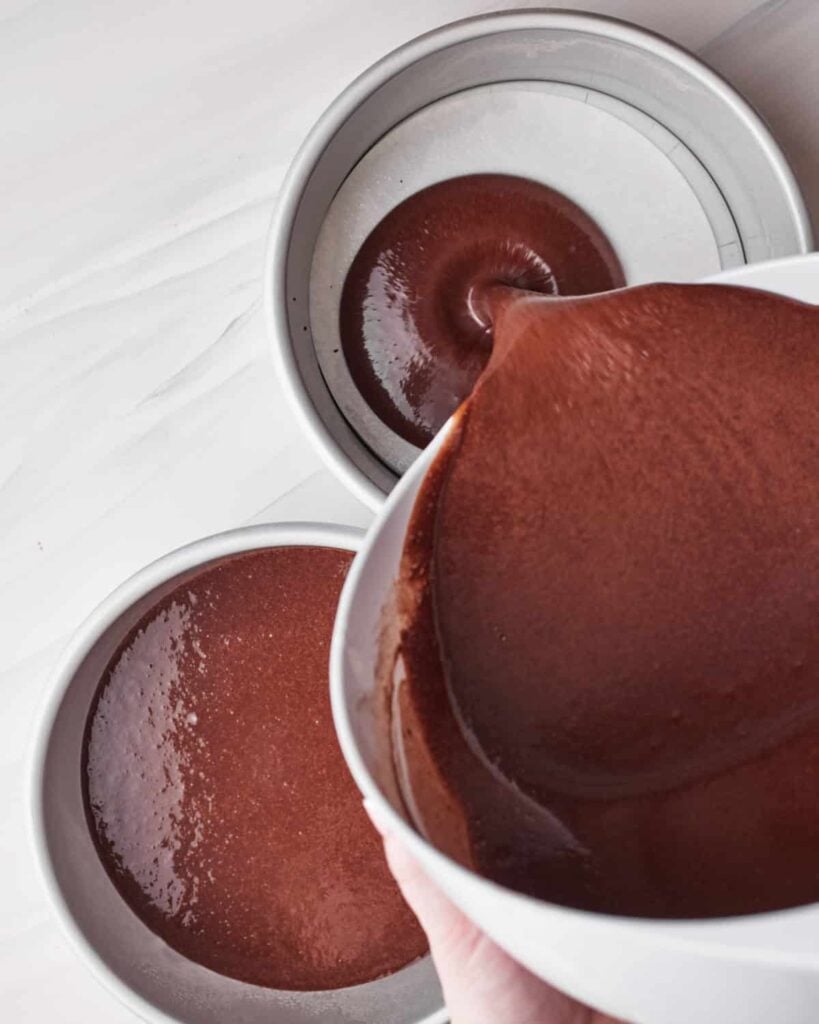
Bake
Pour the batter evenly between your two prepared cake pans and bake for 30-40 minutes or until a toothpick comes out clean. The bake time will vary greatly depending on your oven, so make sure to keep an eye on it once you reach the 20-minute mark.
Leave the sponges to cool in the cake pans for at least 30 minutes before transferring to a wire rack to cool completely.
Make The Espresso Buttercream
This silky espresso buttercream is a coffee-infused version of my Russian buttercream. The great thing about Russian buttercream is that it is incredibly easy to make and tastes amazing.
Whip the Butter
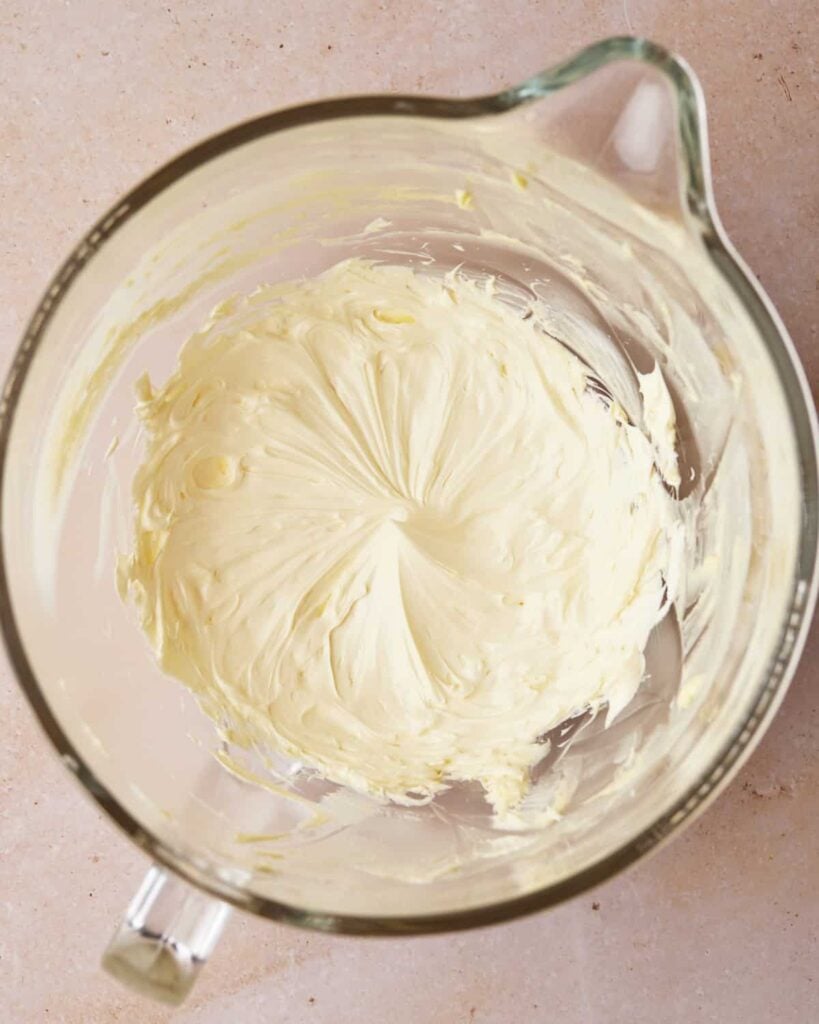
Start by making sure your butter is at room temperature. The butter temperature is super important so the buttercream doesn't split. I find the best results when I remove my butter from the fridge about an hour to an hour and a half before using it.
Place the butter in the bowl of a stand mixer and whip with a whisk attachment at high speed for 5 full minutes, regularly scraping down the sides of the bowl.
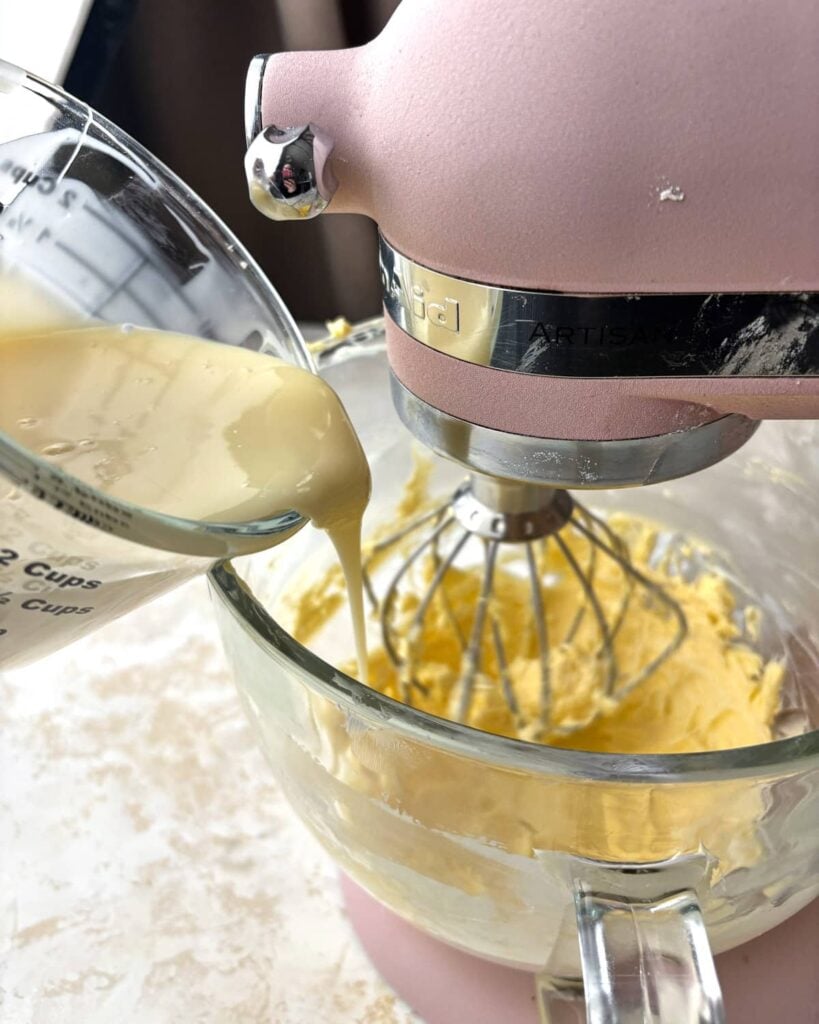
Add Condensed Milk
After 5 minutes, the butter should be super pale and creamy. Turn the mixer down to a medium speed and very gradually drizzle in the condensed milk.
Let it mix and incorporate as you go to avoid splitting.
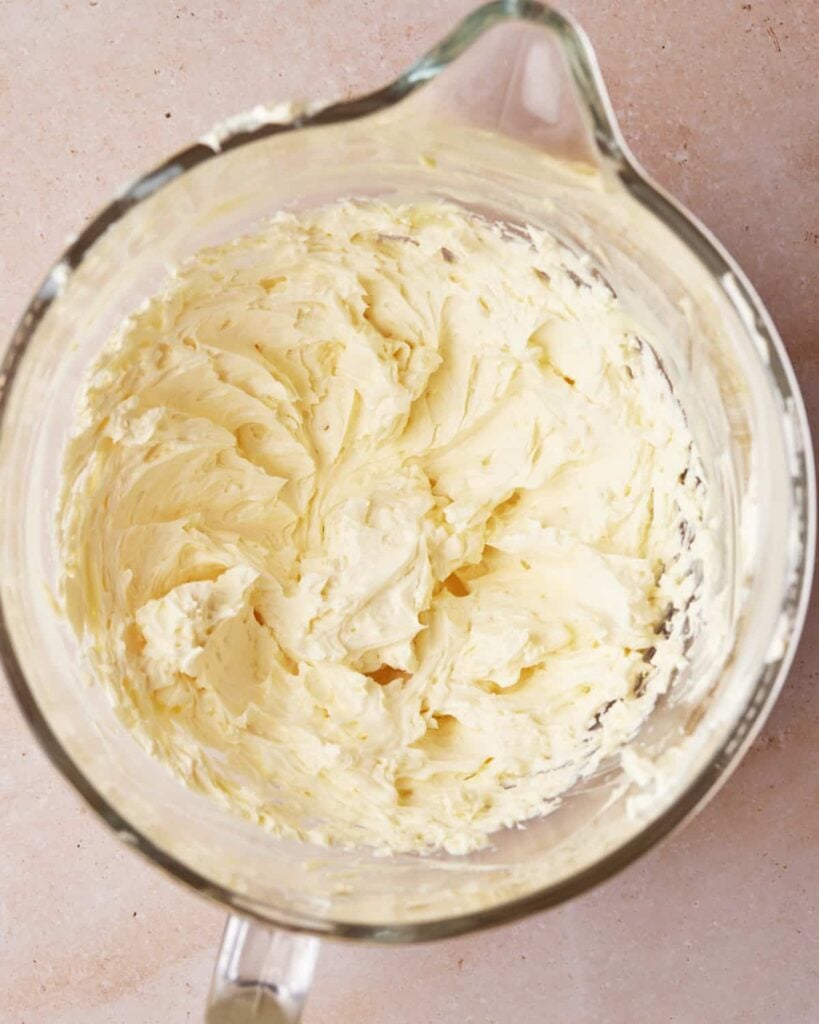
Keep Mixing
Once all the condensed milk is incorporated, turn the mixer back up to high speed and whip for another minute.
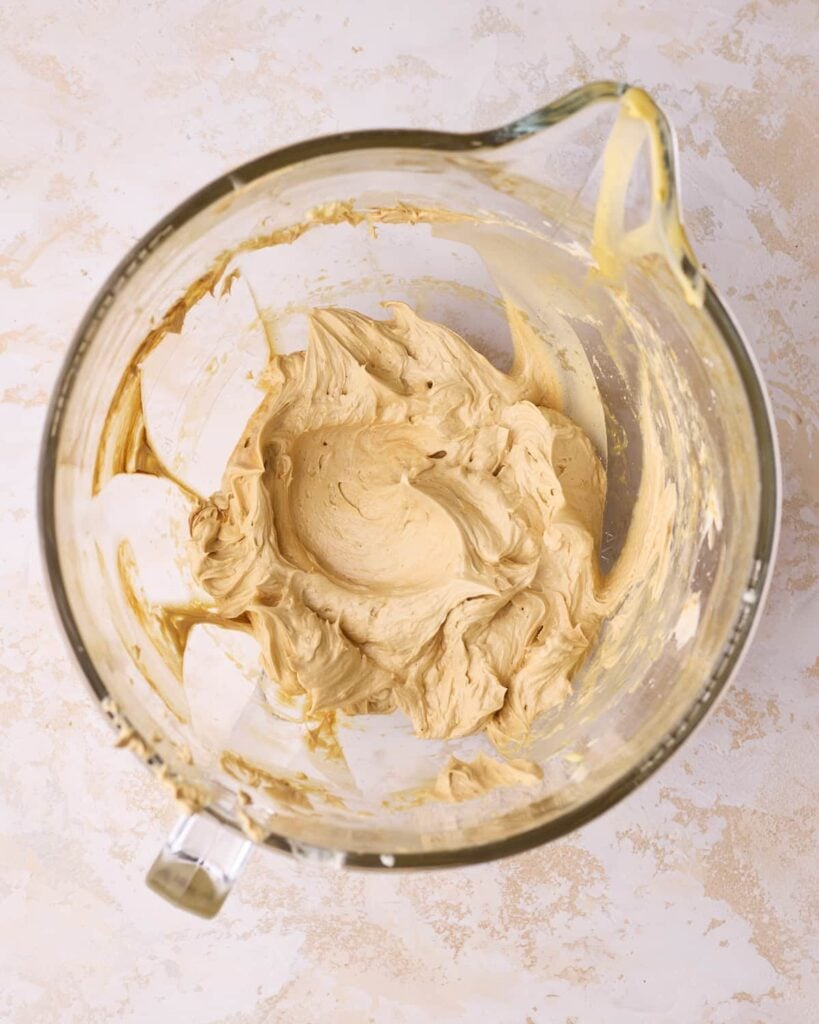
Incorporate Espresso
In a separate small bowl, add the espresso powder and 1-2 tablespoons of hot water, and stir until totally dissolved.
Add the espresso mix to your frosting along with a teaspoon of vanilla and a pinch of salt, then continue to whip the espresso Russian buttercream for a further minute on maximum speed.
It should be thick, glossy, and a spreadable consistency.
Stack and Fill
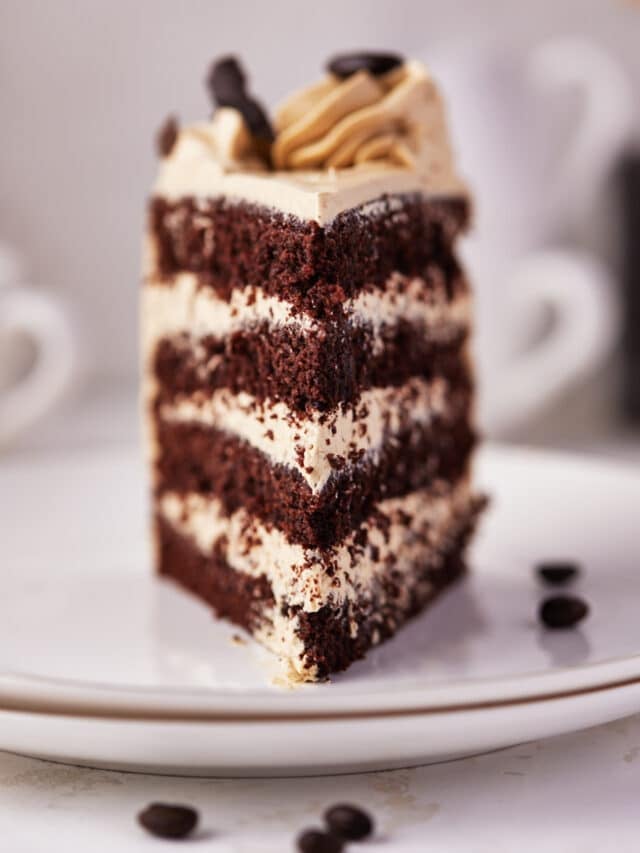
Slice the cooled cakes in half with a cake leveler or serrated knife to make 4 thin layers.
Stack the mocha cake layers with the espresso buttercream, then cover the whole cake in frosting and decorate.
Troubleshooting
Cake - If your cake sinks in the middle or seems underbaked, check out my guide on why cakes sink to troubleshoot and find out how to prevent it.
Frosting - If your buttercream doesn't look silky smooth or thick, see my guide on how to fix broken buttercream. If your frosting looks like it became too aerated in the whipping process, you can mix it on low speed with a paddle attachment for one minute to make it smoother.
Storage
Store your chocolate espresso cake in an airtight container. It is best kept at room temperature, as the fridge will dry it out. Eat within 3-5 days of baking.
FAQ
If you have a question about this recipe that isn't answered here, please write it in the comment section and I will get back to you as soon as I can.
I have experimented a lot with using freshly brewed espresso in my baking, and although it has a delicious and strong coffee flavor, it requires too much liquid to be added to the mixture to achieve the level of flavor we want.
That's why espresso powder is a perfect option for baking; you can get the incredible espresso flavor without having to water down your batter too much. If you'd like a recipe that does use real espresso, check out my Tiramisu Cake.
Show Me Your Bakes!
If you make this recipe, please tag @bonni_bakery on Instagram or send me a photo - I love seeing all your creations.
Want your bake featured on the blog? You can also upload a photo here.
More Coffee Desserts
If you love getting your caffeine and sugar fix together, you might enjoy some of these other coffee dessert recipes:
Watch How To Make It (Video)
Watch a full video tutorial of exactly how to make this delicious mocha cake:
P.S. Subscribe to my YouTube channel for future video updates!

Chocolate Espresso Cake
Ingredients
- 240 g (2 cups) All-purpose Flour (plain flour)
- 400 g (2 cups ) Granulated Sugar (caster sugar)
- 2 teaspoon Baking Powder
- ½ teaspoon Baking Soda
- ½ teaspoon Salt
- 2 Large Eggs
- 50 g (½ cup) Dutch Processed Cocoa Powder
- 120 ml (½ cup) Vegetable Oil
- 120 ml (½ cup) Whole Milk
- 1 teaspoon Vanilla Extract
- 3 tablespoon Espresso Powder
- 120 ml (½ cup) Hot Water
- 790 g (28 oz) Sweetened Condensed Milk
- 452 g (4 sticks) Unsalted Butter
- 1 teaspoon Vanilla Extract
- ½ teaspoon Salt
- 3 tablespoon Espresso Powder
Equipment
- Stand Mixer for frosting
Instructions
- Preheat oven to 350°F / 180°C (160° fan-assisted) and grease and line two 9-inch cake pans.
- Sift the dry ingredients (except the espresso powder) into a large bowl and mix together.240 g (2 cups) All-purpose Flour, 400 g (2 cups ) Granulated Sugar, 2 tsp Baking Powder, ½ tsp Salt, 50 g (½ cup) Dutch Processed Cocoa Powder, ½ tsp Baking Soda
- Stir the wet ingredients (except the hot water) together in a separate bowl until combined, then pour them into the dry ingredients and whisk gently until combined and free from lumps. Make sure to scrape down the bottom of the bowl. You can use a stand mixer for this if you want, but it's very easy to do with just a bowl and a hand whisk.2 Large Eggs, 120 ml (½ cup) Vegetable Oil, 120 ml (½ cup) Whole Milk, 1 tsp Vanilla Extract
- Stir the espresso powder into a cup of recently boiled water, then add it to the cake batter and mix it in. The batter will be VERY runny, don't worry, this is how it's supposed to be!3 tbsp Espresso Powder, 120 ml (½ cup) Hot Water
- Divide cake batter evenly between cake pans and bake for 30 - 40 minutes, or until a skewer inserted into the middle of the cake comes out clean. Bake time may vary depending on your oven, so always test with a skewer before taking it out of the oven.
- Whip butter with a whisk attachment on high speed for 5 full minutes until pale and creamy. Make sure to pause periodically to scrape down the sides of the bowl.452 g (4 sticks) Unsalted Butter
- Turn the mixer down to medium-high speed and drizzle in the condensed milk very slowly and gradually, a little at a time, whipping in between additions. It is important not to add the condensed milk too quickly, or it won't emulsify and the buttercream will split.790 g (28 oz) Sweetened Condensed Milk
- Add the vanilla and salt and whip on high speed for a minute. The frosting should be smooth, thick and glossy.½ tsp Salt, 1 tsp Vanilla Extract
- Mix the espresso powder in 1 tablespoon of hot water and add it to the buttercream, whip until combined.3 tbsp Espresso Powder
- Check my Russian Buttercream recipe post for more details on this buttercream and a troubleshooting guide.
- Once the chocolate cakes have completely cooled, use a cake leveler or serrated knife to cut off the tops to make them level. If you'd like four thinner cake layers like I have in the pictures, slice each cake in half. You can also just keep it as two thicker layers.
- Put one layer of your cake onto a cake plate or board and add an even layer of coffee buttercream, then add the next layer and repeat until all your layers are used.
- Cover the cake with the remaining buttercream and decorate as desired.


Steph says
Hi! The article says cook at 350 for 30-40 mins but the recipe says 335 for 25-35 mins. Which is the correct temp and time? Thanks!
Jules Grasekamp says
Hi Steph,
Thank you so much for catching that! I updated this recipe recently and actually changed the cake batter to a totally different recipe - I must have missed updating the bake temp and time in the body of the post so thank you so much!
The correct temp and timing is the one in the recipe card - 335 for 25-35 minutes. I will edit the post now.
Thank you!
Jules
Destiney McDowell says
The cake turned out phenomenal!! And finally, someone adds the measurements with the instructions. Heaven sent!!
Jules Grasekamp says
So glad you loved the chocolate espresso cake Destiney!
Thank you so much for trying my recipe and for taking the time to let me know 🙂
Jules
Jarrod says
Yo we are making this and the batter is incredibly runny. Going to try it out and see what happens.
Jarrod says
Came out of the oven. Confirmed that the batter will be far more liquid than a box cake batter.
Cake baked very nicely!
Jules Grasekamp says
Hi Jarrod,
Yes it is a super liquidy batter but that is how it is supposed to be! I'm happy to hear your cake turned out well!
Thank you for trying my recipe 🙂
Jules
Sue says
I live in a high altitude area. How can I make your recipe ?
Ashley says
Followed the instructions step by step! Unfortunately my cake did not come out as in the picture! It actually came out super thin almost looking like a brownie, it did not come out spongy at all…super disappointed!!
Jules Grasekamp says
Oh no I'm sorry to hear that Ashley, it's so disappointed when bakes don't turn out! I'm happy to help you troubleshoot. Can I ask first, did you use cups or a scale to measure your ingredients?
Annie Lyda says
I whipped this up for my daughter’s birthday, it’s now a new family favorite. The buttercream isn’t excessively sweet. It’s light and creamy which pairs well with the dark chocolate espresso flavor of the cake. I have made it at least 6 times since my daughters birthday in july and every time it turns out perfect.
Jules Grasekamp says
Hi Annie,
Thank you for trying my recipe and taking the time to let me know you loved it! It makes me so happy to hear when families enjoy making my desserts over and over!
I hope your daughter had a wonderful birthday!
All the best,
Jules
Natalie Cole says
Hi Bonni
Under the ingredients section at the very top you can choose 1x; 2x or 3x ingredients. Please can you explain to me how this affects the volume of cake batter and what size and how many tins you need for 2x and 3x the ingredients.
I’m assuming the 1x ingredients make 2x 8inch or 9inch round cake tins.
Thank you very much.
Natalie
Jules Grasekamp says
Hi Natalie,
The 1x 2x 3x feature on the recipe card is most commonly used when people are wanting to make multiples of the recipe quantity, rather than for increased pan sizes. It will literally make double or triple the recipe, so if you wanted to make 2 or 3 of this cake, in the same size. I'm afraid i couldn't confidently tell you how it would fill other sizes of pans as I haven't fully tested this recipe in other sizes.
The standard 1x of the recipe will fill 2 8-inch cake pans. (You can use 9-inch if you prefer, but the cakes will be thinner).
I hope this helps!
Jules
Matthew says
How am I supposed to completely dissolve 4 tablespoons of espresso powder in only 1-2 tablespoons of hot water for the icing? It don’t even make sense lmao.
Jules Grasekamp says
Hi Matthew,
Thanks for your comment. 1-2 tablespoons is actually plenty of hot water to dissolve 4 tablespoons of espresso powder! Just make sure you are using espresso powder and not regular coffee granules. The mixture will make kind of a paste, which you'll then mix into the frosting. If you have any troubles with it, please feel free to reach out.
I'd really appreciate if you could remove your 1 start rating if you haven't actually tried the recipe yet - I promise it's a good one!
Jules
Renee Casarez says
My mother made this cake for my brothers girlfriend for her birthday and we all loved it . It was delicious. The only suggestion that she would make is to make 1 and a half times the frosting.
Bobbi says
I followed this recipe to the T… that being said the photo of this cake was a great way to make us want to make it!
This cake was so hard, dense, and lacking in everything. I didn’t even attempt to frost it!
The batter alone was very thick and dense—I even added extra hot water trying to thin it out a bit— didn’t help! How did this recipe ever get published?!?
Jules says
Hi Bobbi,
I'm sorry to hear your cake didn't turn out. It sounds like something went wrong at the measuring stage because the finished batter should be very thin and liquid-like - not thick at all. May I ask whether you measured your ingredients using cups or a scale? When people have trouble with a recipe this is usually the answer as it's actually very difficult to measure accurately with cups! Many people end up adding far too much flour, which can result in a dense cake. Alternatively, it could be the cocoa powder? Did you use dutch processed cocoa powder or natural cocoa powder? Dutch processed cocoa powder results in a far better texture and flavor. In any case, I'm happy to try to help you get to the bottom of the problem!
The recipe is published because it is a tried and true recipe we used and sold cakes with in my bakery for 10 years, and since then has been a huge success with thousands of readers on this site - it's a favourite for sure, so i really hope we can figure out what went wrong so you can enjoy it next time :).
Jules
Matthew says
I have made the recipe and it did make a paste. However your recipe clearly states in bullet point 4 of making the buttercream, “In a small bowl, add the espresso powder and 1-2 tablespoons of hot water and stir until totally dissolved.” It doesn’t “totally dissolve”. I’d really appreciate if you could edit the recipe so it more accurate - it sounds like it would be really good made correctly!
Samantha Knowles says
Followed recipe to a T and measured out everything perfectly cake was super dense and I did not like it at all, batter was really tasty though. Icing was also delicious but not easy to decorate with
Grace says
The cake turned out good, not too dense. However, the frosting recipe just does not work. I set the butter out for an hour, making sure it was semi-soft before I started to whisk it. Added condensed milk 1/3 at a time. It was looking good until I added the espresso. It instantly separated once I started pouring it in. I tried it again and the same thing happened. Both times I set it in the fridge for a little over 10 minutes and whisked it again and it just separated more and got very soupy. Just wondering what I could do to fix?
Michelle Vieira says
This recipe was awful. The cake was so dry and dense that it made the cake almost inedible. I made this for my daughters birthday since she loves chocolate and coffee but no one liked it. The Russian buttercream turned out great and has great flavor but a box cake would have been better than the cake recipe here. I don’t recommend this!
Jules says
Hi Michelle,
Thank you for your comment. The most common cause of a cake coming out dry and dense is too much flour - did you measure the ingredients using cups or a scale? It's so easy to over-measure your dry ingredients when using cups, which is why I always recommend using a scale. The second thing could be using the wrong kind of cocoa powder. Natural cocoa powder can cause a dense, gluey texture in cakes, it's much better to use dutch processed cocoa powder, which will not affect the texture at all. I hope this helps and that your daughter had a lovely birthday!
Y Gonz says
This cake came out very dense for me and I felt like I needed a cup of milk to dunk in a slice! I think I needed less oil and flour maybe. Or maybe too much cocoa powder. Too much something. I think I'll go back to my usual chocolate cake that uses 1/4 cup of oil and a cup of boiling water. The buttercream with condensed milk did not come out as stiff as I wanted but then it was very humid today. I'll stick with your pistachio cake recipe! 🙂
Melissa says
Do you recommend making this the same day that you will serve it? Or can the cake and/or russian buttercream be made a day in advance? Is it as nice/fresh the next day or better the day of?
Sandra O says
The cake is delicious. It makes a lot of batter. When I do it again I will likely use two 9" pans, or better yet will bake it in three 8" pans and avoid cutting the layers. I have a device for that, but think three 8" or 9" layers would be easier.
Read the tips, but my first attempt at that Russian buttercream was not that successful. First it was runny. I refrigerated it. Kept checking at 10 minute intervals, and then it seperated when I whipped it. I waited to do this on a cooler and less humid day. I am using a different buttercream recipe. But I will say the flavor was amazing.
Jules says
Hi Sandra, thanks for your comment! I'm so glad you liked the cake! It does make pretty big cake layers, so two 9 inch pans/ 3, 8-inch pans woth both work well!
Sorry to hear about your buttercream, it definitely sounds like it was a temperature issue. I recently published a new post with more details and tips for making Russian buttercream, so you might find it helpful. https://bonnibakery.com/russian-buttercream/
Hope this helps! 🙂
Melle Kroes says
I was wondering what your recommendation are about baking it ahead of time. Would it be better to bake the cake before and make the buttercream the day of. Or something else?
Jules Grasekamp says
Hi Melle,
You can definitely make this ahead of time. You can make the cake and the buttercream a couple of days ahead. Just make sure the cake is well wrapped and in an airtight container (preferably at room temp) and that the buttercream is stored in the fridge. When you are ready to frost, let it come to room temp on the counter and fluff it up in your mixer with whisk attachment for a minute or so to bring the texture back.
You could also frost the whole cake the day before and store it in an airtight container at room temp overnight. Hope this helps!
Jules
B Onzi says
Going to try this - good tip with dutch cocoa powder. Hope it’s not too hard to get over here:)