
Graham Cracker Crust is the perfect base for no-bake pies, cheesecakes, and desserts. It's buttery, crumbly, and takes just a few minutes to make.

An easy Graham cracker crust is the delicious buttery base for so many desserts. Once you see how quick and tasty this crust recipe is, you'll never buy a store-bought Graham cracker crust ever again!
You can use this method for a variety of desserts, like Banoffee Pie, Cinnamon Roll Cheesecake, and S'mores Brownies!
Jump to:
Why You'll Love This Graham Cracker Crust Recipe
- A homemade crust that's a quick and easy alternative to a traditional pie crust.
- Buttery, homemade goodness that outshines store-bought crusts.
- Use for cheesecakes, no-bake dessert bars, and pie recipes.
Ingredients for Graham Cracker Crust
You'll only need two simple ingredients for this tasty crumb crust.
- Graham Crackers - The key ingredient! You can use whole Graham crackers or ready-made graham cracker crumbs.
- Butter - Use unsalted butter so that you can control the salt content in the base. If you use salted butter, leave out the extra salt.
See the recipe card for quantities and the full recipe.
How To Make Graham Cracker Crust
Once you see how simple this easy recipe is, you'll never buy a pre-made graham cracker crust again!

Crush the Crackers
Pulse the Graham crackers in a food processor until they are fine crumbs.
If you don't have a food processor, you can put them in a Ziploc bag and use a rolling pin to crush them until there are no more big chunks.

Add Butter
Melt the butter in the microwave in 30-second bursts, then add it to the food processor along with the salt. If you are adding any extra sugar or spices, add them now.

Combine
Pulse or stir until everything is well combined - the mixture should resemble wet sand. When you pinch it between your fingers, it should hold its shape.
If it feels too dry or crumbly, add a little more melted butter.

Press Mixture Into Pan
Tip the crumb mixture into your pan and use your hands or the bottom of a measuring cup to firmly pack it down into an even layer.
If you want it to go up the sides of the pan (like for a pie), then press it evenly up all sides with your hands or the back of a spoon.

Bake (Optional)
Your Graham cracker crust is good to go! If you want it to be extra sturdy, you can give it a quick bake in the oven for 10 minutes, just to help everything firm up and hold together. But an unbaked Graham cracker crust is just as good!
Let your baked crust cool before adding your filling.
How to Use Homemade Graham Cracker Crust
You can use this homemade crumb crust in a variety of ways, depending on what kind of dessert you are making.
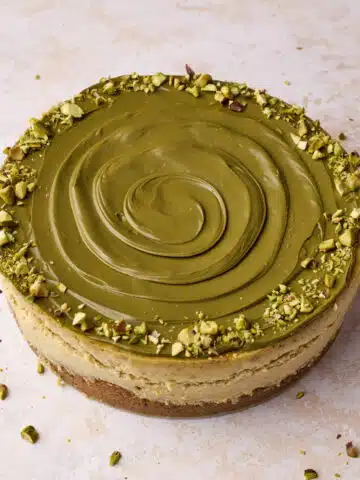
- Cheesecake Base - Press your crust into an even, flat layer for a classic cheesecake base. I love it in my Cookie Dough Cheesecake and Caramel Cheesecake. You can also add in a few extras to change up the flavor and go with your cheesecake recipe (see variations).
- Pie - A Graham cracker crust is a super quick and easy homemade pie crust for no-bake pie fillings like cream pies. You can press it all the way up the sides of a 9-inch pie plate, or even into a loose-bottomed tart pan if you don't want to serve it in a pie dish (like in my Banoffee Pie recipe).
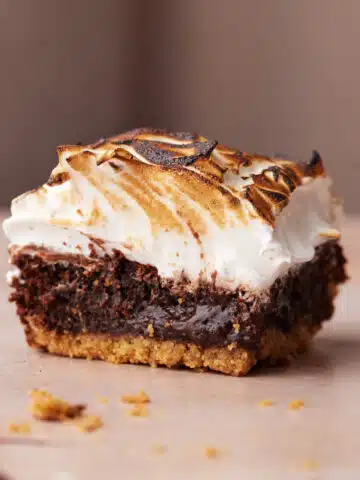
- Bars - This crust makes a perfect base for traybakes too! I love using it under gooey S'mores Brownies for that classic campfire combo, but it also pairs beautifully with peanut butter bars, lemon slices, or no-bake layered treats. You'll need a square pan for this method.

Variations
There are a lot of easy ways to switch up this simple Graham cracker crust for different dessert recipes. The versatility is another big benefit over using pre-made crusts!
- Sweet - For a touch of sweetness, add 2-3 tablespoons of white or light brown sugar to your crust when crushing the crackers.
- Spices - A sprinkle of cinnamon, ginger, or pumpkin pie spice goes a long way - add some warm spices to your crust for a warm, holiday feel. I do this in my Cinnamon Roll Cheesecake.
- Other cookies - The beauty of a cookie crust is that it can be any cookies! Try with vanilla wafers, speculoos cookies (like my Biscoff Cheesecake), or even Oreos for an easy Oreo crust. You may need to adjust how much butter is added depending on what kind of cookies you are using.
Equipment
- Food Processor - Or a plastic bag and rolling pin, or a meat mallet.
- Pan - This Graham cracker crust recipe will make enough for an 8 or 9-inch pie pan, springform pan, cake pan, or tart pan.
How to Store Graham Cracker Crust
This Graham cracker crust can be made right before filling or up to 5 days in advance.
Wrap the crust in plastic wrap or aluminium foil and store at room temperature for 3 days or in the fridge for 5 days.
To freeze, wrap tightly in foil, then place into a sealed freezer bag to protect from moisture and store for up to 3 months. (Although it's so quick and easy to make that it may not be worth the storage space in the freezer!)
Graham Cracker Crust FAQs
If you have a question about this recipe that isn't answered here, feel free to write it in the comment section and I will get back to you as soon as I can.
Yes! Digestive biscuits work really well as a substitute. They have a similar texture and slightly less sweetness, so you may want to add a little sugar if your personal preference is a bit on the sweeter side.
Make sure there is enough butter to bind the crumbs - you can check by squeezing the mixture between your fingers - it should clump and hold together. If it doesn't, add more melted butter. Also ensure you pack it down into the pan tightly enough to hold together.
For an extra sturdy crust, you can bake the crust for 10 minutes before filling to help it hold together.
You don't have to bake a Graham cracker crust, it works perfectly well as a no-bake crust. But baking it for just 10 minutes can help it solidify and hold together a little bit better when you slice it.
Yes! You can make the crust up to 5 days in advance and store it covered in the fridge. It's a great make-ahead step for busy baking days.
Graham Cracker Crust Recipes
Looking for a way to use your Graham cracker crust? Try these:


Graham Cracker Crust Recipe
Ingredients
- 180 g (1 ½ cups) Graham Cracker Crumbs 180g
- 85 g (¾ stick) Unsalted Butter 85g (melted)
- ¼ teaspoon Salt
Equipment
- Food Processor or a plastic bag and rolling pin
Instructions
- Crush the graham crackers in a food processor until they are fine crumbs. If you don't have a food processor you can use a Ziploc bag and a rolling pin to crush them.
- Melt the butter in the microwave in 30-second bursts, then add it to the food processor and pulse until it looks like wet sand. If you aren't using a food processor, just mix the butter and crumbs together in a large bowl. If you squeeze the mixture together in your hands, it should hold together. If it doesn't, you may need a little more melted butter.
- Press the crumb mixture into a pie dish, springform pan or baking pan, depending on what you are using it for. Use your hands or the back of a measuring cup to pack it down tightly. If you are using a pie dish you or tart pan, you can also press it up the sides of the pan.
- The crust is ready to use. If you want it to be extra sturdy, you can bake it in a preheated oven at 350°F / 180°C for 10 minutes, just to solidify the crust and help it hold together. This is optional though. If you do bake the crust, let it cool completely before adding your filling.


Chris Radwanski says
I do love a cheesecake with a graham cracker crust. You always make the recipe so easy to follow and have the best tips!