
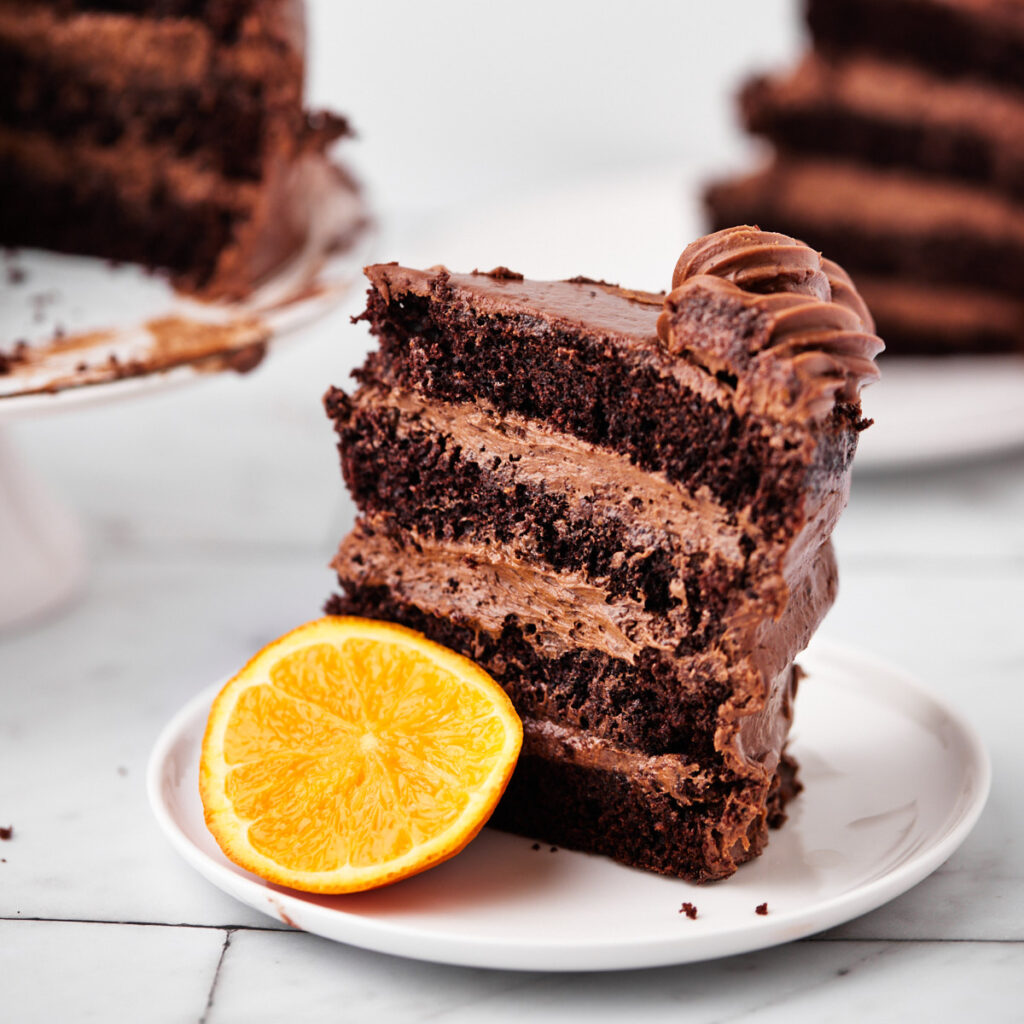
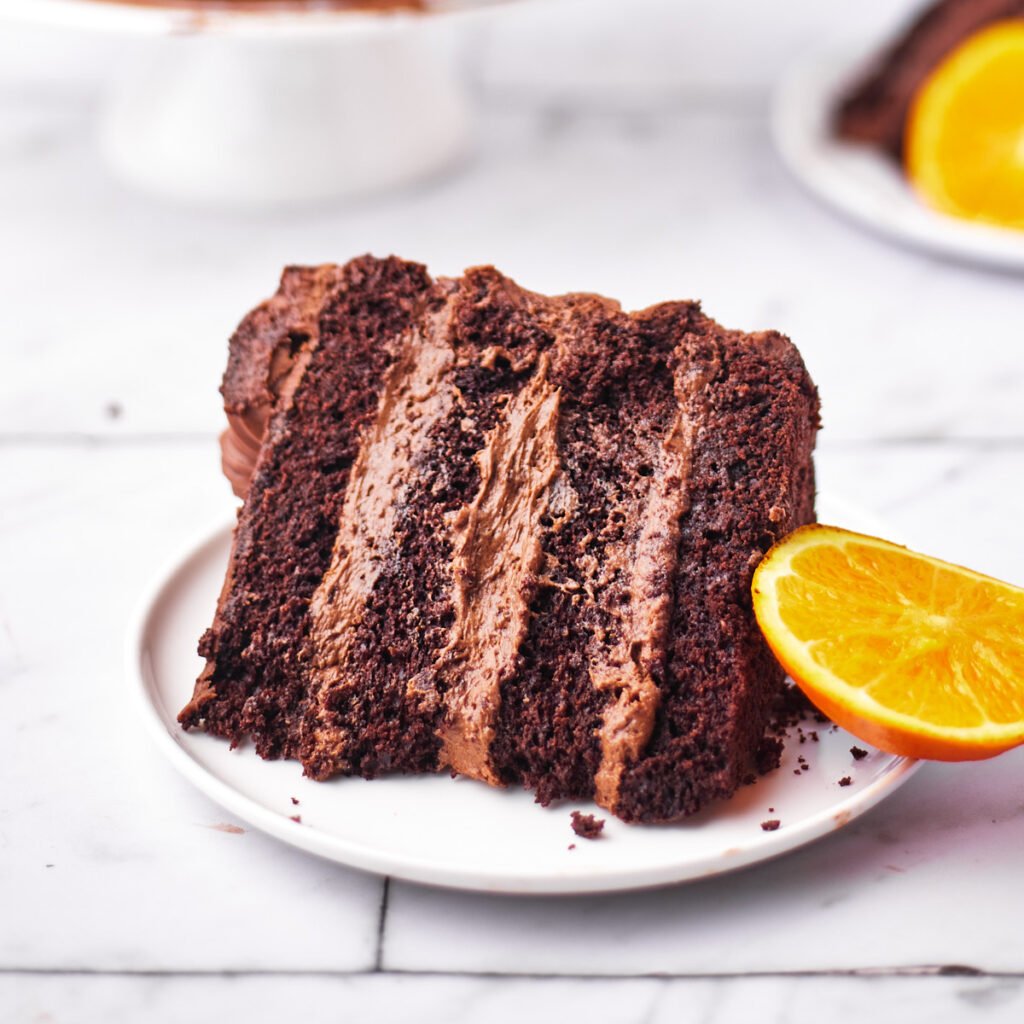
This Chocolate Orange Cake tastes just like a Terry's Chocolate Orange in cake form! Moist chocolate and orange sponge cake filled with layers of the most divine, silky, mousse-like chocolate orange frosting, and topped with an orange-infused chocolate ganache - prepare to fall in love! And all the orange flavor comes from real oranges - no orange extract or artificial flavorings.
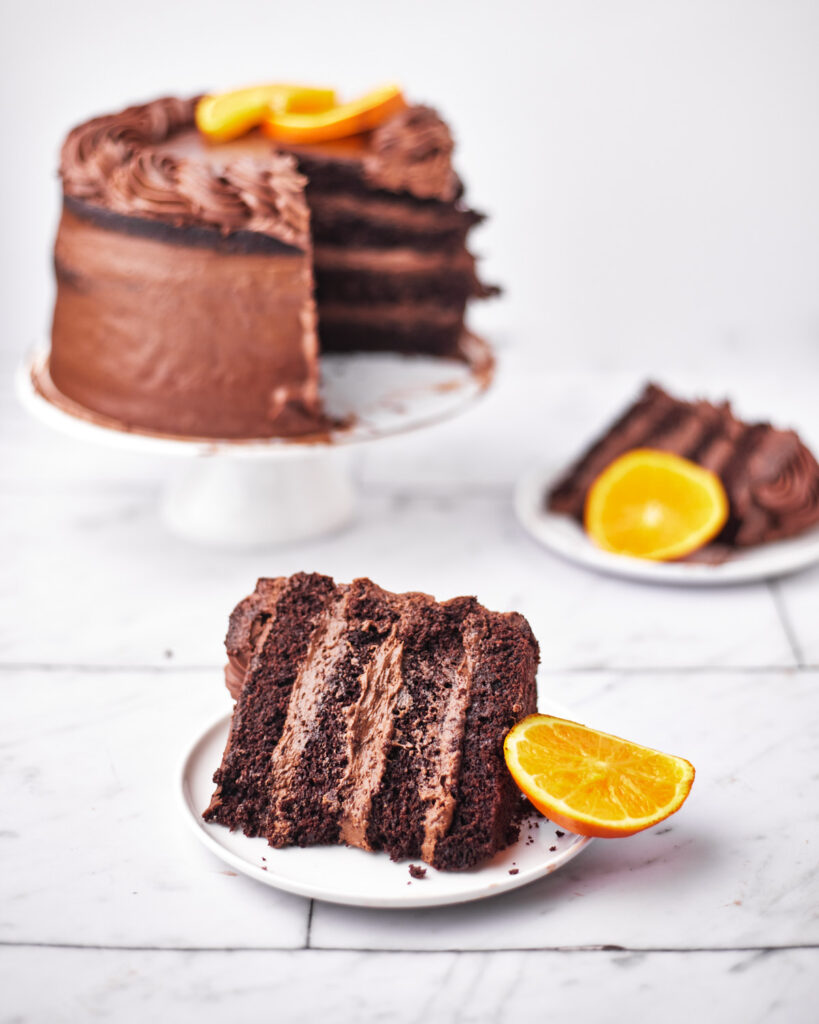
If you love chocolate orange and want to make a super celebratory and impressive dessert, this chocolate orange layer cake is calling your name. The silky chocolate orange filling does have quite a few steps involved, but I promise you it's worth the extra effort and you'll be so glad that you made it! It's an adaption of my Chocolate German Custard Buttercream, which is unbelievably delicious as it is, but the addition of the orange just takes it to a whole new level. It tastes like a silky chocolate orange mousse, but it is spreadable like frosting and doesn't need to set.
I love the flavor combination of chocolate and fruit, such as my Chocolate Strawberry Cupcakes and my Black Forest Cupcakes. But the combination of chocolate and orange gives me such a 'special occasion' feeling, so it's appropriate that this cake is extra special to match!
Jump to:
Ingredients
Ingredients for the Chocolate Orange Cake
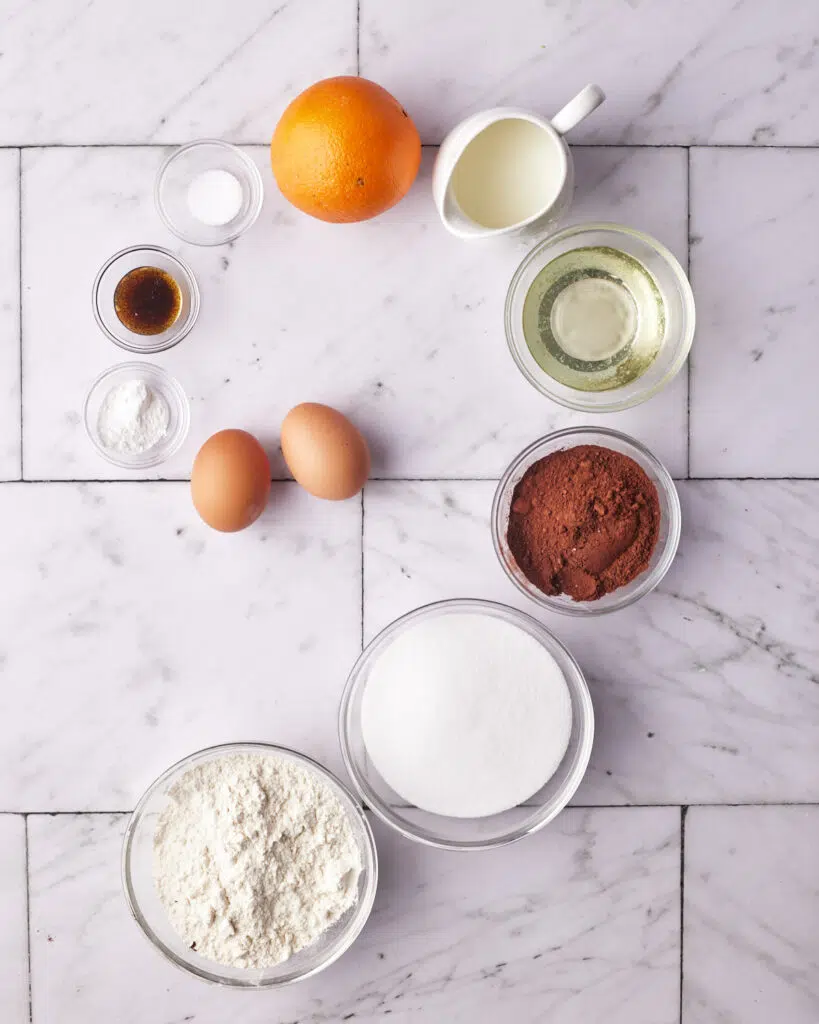
- All-purpose Flour - Regular all-purpose flour (plain flour) is great here, or if you are using Self-Raising flour you can skip the baking powder.
- Sugar - You want to use extra fine white sugar (we call it caster sugar in the UK), but it's finely ground white sugar.
- Vegetable Oil - using oil instead of butter helps make a moist cake that is not too dense.
- Milk - Use whole milk if you have it and make sure it's at room temperature before baking.
- Cocoa Powder - make sure you are using dutch processed cocoa powder. It's not as important in the cake batter, but for the filling, you definitely want dutch processed.
- Eggs - use large eggs and always free-range if you can.
- Vanilla Extract - Vanilla extract helps round out the chocolate flavor of the cake, Use vanilla extract or vanilla paste, but never vanilla essence.
- Fresh Oranges - I used navel oranges, but any kind of large oranges will do - just not something like the tiny little clementines as they won't zest as well.
Note: I am a big believer in using the real ingredients to create flavors when possible, but if don't feel like zesting and juicing multiple oranges, you could use an orange extract instead - just try to find a good quality one so it tastes as authentic as possible.
Ingredients for the Silky Chocolate Orange Filling
- Milk - Make sure you use whole milk for this part of the recipe as we need the fat content.
- Egg Yolks - We only use yolks for the filling, but don't throw your egg whites out! Set them aside and use them later to make something like Pistachio Italian Meringue Frosting.
- Sugar - Again you will need extra-fine white sugar (caster sugar in the UK)
- Vanilla - Vanilla extract or vanilla paste will be great here. If you have a vanilla bean pod you can absolutely use that, but it's not necessary.
- Cornstarch - cornstarch (or cornflour) will help to thicken the custard mixture.
- Fresh Oranges - I used the same oranges as for the cake - navel oranges.
- Dark Chocolate - Dark chocolate really is the best chocolate to use for this portion of the recipe as it's needed for the chocolate flavor to come through properly.
- Cocoa Powder - It's really important you use dutch processed cocoa powder for this filling, if you use natural unsweetened cocoa powder it can be a bitch stodgy and the chocolate flavor overwhelms the orange. For more information on the difference between the types of cocoa powder, check out this article from Sally's Baking Addiction - Dutch-process vs Natural Cocoa Powder.
- Butter - Use unsalted butter and take it out of the fridge about an hour before you use it so it's perfectly at room temperature.
- Icing Sugar - the icing sugar (confectioners sugar / powdered sugar) will control the sweetness of your filling, so taste test and add more or less according to your preference.
See recipe card for quantities.
Ingredients for the Orange-infused Chocolate Ganache (optional)
Chocolate - You can choose what kind of chocolate you would like for the ganache. If you want it to taste just like a terry's chocolate orange I recommend using milk chocolate, but it can be a bit too sickly sweet for some, so semi-sweet is a good alternative. Dark chocolate is a lot more intense and less sweet but if you love dark chocolate it does go beautifully with the orange!
Whipping Cream - whipping cream, heavy cream or double cream are all good - basically any cream with about 30% fat content. Do not use half and half!
Fresh Orange - as above, navel oranges are great but any large orange will do.
How to Make the Cake
The cake portion of this is a super easy and simple recipe. It's an adaption of my favorite easy chocolate cake recipe and it turns out perfectly every time!
- Pre-heat oven to 350°F / 180°C and grease two 8-inch cake pans (I use cake pan spray and parchment paper rounds, but you can also use cooking spray or butter).
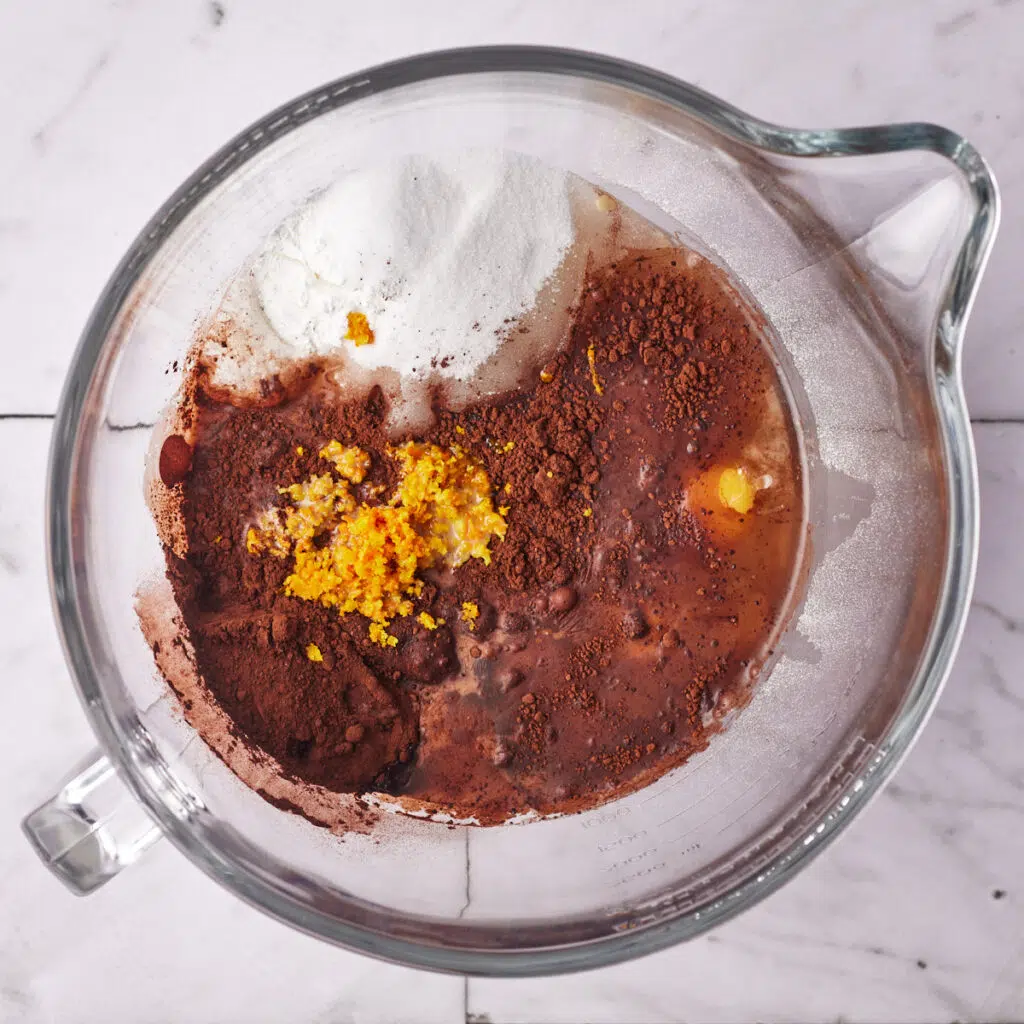
- Zest both oranges and put the orange zest in a small bowl.
- In a separate bowl, juice the oranges - you will need about ¼ cup of freshly squeezed orange juice. Be careful not to get any seeds in there.
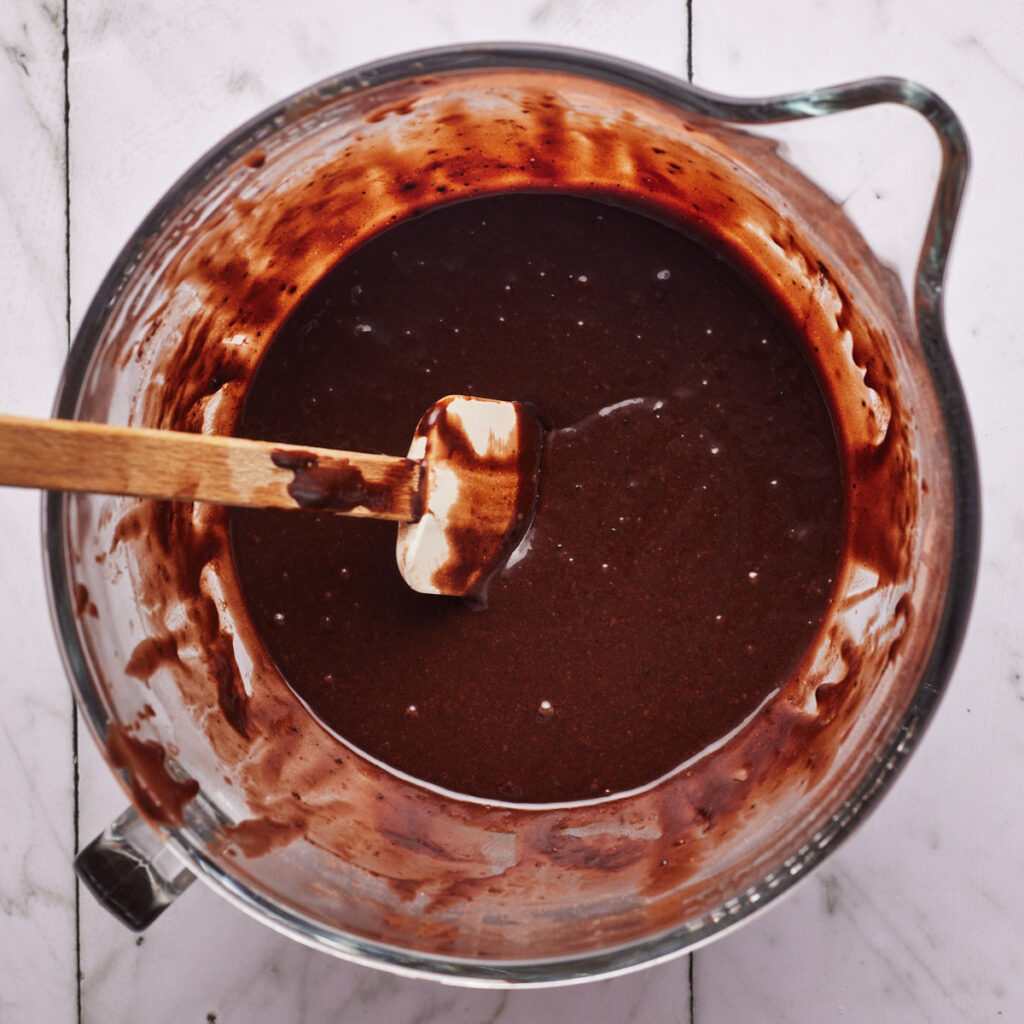
- In a large bowl, put in all the dry ingredients and wet ingredients (except hot water). So that will be your flour, sugar, oil, milk, eggs, cocoa powder, orange zest, orange juice, baking powder, salt and vanilla.
- Mix everything together until there are no lumps.
- Add the hot water and then stir for another 10 seconds. The hot water helps the cocoa powder to dissolve and develop into the cake mix.
- Divide batter between the two cake pans and bake for 30-40 minutes, or until a wooden skewer comes out clean. I used 8-inch pans, but 9-inch would also work fine as it is a large cake.
- Allow the cakes to cool for at least 30 minutes before transferring to a cooling rack. Do not attempt to cut the cakes until they are completely cool.
- If you are making the filling right away, you can leave the cakes on your wire rack while you work, but if you made them in advance, wrap them in plastic wrap or store them in an airtight container until you are ready to use them.
How to Make the Filling
There are two main steps to making the Chocolate Orange Filling. First, we will make a chocolate orange custard, then once it has cooled we will combine it with the other ingredients to turn it into a lovely silky smooth, spreadable frosting.
Make the chocolate orange custard:
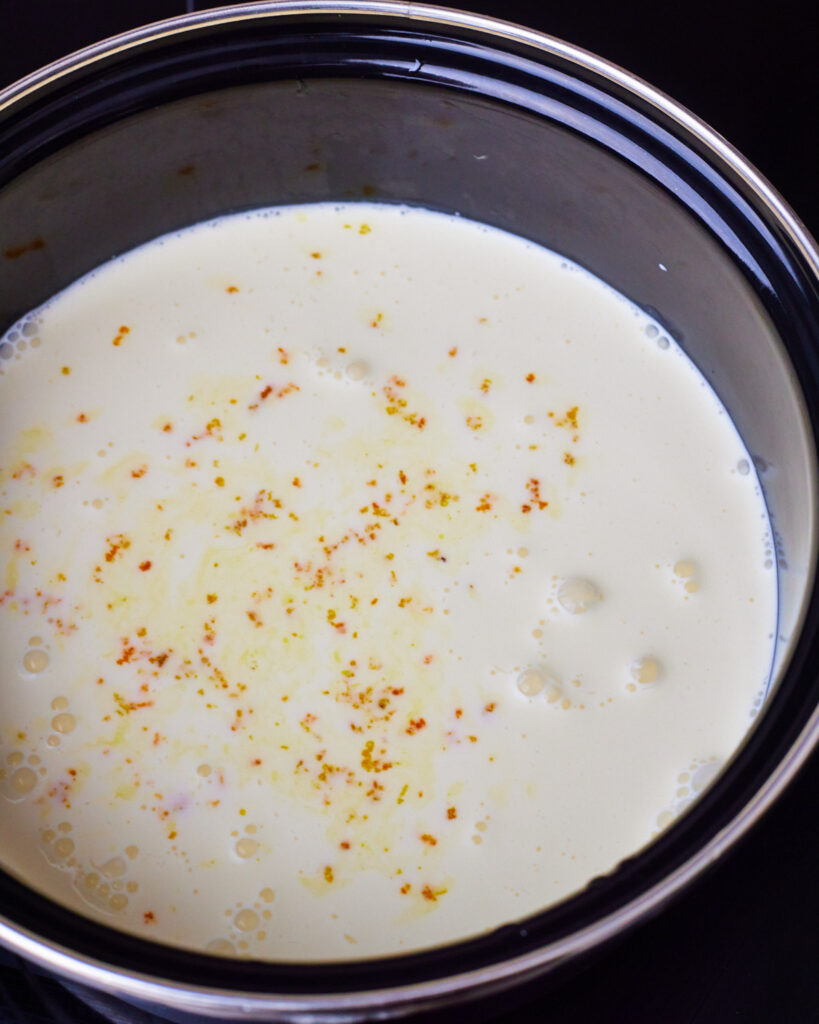
- Zest the orange and place it into a saucepan along with the milk, vanilla and two tablespoons of the sugar. Save the leftover orange for use in the frosting later.
- Add the egg yolks to a large mixing bowl and whisk together with the remaining sugar, flour and cornflour. Set aside.
- Put the saucepan with the milk mixture on a low heat and let it slowly warm up. You don't want to rush this step as the longer it takes to heat, the longer the orange zest will steep and give it that beautiful orange flavor!
- Once the milk mixture starts to feel warm, pour a little of it into the egg yolk mixture and whisk it in.
- Add a little more milk to the egg yolk mixture and whisk it in completely. Continue adding in small increments until all the milk is incorporated into the egg yolks. Do not add all the milk at once or you risk scrambling the eggs - the key here is to do it slowly and gradually.
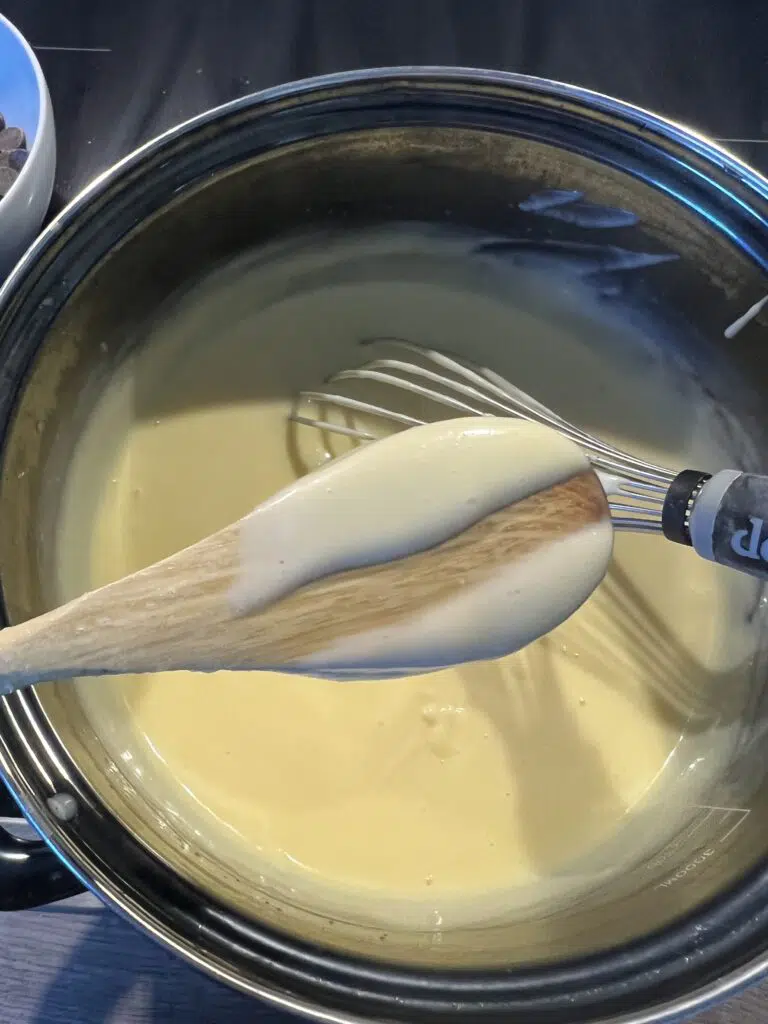
- Once all the milk is added, pour the entire mixture back into the saucepan and continue to heat, whisking constantly until the mixture thickens.
- You'll know the custard is ready when it can coat the back of a spoon and you can run your finger down the spoon and leave a trail there. It's super important that you whisk the custard the whole time it is cooking and don't step away, as the thickening part happens in a matter of seconds and if you don't whisk you may end up with lumps.
- Remove from the heat and pass the custard through a sieve into a medium bowl to remove the pieces of orange zest (and any rogue lumps that may have formed).
- Melt your dark chocolate in the microwave in 30 second increments, then pour the melted chocolate into the orange custard and stir until it is completely smooth and incorporated.
- Cover the chocolate orange custard in plastic wrap, making sure it touches the surface of the custard so that a skin cannot form, and let it cool completely (about 2 hours).
Make the chocolate orange frosting:
- Once the chocolate orange custard has completely cooled you can start making the final filling.
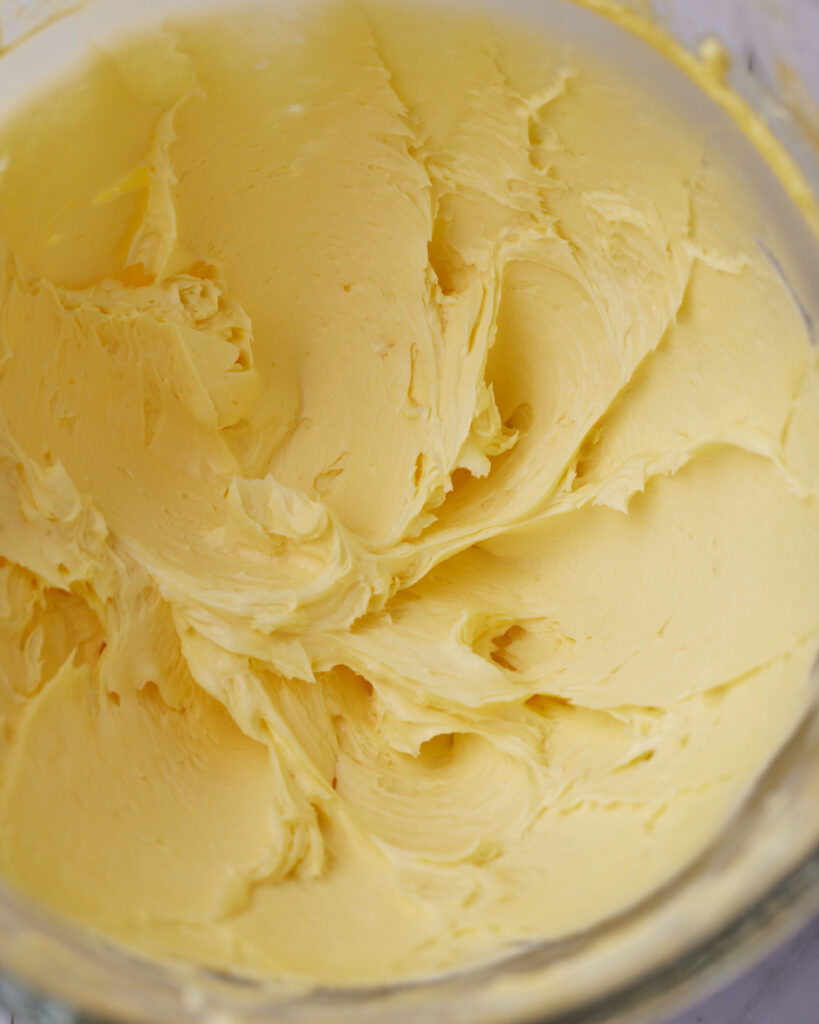
- Add the room temperature butter and icing sugar to the bowl of a stand mixer (you can use an electric mixer for this but it's a bit of a long process so might be a bit tiring!) Using a paddle attachment, beat the butter and icing sugar until it is pale and creamy (about 1-2 minutes).
- Add the cocoa powder and 2-3 tablespoons of juice from the orange you zested earlier and beat until everything is combined.
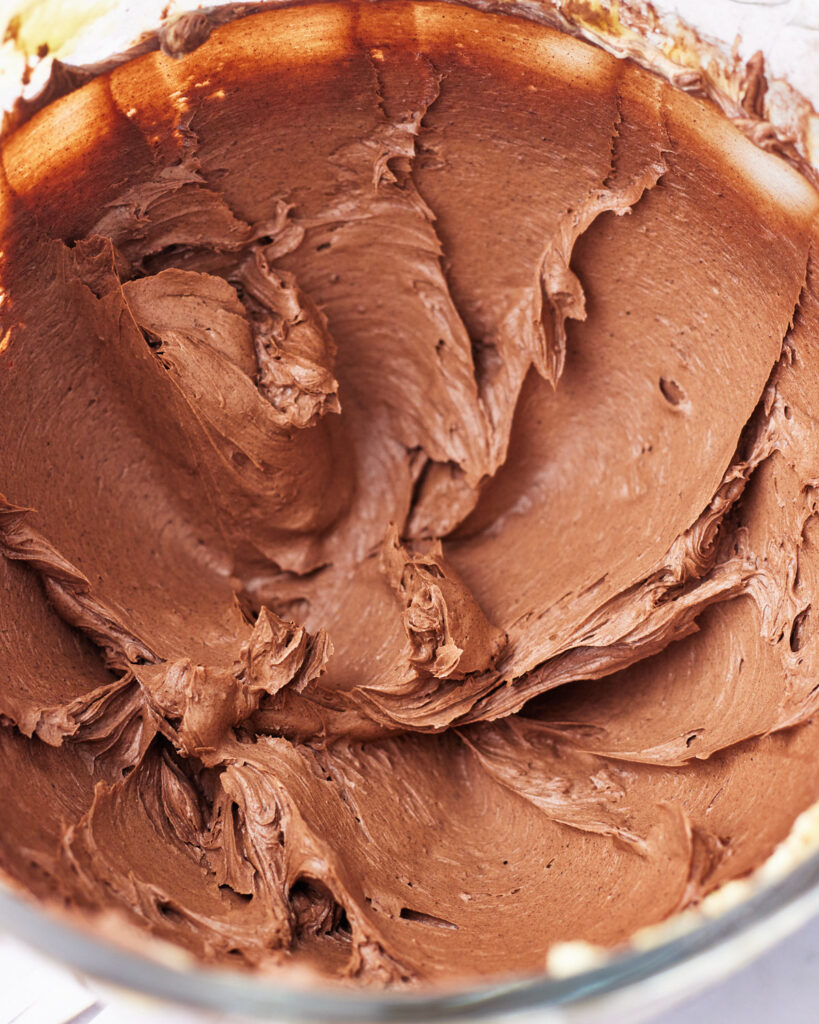
- Switch to a whisk attachment and on a medium speed, add the cooled chocolate orange custard one tablespoon at a time, letting it whip for a few seconds in between additions.
- By this point it the frosting should be beautiful and thick and silky, but if it doesn't look quite right, let it whip for another minute on high speed and that should sort it out.

How to Make the Ganache
- If you are using chocolate callets, pour them into a large bowl. If you are using a bar of chocolate, chop it up into small pieces, then place into the large bowl. Note: there is a difference between chocolate callets and chocolate chips - do not use chocolate chips for this as it will not work.
- Zest one orange and then peel the zested peel from the orange and set aside.
- Add the whipping cream to a small saucepan along with the orange zest and the orange peel.
- Heat over a low heat until the cream just begins to bubble slightly.
- Pour the hot cream through a sieve and onto the chopped chocolate, this will remove the orange zest and peel.
- Let the chocolate mixture sit for a minute or so, then stir it together until everything is glossy and free from lumps (this is my favorite part!)
- Allow to cool and thicken before using. See notes on decorating the cake below for when you should use the ganache depending on how you want to decorate.
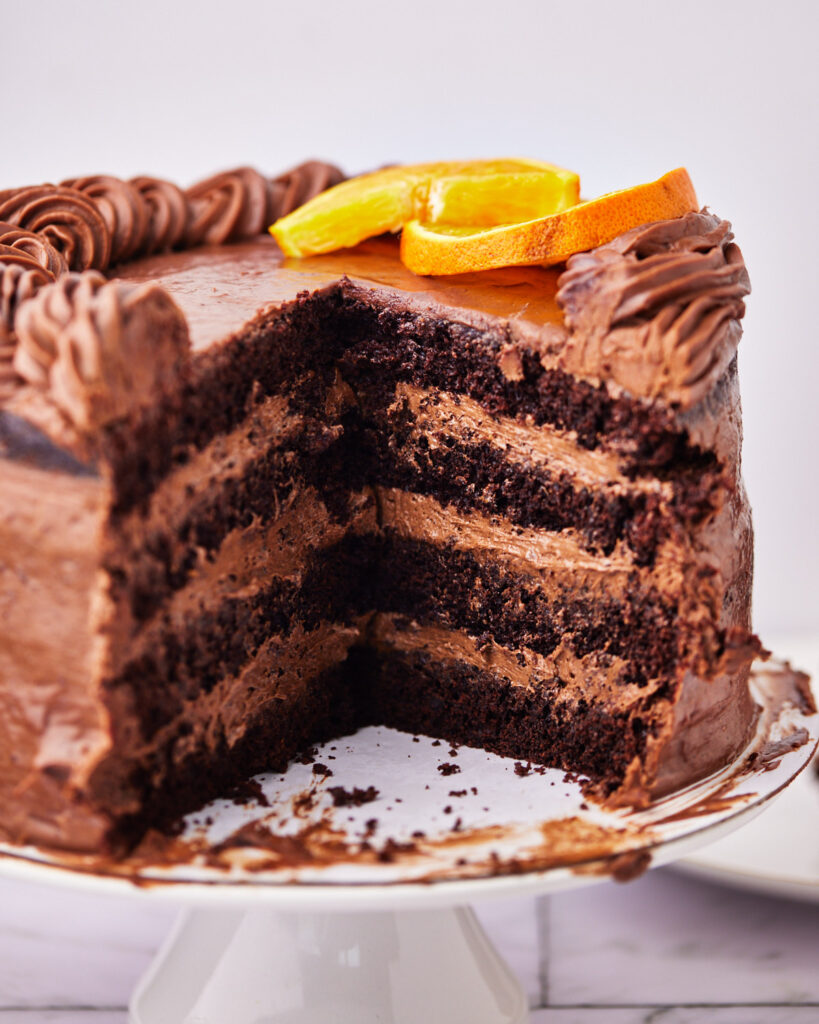
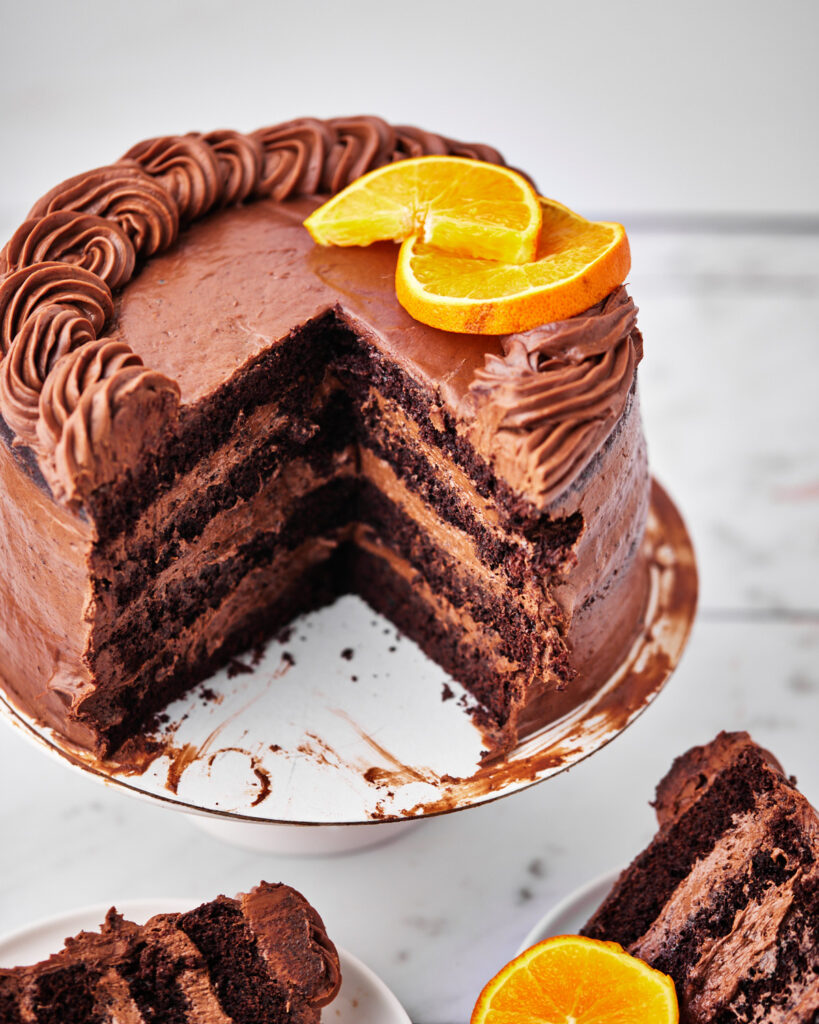
How to Assemble the Chocolate Orange Cake
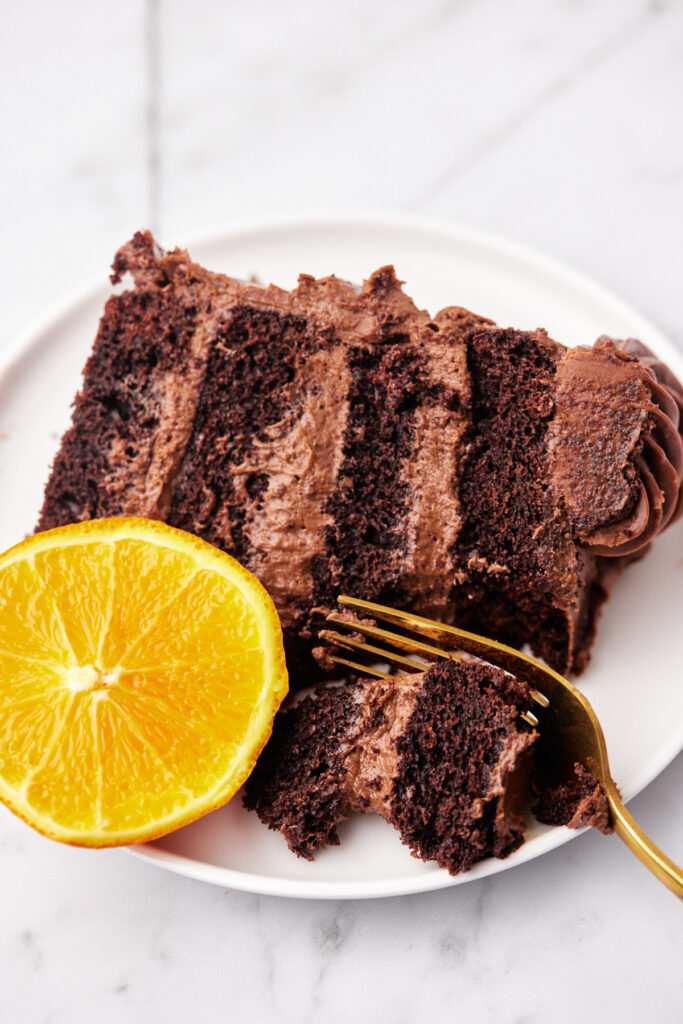
- Firstly, take your two cool cakes and slice off the domed top of the cake so you have two nice flat cake layers. Then, slice each cake again, halfway up, so you will have four even cake layers. I have best results with a cake leveler, but you can use a serrated knife too.
- Put the first layer on your cake board, turntable, or cake plate, and place a healthy dollop of the chocolate orange filling on top. Smooth it out with an offset spatula until you have a nice, smooth, even layer.
- Add the next layer of cake on top and repeat until you have all your layers of cake and filling assembled.
- Use the remaining chocolate orange filling to spread a thin layer all over the top of the cake and the edges of the cake to seal in all the filling and crumbs and to smooth out any spilling edges. If you want to you could serve it like this and it would be perfection. But if you want to go the extra step with the chocolate ganache, keep going.
Ways to Decorate with Ganache
The ganache can be used in multiple ways on your cake. Here are a few options.
- Smooth a thick layer of ganache all over the cake as an outer coating.
- Pour the ganache over the cake while the ganache is still warm to get a smooth, shiny finish.
- Frost the cake entirely with the chocolate orange filling and then use the ganache to do a drip down the side of the cake.
- Let the ganache set up a little longer and use it to pipe rosettes onto the top of the cake.
All options are wonderful and delicious - it's purely down to personal preference. If you want to pour or drip your ganache, use it when it is still slightly runny. For smoothing or piping, let it cool completely. If it has already cooled and you want to pour or drip, just pop it in the microwave for 20 - 30 seconds.
I like to finish mine off with a few orange slices or some candied orange peel. You could also decorate with some pieces of actual Terry's Chocolate Orange.
Variations and Shortcuts
This is an undeniably delicious cake as it is, but there are many different ways you can enjoy this chocolate orange cake if you'd like to make it a little faster or with less steps or ingredients.
Swap the filling for a buttercream frosting - I highly recommend that you try this chocolate orange filling at least once in your life, as it is honestly to die for, but if you would like a faster version of this cake, try taking a regular chocolate frosting recipe and adding the zest of one orange and 2-3 tablespoons of fresh orange juice.
Use Orange Extract - as I said above, I strive to use as many real and natural ingredients as possible in my recipes, firstly because I believe the flavor is better, but also so that they are accessible for everyone and can be made with what can be easily found in a supermarket. However, if you don't like the idea of zesting and juicing a bunch of oranges, you could use a good-quality orange extract or orange emulsion instead.
Storage
I usually say to never store cake in the fridge, but because of the custard base in the chocolate orange filling, this cake does need to be stored in the fridge. If you have space, try to store it in an airtight container inside the fridge to prevent it from drying out. It will keep in there for 3-5 days.
I recommend taking it out of the fridge about an hour before you serve as it is best served at room temperature for maximum flavor.
Summary
This chocolate orange cake recipe is hands down one of the best cakes I've made in a long time and I urge you to give it a go. Yes, it is a little more time-consuming than some of my other bakes, but it really is a special cake and you (and your taste buds) will not be disappointed!
Chocolate Orange Cake
Ingredients
- 375 g (3 cups) All-purpose Flour 375g
- 600 g (3 cups) Granulated Sugar 600g
- 4 (4 Large) Eggs
- 122 g (1 ⅓ cups) Cocoa Powder 122g (dutch processed)
- 240 ml (1 cup) Vegetable Oil 218g / 240ml
- 300 g (1 ¼ cups) Whole Milk 310g / 300ml
- 2 Oranges
- 1 teaspoon Salt
- 2 teaspoon Baking Powder
- 1 teaspoon Vanilla Extract
- 80 ml (⅓ cup) Hot Water 80g / 80ml
- 600 ml (2 ½ cups) Whole Milk 620g / 600ml
- 100 g (½ cup) Granulated Sugar 100g
- 5 (5 Large) Egg Yolks
- 1 tablespoon All-purpose flour
- 2 tablespoon Corn starch
- 2 teaspoon Vanilla Extract
- 1 Orange
- 150 g (5.3 oz) Dark Chocolate 150g
- 30 g (⅓ cup) Cocoa Powder 30g (dutch processed)
- 345 g (3 sticks) Unsalted Butter 345g
- 180 g (1 ½ cups) Powdered Sugar 180g
- 175 g (6 oz) Chopped Chocolate 175g (your choice of milk, dark, or semi-sweet)
- 120 g (½ cup) Whipping Cream 120g
- 1 Orange
Instructions
- Preheat oven to 350°F / 180°C and prepare two 8-inch cake pans.
- Zest the two oranges and add the zest to a large bowl.2 Oranges
- In a separate bowl, squeeze oranges until you have about ¼ cup of juice (60ml), and add the juice to the bowl with the zest.
- Put all the wet and dry ingredients (except hot water) into the bowl with the orange zest and juice.375 g (3 cups) All-purpose Flour, 600 g (3 cups) Granulated Sugar, 4 (4 Large) Eggs, 122 g (1 ⅓ cups) Cocoa Powder, 240 ml (1 cup) Vegetable Oil, 300 g (1 ¼ cups) Whole Milk, 2 Oranges, 1 tsp Salt, 2 tsp Baking Powder, 1 tsp Vanilla Extract
- Mix all the ingredients together until they are combined and there are no lumps.
- Add the hot water and mix in until totally combined.80 ml (⅓ cup) Hot Water
- Divide the batter between the cake pans and bake for 30-40 minutes or until a skewer comes out clean.
- Zest the orange and place it into a saucepan along with the milk, vanilla and two tablespoons of the sugar. Save the leftover orange for use in the frosting later.600 ml (2 ½ cups) Whole Milk, 1 Orange, 2 tsp Vanilla Extract
- Add the egg yolks to a large mixing bowl and whisk together with the remaining sugar, flour and cornflour. Set aside.100 g (½ cup) Granulated Sugar, 5 (5 Large) Egg Yolks, 1 tbsp All-purpose flour, 2 tbsp Corn starch
- Put the saucepan with the milk mixture on a low heat and let it slowly warm up
- Once the milk mixture starts to feel warm, pour a little of it into the egg yolk mixture and whisk it in.
- Add a little more milk to the egg yolk mixture and whisk it in completely. Continue adding in small increments until all the milk is incorporated into the egg yolks
- Once all the milk is added, pour the entire mixture back into the saucepan and continue to heat, whisking constantly until the mixture thickens.
- You'll know the custard is ready when it can coat the back of a spoon and you can run your finger down the spoon and leave a trail there. It's super important that you whisk the custard the whole time it is cooking and don't step away, as the thickening part happens in a matter of seconds and if you don't whisk you may end up with lumps.
- Remove from the heat and pass the custard through a sieve into a medium bowl to remove the pieces of orange zest and any lumps.
- Melt your dark chocolate in the microwave in 30-second increments, then pour the melted chocolate into the orange custard and stir until it is completely smooth and incorporated.
- Cover the chocolate orange custard in plastic wrap, making sure it touches the surface of the custard so that a skin cannot form, and let it cool completely (about 2 hours).
- Once the chocolate orange custard has completely cooled, you can start making the final filling.
- Add the room temperature butter and icing sugar to the bowl of a stand mixer and beat until pale and creamy (about 1-2 minutes).345 g (3 sticks) Unsalted Butter, 180 g (1 ½ cups) Powdered Sugar
- Add the cocoa powder and 2-3 tablespoons of juice from the orange you zested earlier and beat until everything is combined.30 g (⅓ cup) Cocoa Powder
- Switch to a whisk attachment and on a medium speed, add the cooled chocolate orange custard one tablespoon at a time, letting it whip for a few seconds in between additions.
- It should be beautiful and thick and silky, but if it doesn't look quite right, let it whip for another minute on high speed.
- Pour your chocolate pieces into a bowl and set aside.175 g (6 oz) Chopped Chocolate
- Zest one orange and then peel the zested peel from the orange and set aside.1 Orange
- Add the whipping cream to a small saucepan along with the orange zest and the orange peel.120 g (½ cup) Whipping Cream
- Heat over a low heat until the cream just begins to bubble slightly.
- Pour the hot cream through a sieve and onto the chopped chocolate, this will remove the orange zest and peel.
- Let the chocolate mixture sit for a minute or so, then stir it together until everything is glossy and free from lumps.
- Allow to cool and thicken before using. See notes on decorating the cake anove for when you should use the ganache depending on how you want to decorate.


Cynthia says
The chocolate cake is good, but the filling is way too runny, it won't hold on to the cake at all.
Emma says
The batter made 3 x 8 inch cakes for me. The frosting also had to sit up in the fridge for a while and was still very runny. The flavor was great and I would definitely try to make again!
Dawn Stevens says
It doesn't seem right that this is only 2 8 inch pans instead of 3. I am already 20 minutes over the 40 minute time and it doesn't seem like it will cook. I hope this isn't wrong...
So far the batter taste good but hopefully I didn't mess up the cake pan sizes. My pans are more than 75 percent full.
Rhona says
My two 8 inch pans were full to the top. It took 68 minutes to cook these 2 cakes.
Should say three 8 8nch pans or two 9 inch pans.