
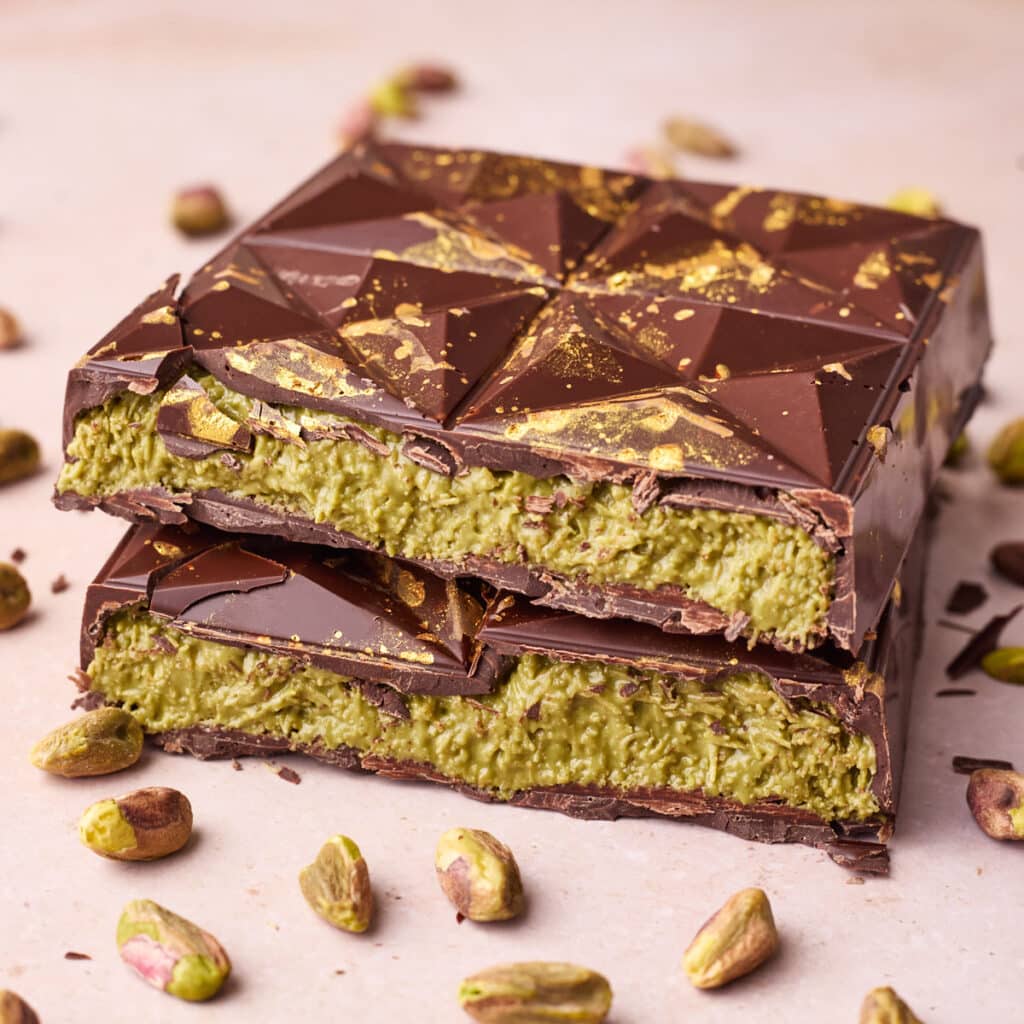
How to make a Dubai Chocolate Bar at home - the right way. This recipe will guide you on finding the right ingredients and the best technique for putting them together to make an indulgent Dubai chocolate bar that is so much better than store-bought.
Reader Review:
Excellent recipe! So good!
⭐⭐⭐⭐⭐ - Catana
As the self-proclaimed Queen of pistachio desserts (hello Pistachio Dacquoise), when I saw the viral Dubai chocolate bar, I knew I had to try it!
I was surprised to see that there aren't many trustworthy tutorials on how to make Dubai chocolate properly, and a lot of posts had misinformation or even incorrect ingredients listed, which is probably leaving a lot of people disappointed!
So, to set the record straight and cut through the confusion, here is my in-depth Dubai Chocolate recipe with reliable step-by-step instructions and every bit of information you need to make the ultimate pistachio chocolate bar the right way!
Jump to:
What is Dubai Chocolate?
After popping off on social media last year, this viral treat has been recreated by chocolate lovers globally, so I knew I had to jump on the trend!
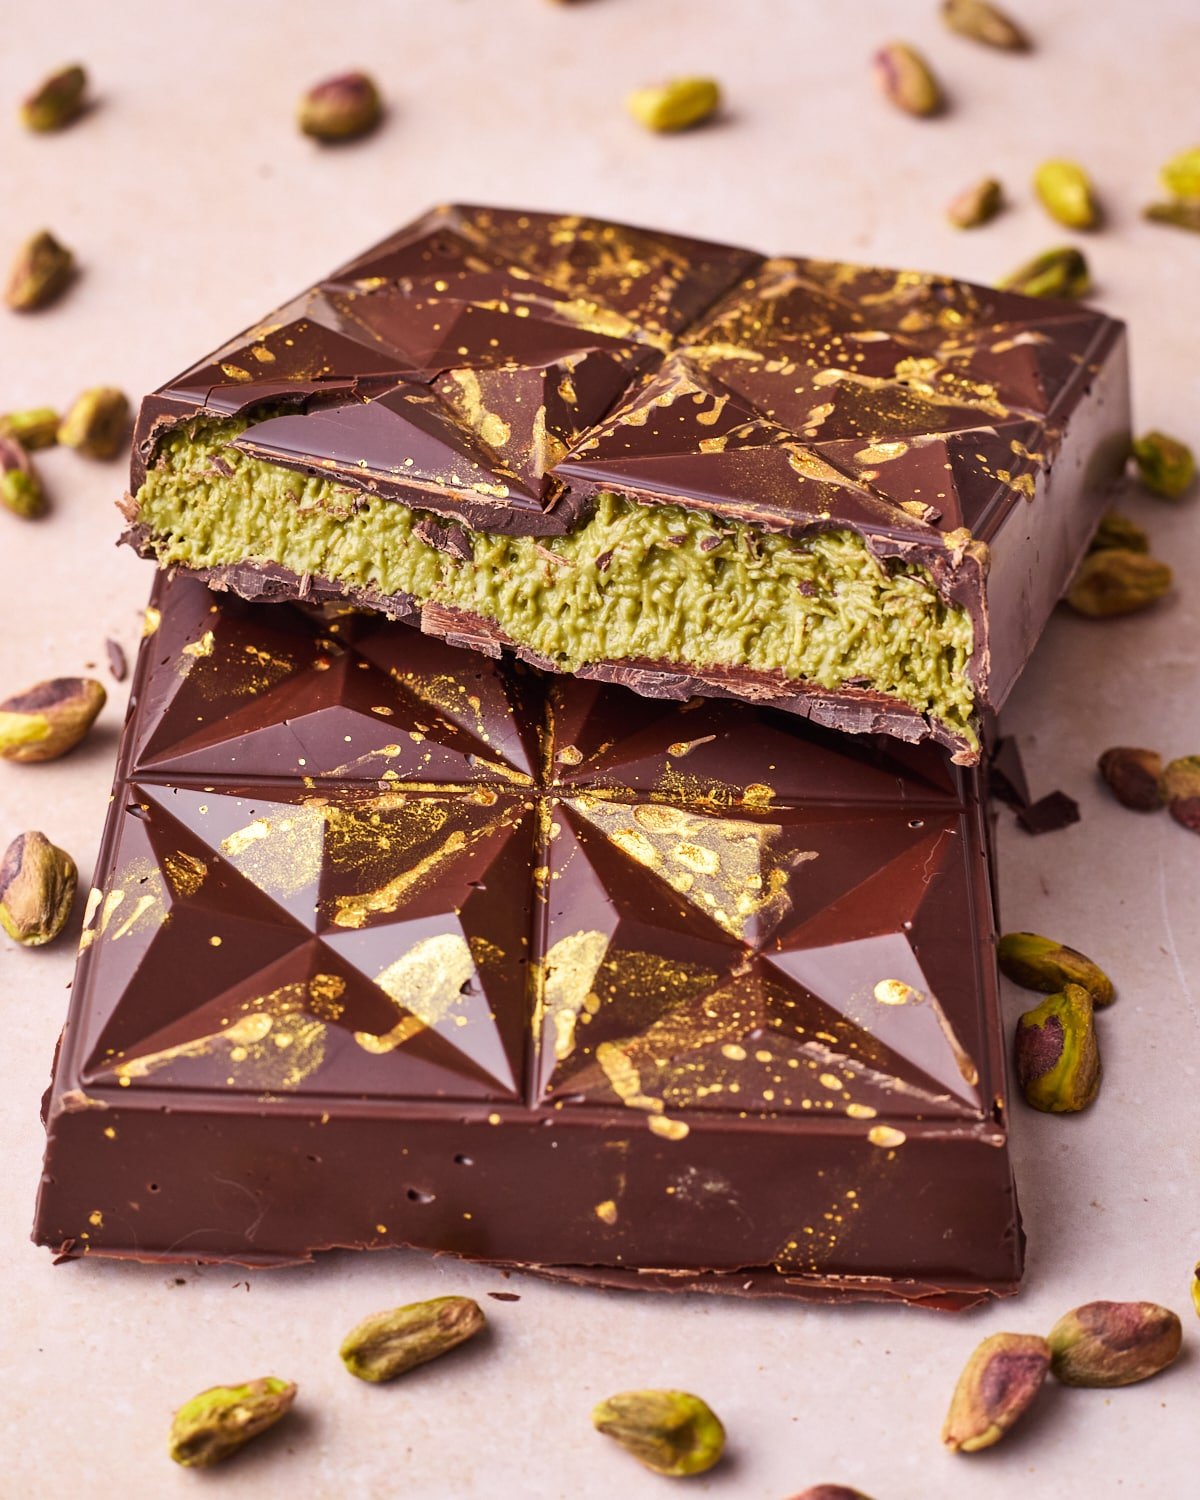
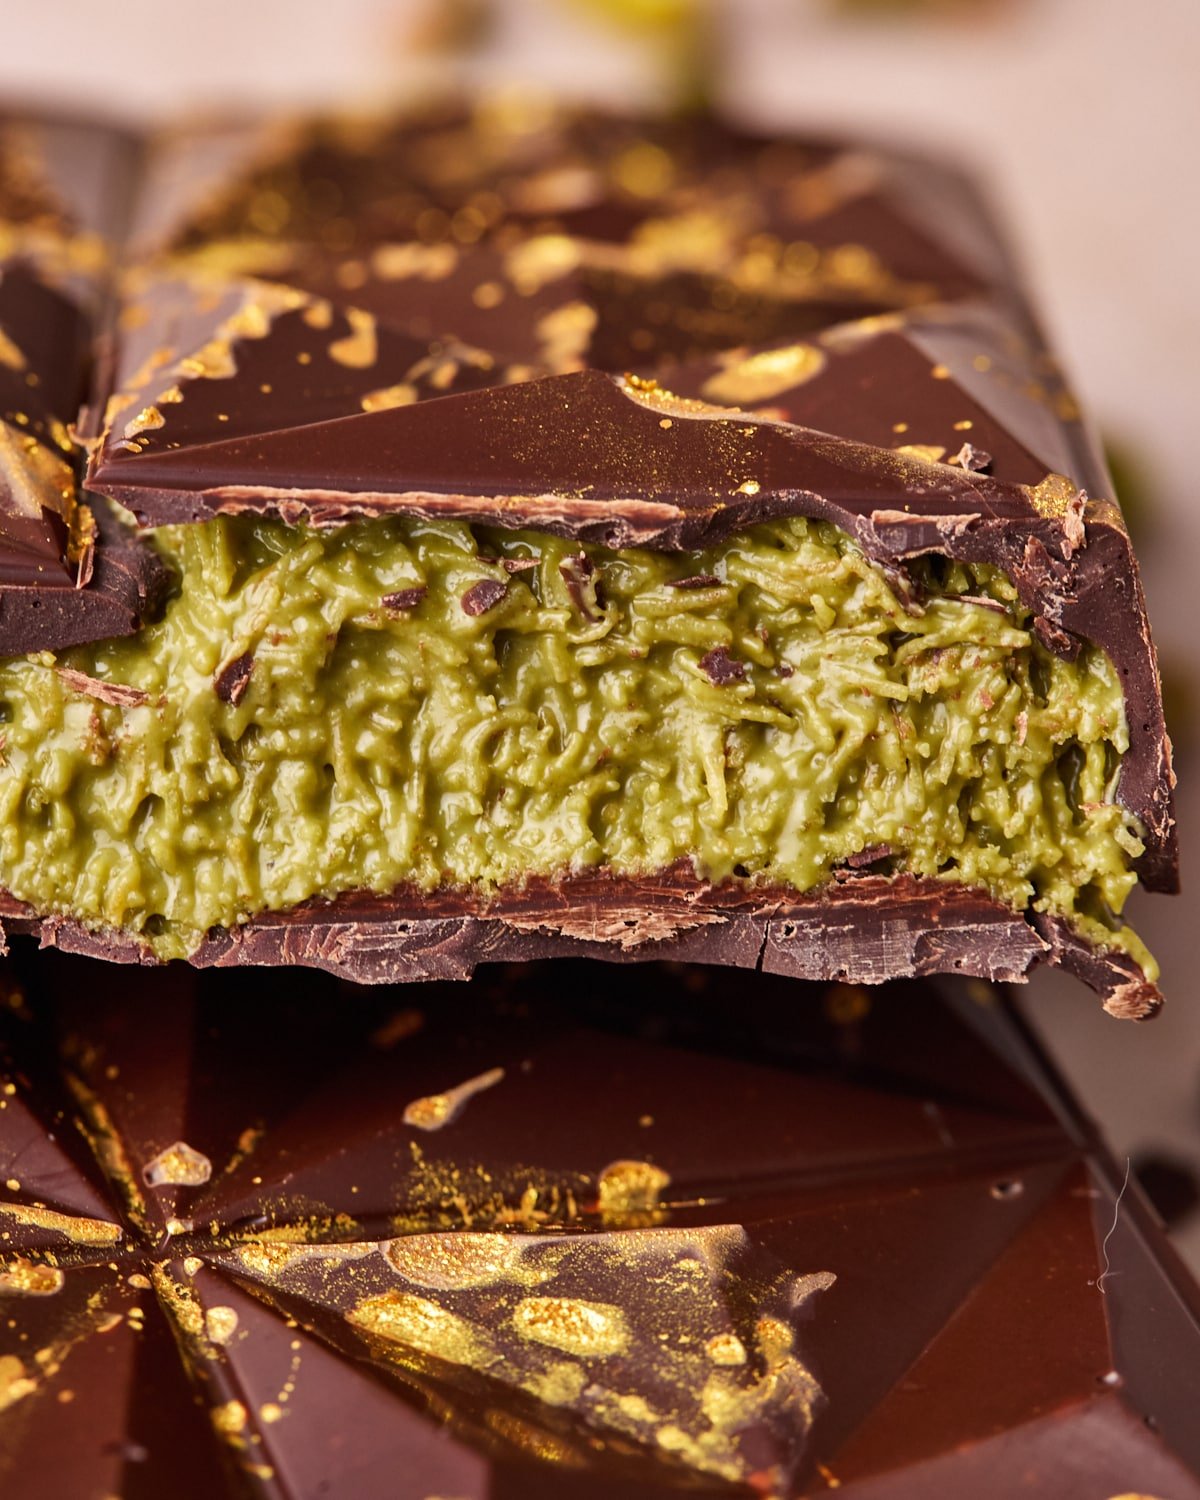
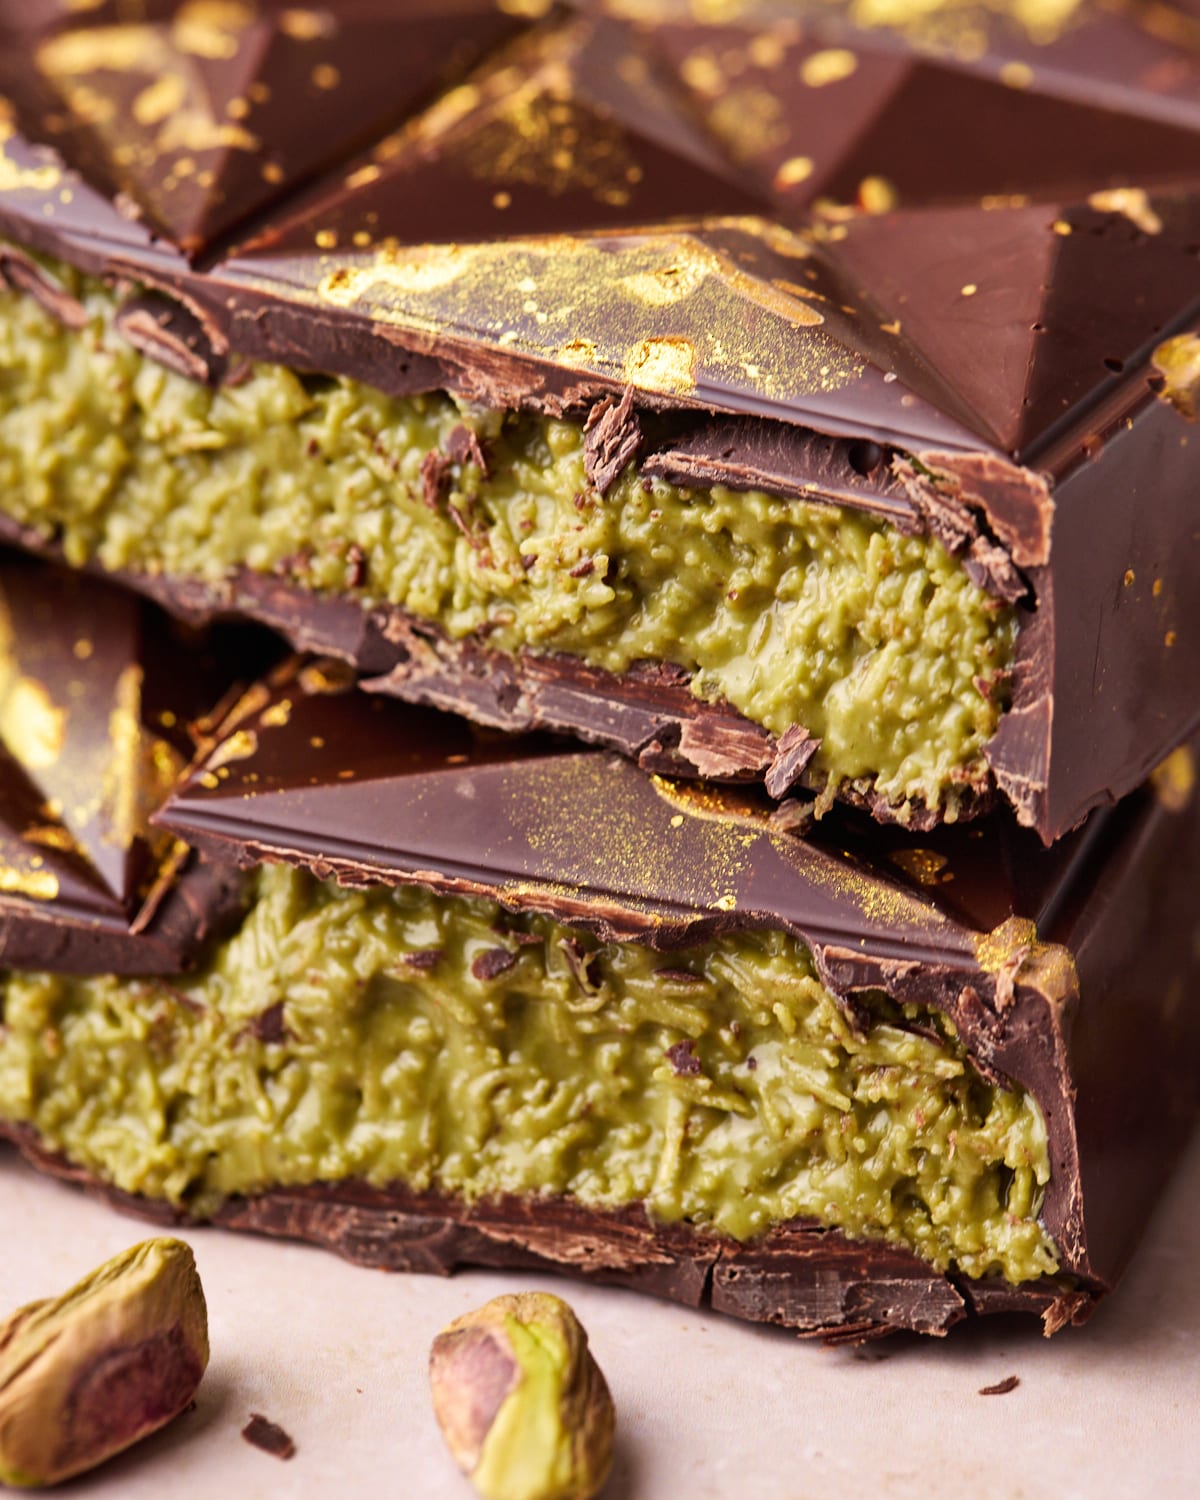
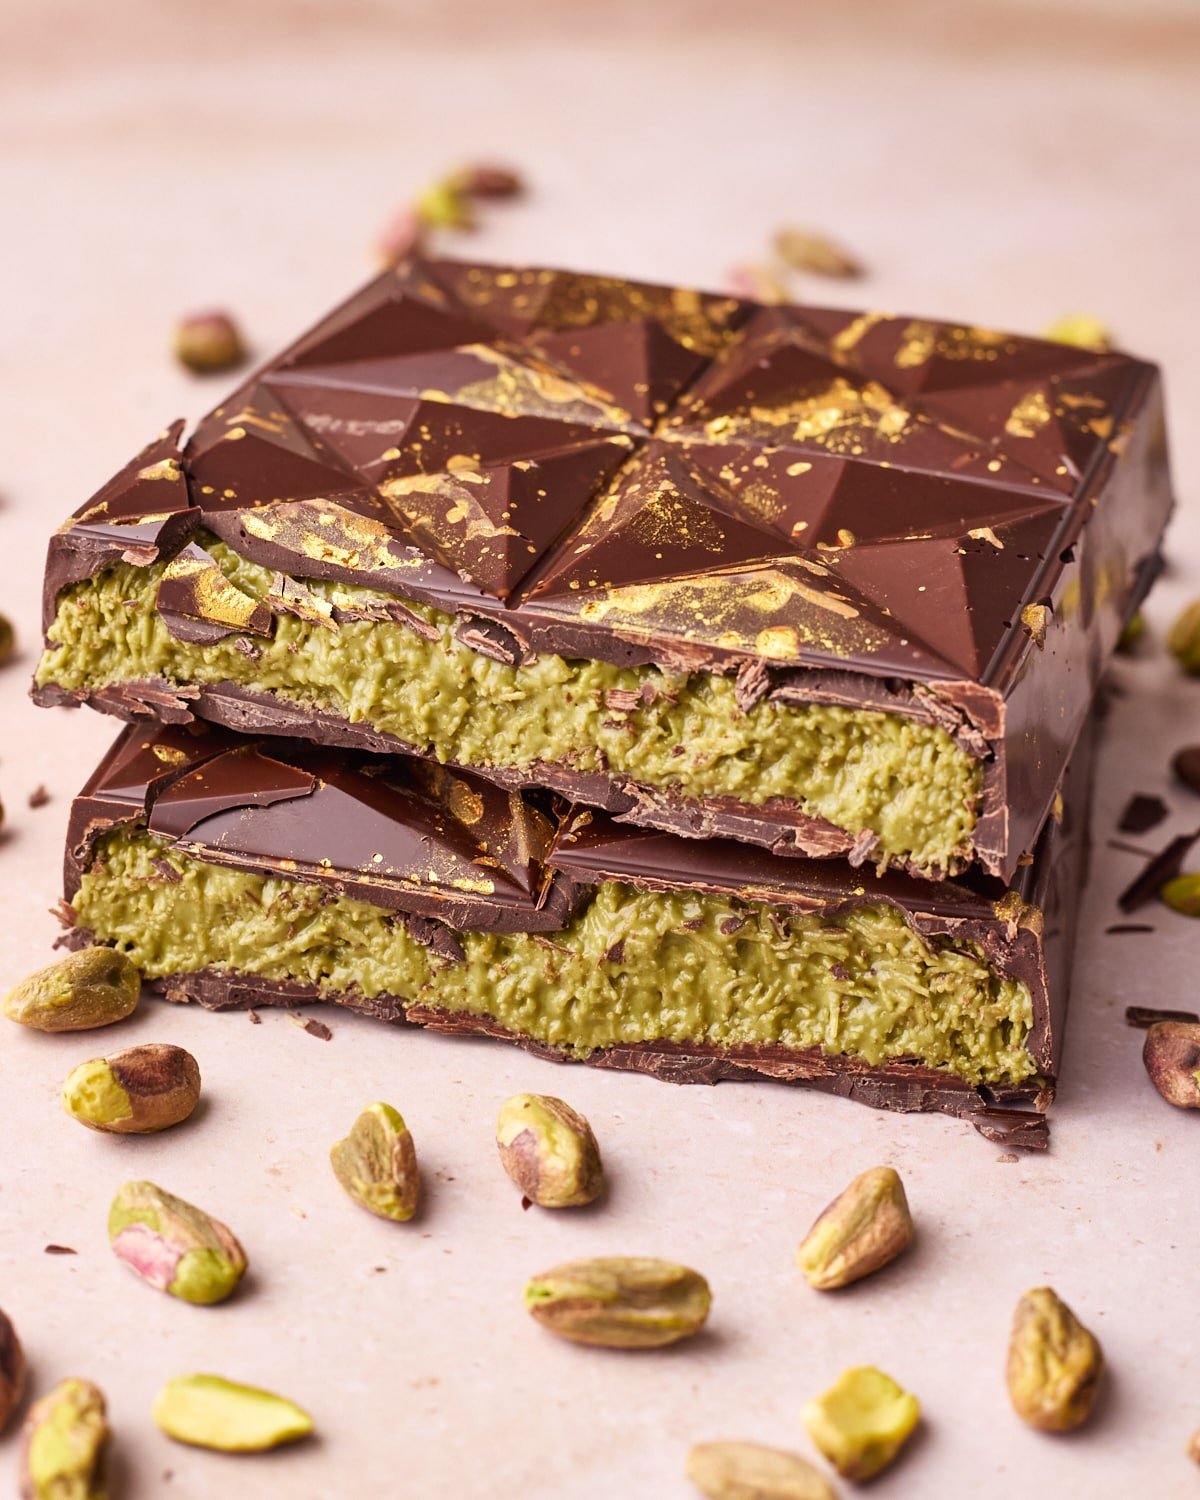
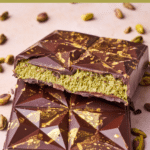
Dubai Chocolate is a rich, indulgent treat that's taken the internet by storm - think luxurious layers of silky chocolate and creamy pistachio goodness, all wrapped up in a glossy, irresistible shell.
It's inspired by the elegant sweets often found in high-end dessert shops across the United Arab Emirates, combining bold flavors with beautiful presentation. The real star of the show? Pistachio cream. It adds a nutty, slightly sweet, ultra-smooth filling that pairs perfectly with dark or milk chocolate.
Ingredients
This viral knafeh chocolate bar recipe uses traditional Middle Eastern flavors to create the tastiest, decadent treat. Some of these ingredients might be a little tricky to source, but I managed to find them all online.
Be warned, some of the ingredients are a little pricey, which is why it's so expensive to buy Dubai Chocolate bars. But making homemade Dubai chocolate will still be a lot more cost-effective than buying it, and you get quite a lot out of the ingredients.
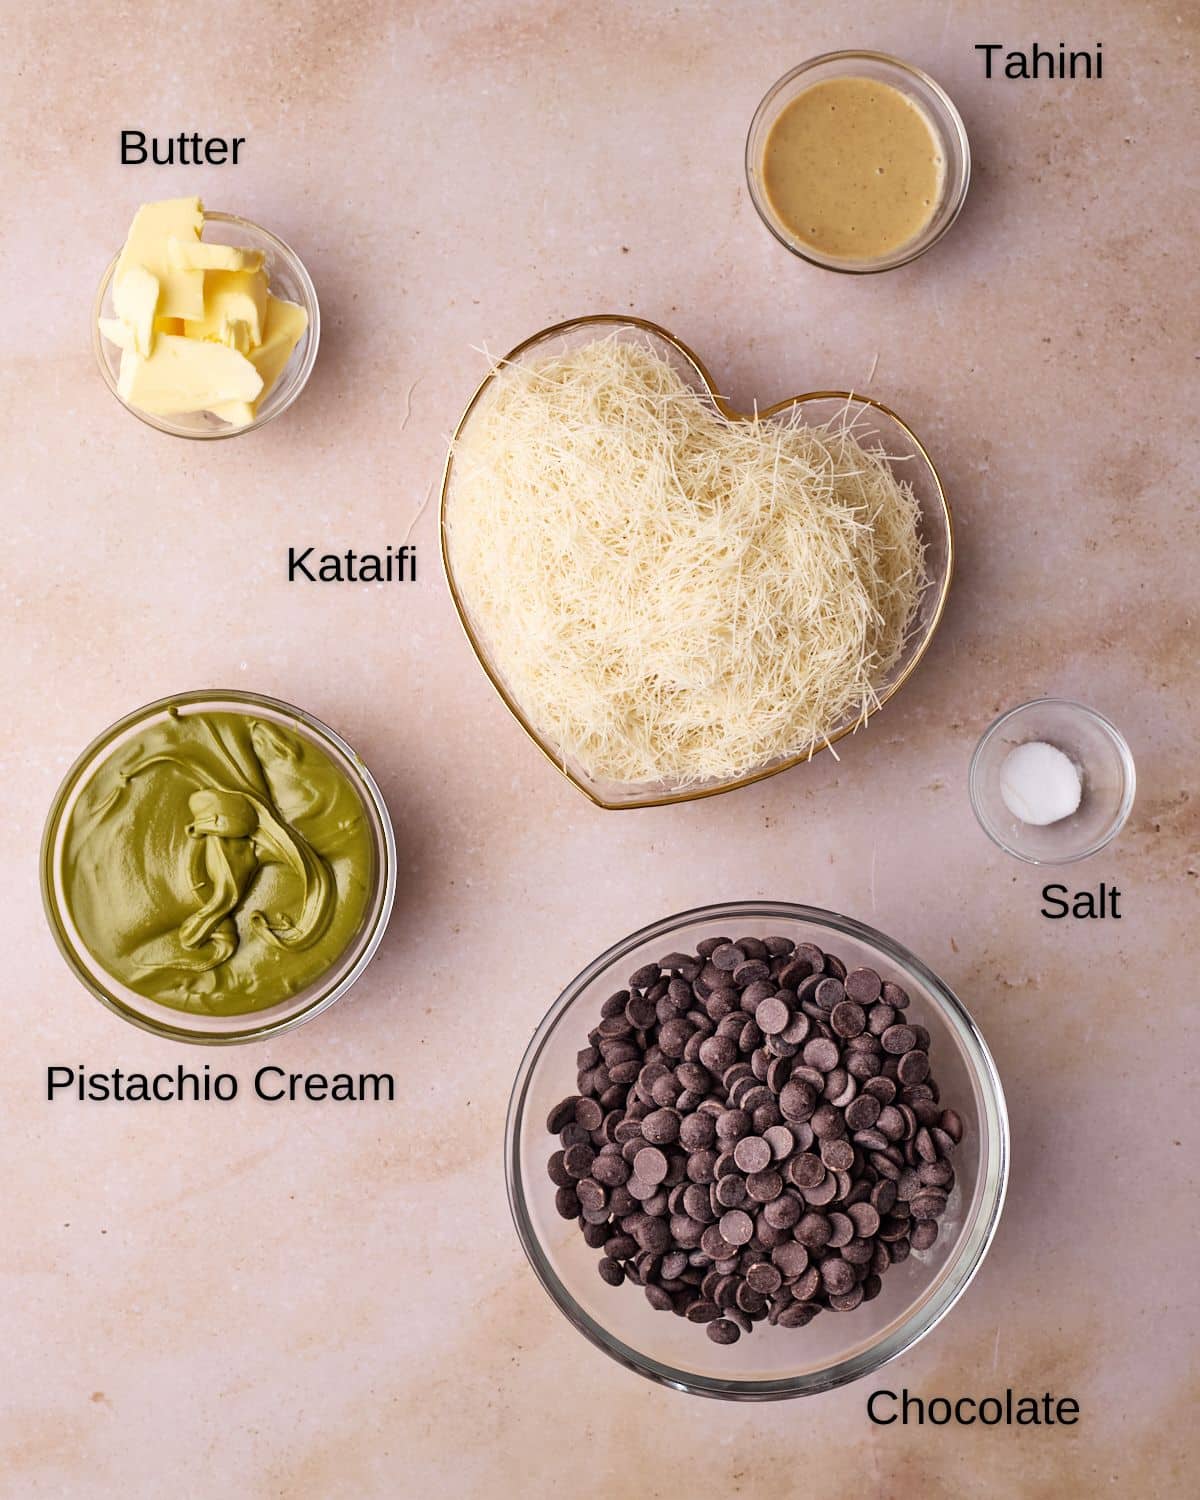
- Kataifi - Also known as 'kadayif', kataifi is shredded phyllo dough. You can buy this online. Ideally, look for the 'dried and chopped' kind, but if yours isn't chopped, you can just cut the kataifi into small strands before using.
- Pistachio Cream - Important note: this is NOT the same as pistachio paste or pistachio butter. Pistachio cream is a sweet spread made with a mix of pistachios and other ingredients, whereas pistachio paste/butter is 100% blended pistachios, with quite a savory taste. Dubai bars should have a scrumptious sweet flavor, so make sure you're using the right ingredient for your pistachio filling.
- Tahini - The sesame flavor adds depth to the filling and balances out the sweetness.
- Unsalted Butter - Unsalted butter is best as it means you can control the amount of salt in your kataifi pastry filling.
- Salt - Just a dash - it will really bring out the pistachio flavor.
- Dark Chocolate - Use REAL chocolate, not chocolate chips or chocolate candy bars (these have additives to stop them from melting properly). I like to use dark chocolate to create a distinct contrast with the sweet filling, but you can also use milk chocolate if you have more of a sweet tooth.
See the recipe card for quantities.
Things You'll Need
- Chocolate Molds - Make sure you have a nice deep chocolate mold so there is enough room for that delicious pistachio filling. It's also helpful to use silicone molds so that the chocolate comes out more easily.
- Frying Pan - A large, deep-sided pan is best for toasting the kataifi.
- Heat-Proof Bowl - for melting the chocolate.
- Thermometer - If you are tempering your chocolate with the traditional method, you'll need a thermometer.
- Bench Scraper - Not strictly necessary but a bench scraper is an easy way to keep the edges of your chocolate molds nice and clean by scraping away the excess.
How To Make Dubai Chocolate
This Dubai Chocolate recipe is pure indulgence made easy. With just a handful of ingredients and a few simple steps, you'll have stunning, tasty treats that are sure to wow anyone who takes a bite!

Toast the Kataifi
Melt the butter in a large frying pan over medium heat. Add the kataifi and cook until it becomes a lovely toasted golden brown color, stirring occasionally.
It will take around 10 minutes to get it fully toasted enough to have that irresistible crispy texture.
Make Pistachio Filling
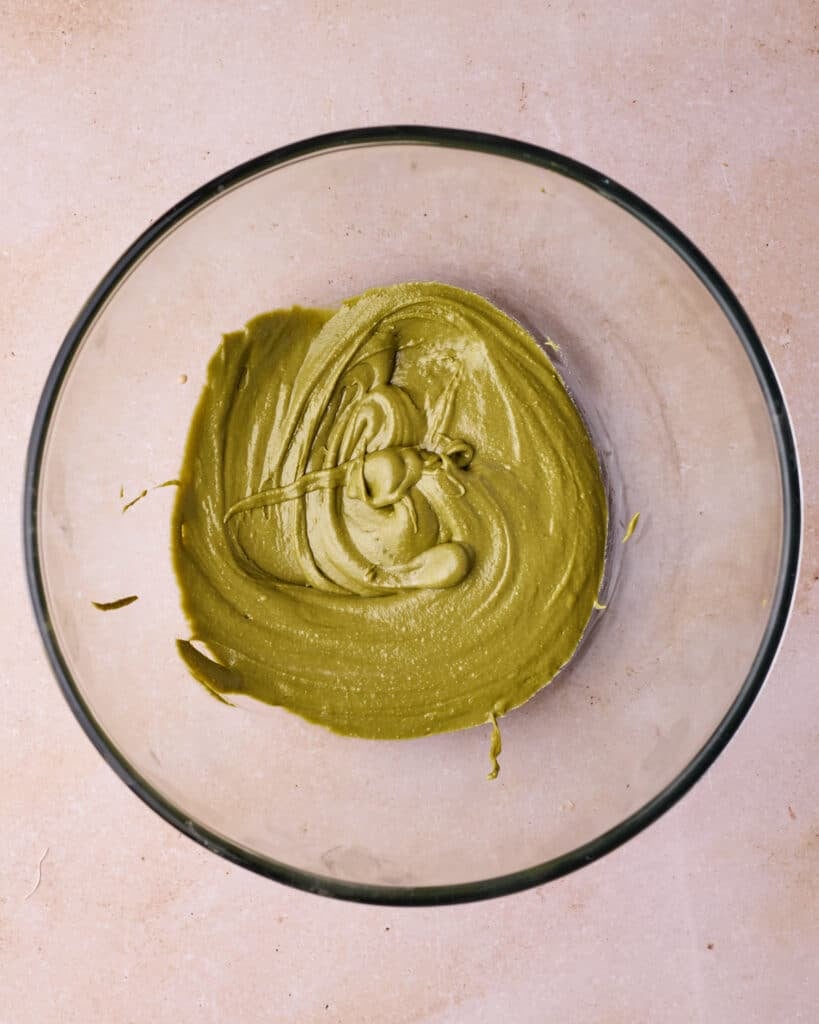
In a large bowl, stir together the pistachio cream, tahini and salt.
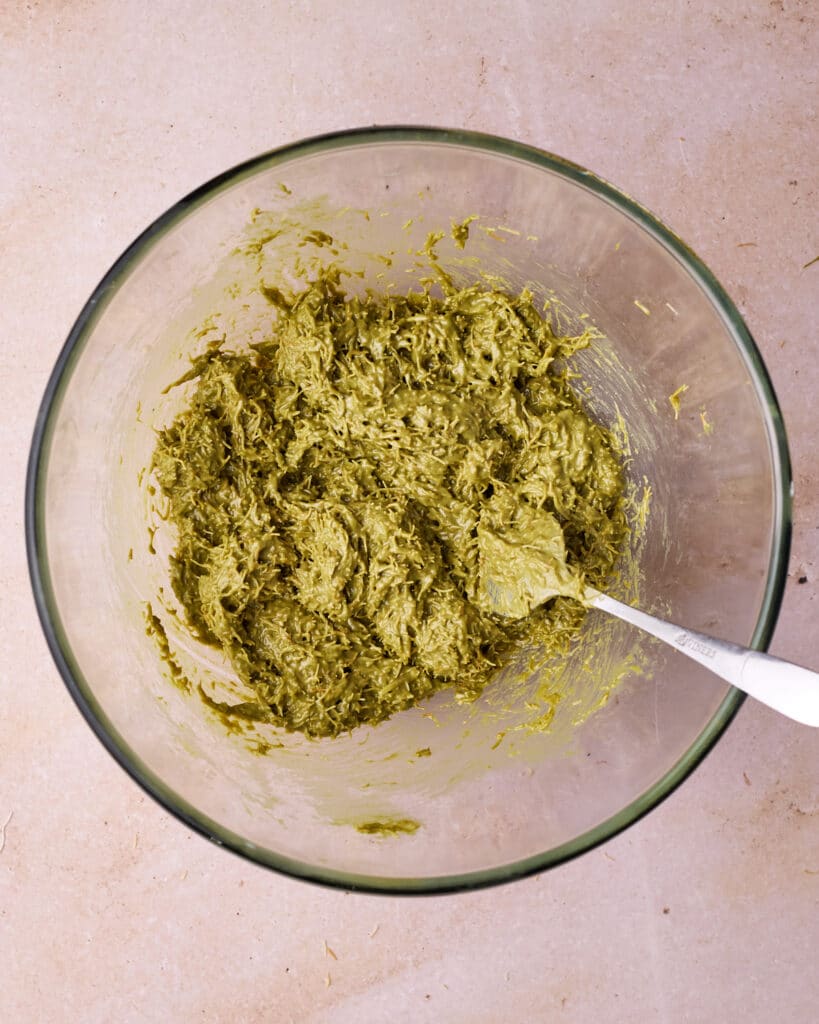
Add the Crispy Kataifi
Add the toasted kataifi to the pistachio cream mixture and stir until everything is evenly distributed.
Set aside while you prepare the chocolate.
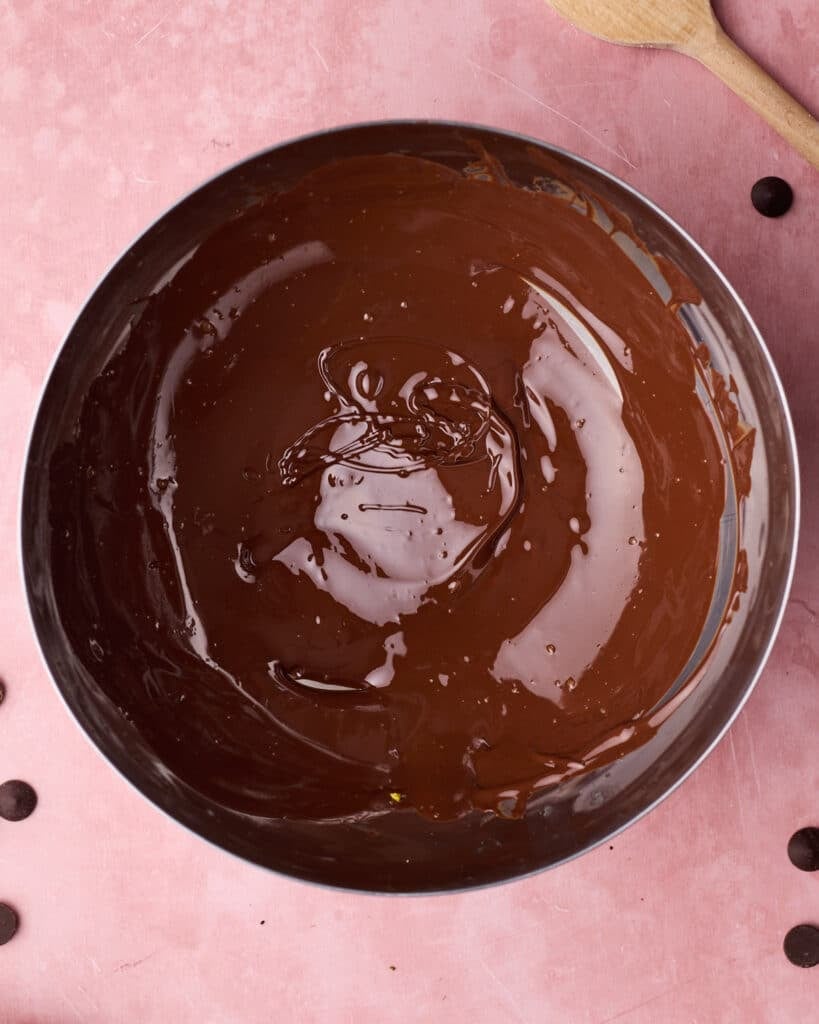
Melt Chocolate
For the best results, I strongly recommend tempering your chocolate for shine and snap. It's a lot easier than you think - I have a post that shows how to easily temper chocolate without a thermometer.
Alternatively, melt the chocolate gently over a double boiler or in the microwave in 30-second bursts, stirring in between.
Pour Into Molds
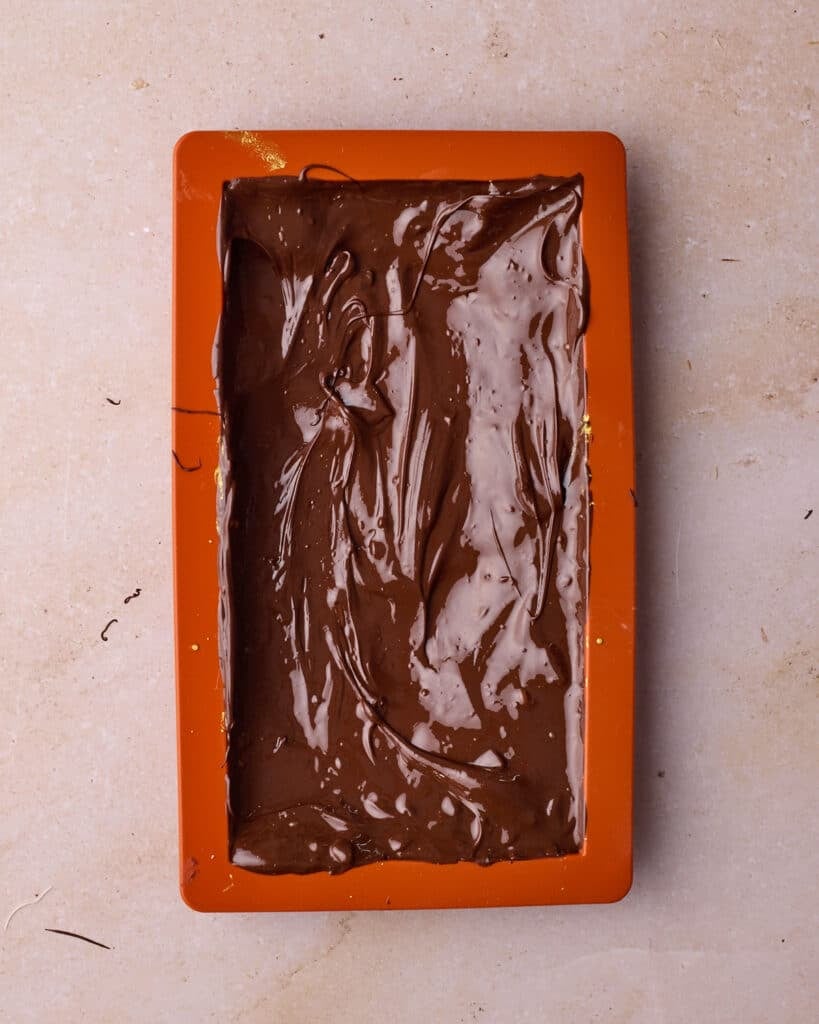
Pour the majority of the melted chocolate into your molds, tilting them in all directions to coat the sides evenly.
Turn the molds upside down over the bowl and gently shake out any excess chocolate, then scrape off the sides.
Place the molds in the fridge to set - the chocolate should firm up in just a minute or two if it's tempered, but it may take longer if it's not.
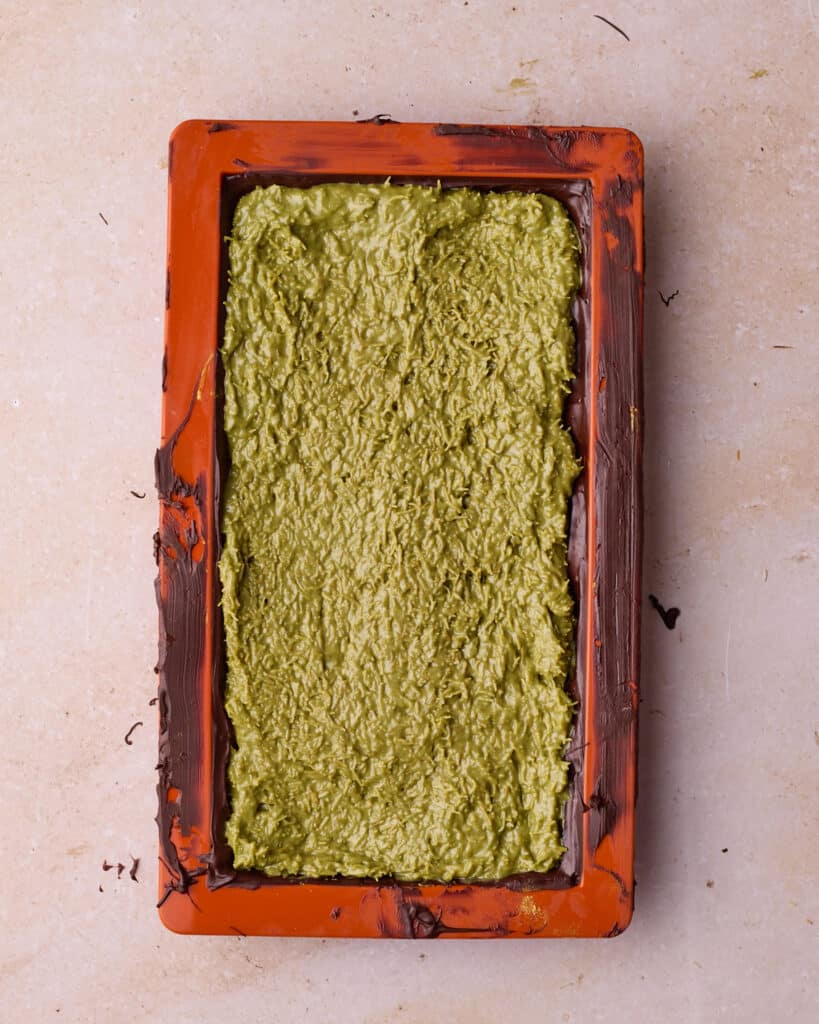
Add the Pistachio Filling
Once the chocolate has set, spoon the pistachio kataifi mixture into the molds, pushing it right out the the corners.
Don't overfill the molds - you want to have an even, flat surface for the base of the chocolate bar.
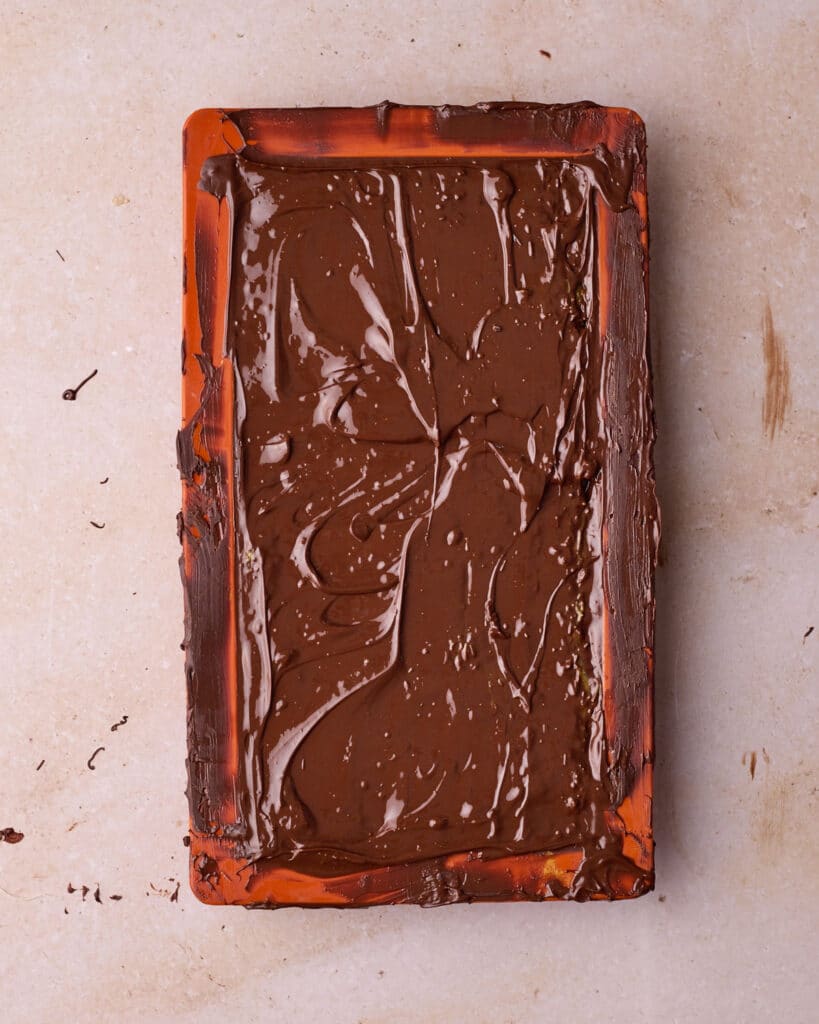
Seal
Using the remainder of the chocolate, pour a layer over the top of the bars to secure the creamy pistachio filling. Glide a bench scraper or spatula across the top of the molds to take away any excess chocolate and create clean edges.
If your chocolate has cooled down too much to work with before sealing, reheat it very gently - don't let it get too hot, or it will undo the tempering.

Refrigerate
Place your fabulous chocolate bars in the fridge and let the magic happen!
Leave them to set completely before turning them out of the molds to reveal your very own Dubai Chocolate bar.
How To Decorate Dubai Chocolate Bar
If you'd like to take your chocolate bars to the next level, add some splashes of color or pops of sparkle to the outside of your chocolate.
Here are a couple easy ways to make your bars more boujee:
- Colored Chocolate- Melt some white chocolate and pop in a few drops of oil-based food coloring. Use a small pastry brush, splash, and/or paint the colorful mixture onto your molds before topping it with chocolate. Note: liquid food colors won't work well with chocolate.
- Lustre Dust - For a simpler, hassle-free method, I just like to use a wee bit of gold lustre dust mixed with water and paint it on in the same way as above. It looks so super pretty!
- Edible Glitter - Sprinkle a touch of edible glitter onto your mold before adding the chocolate for a subtle sparkle.

Pastry Chef Tips
How to make sure your Dubai Chocolate bars turn out perfectly.
- Crunchier the Better - Crispy kataifi is the secret ingredient that transforms this luxurious treat into something special. Make sure the pastry pieces are really nice and toasted, giving you that satisfying crunch in ever bite.
- Temper to Perfection - Trust me, you will not regret tempering your chocolate when you take that first bite of your creation. By doing so, your Dubai Chocolate will have that beautiful glossy finish and satisfying 'snap.' If you skip tempering, the chocolate will turn out soft and a bit dull.
Also, some recipes I have seen recommend adding some coconut oil to your chocolate - I do not recommend this, it will make the chocolate soft and you won't be able to temper properly. - REAL-ly Good Chocolate - Using a good-quality chocolate will make all the difference in creating the perfect Dubai Chocolate. It really is worth it to spend that little bit extra and make your bars the best they can be. Be sure to use proper, real chocolate as opposed to chocolate chips or chocolate bars from a candy store.
Variations
Let's be honest, Dubai chocolate is pretty perfect as it is. But here are a few ways you can customize it and make it your own.
- Different Molds - Though the classic version is a chunky bar with oodles of filling, I have also made this in smaller molds for mini desserts or individual-sized treats. They are great as little individual bars or even as filled Easter eggs!
- Flavor - You can adjust the quantities of tahini and pistachio cream according to your taste.
- Decoration - You can decorate the outside of your Dubai chocolate bars in many different ways, see my section above on how to do this.
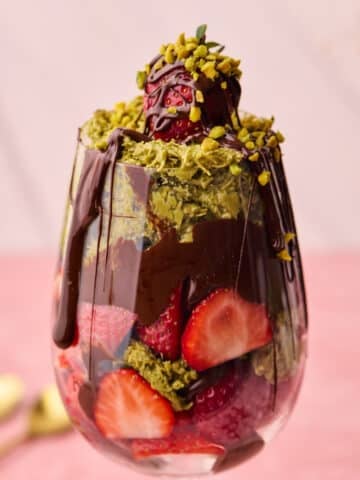
- Dubai Strawberries - If you want the flavor of Dubai chocolate without having to temper chocolate or make bars, try making Dubai chocolate strawberry cups instead.
How To Store Dubai Chocolate Bar
These viral chocolate bars are best kept in a cool, dry place - don't store them in the fridge as the moisture may affect the texture.
You can store them in an airtight container or wrapped up in foil (they make a perfect gift!), and keep for up to 3 months.
FAQs
If you have a question about this recipe that isn't answered here, feel free to write it in the comment section and I will get back to you as soon as I can.
The filling of the viral Dubai chocolate bar is a sweet, crunchy pistachio filling made with toasted kataifi (shredded phyllo pastry) and pistachio cream.
No you cannot use pistachio paste or pistachio butter to make the filling for Dubai chocolate! Many recipes list pistachio paste as an ingredient but they don't realise that they are two completely different products.
Pistachio cream is a sweet spread made with pistachios and other ingredients, whereas pistachio paste is made with 100% pistachios and has a savory flavor. If you use pistachio paste for your Dubai chocolate filling, it will not be sweet.
You don't technically have to temper your chocolate to make Dubai chocolate bars, but if you do temper it you will have a much better result with shiny chocolate that has a 'snap'.
Tempering chocolate is easier than you think! Check out my guide on how to do it easily without a thermometer.
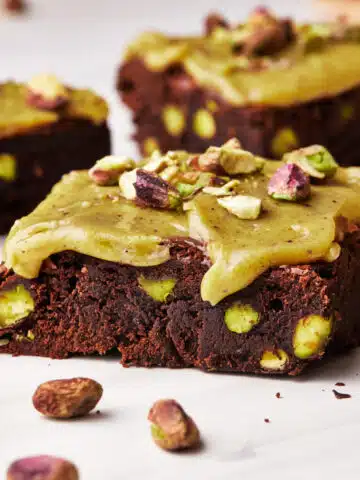
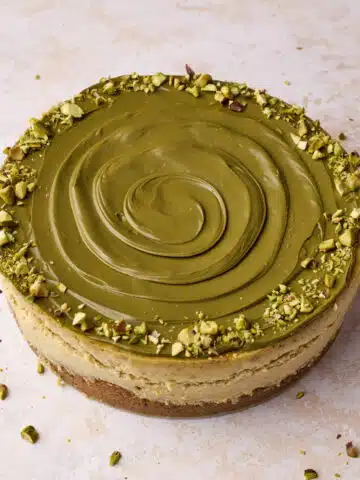
More Pistachio Desserts
Pistachio is my favorite flavor to use in desserts! Check out some of my other most popular pistachio recipes:
Watch How To Make It (Video)
Want to see exactly how to make the Dubai chocolate bar? Check out my recipe video here:
P.S. Subscribe to my Youtube channel for future video updates!
Dubai Chocolate Bar Recipe
Ingredients
- 150 g (4 cups) Kataifi (dried and chopped)
- 290 g (1 cup) Pistachio Cream
- 1 tablespoon Tahini
- 52 g (4 tablespoon) Unsalted Butter
- ½ teaspoon Salt
- 450 g (16 oz) Chocolate dark or milk
Equipment
- Frying pan
- Chocolate Bar Molds Deep molds, preferably silicone
- Thermometer optional
Instructions
- Melt the butter in a large frying pan over medium heat, then add the katafi and cook until it is a lovely golden toasted color. On medium heat with occasional stirring, this should take about 10 minutes.52 g (4 tablespoon) Unsalted Butter, 150 g (4 cups) Kataifi
- In a large bowl, stir together the pistachio cream, tahini and salt until combined.290 g (1 cup) Pistachio Cream, 1 tbsp Tahini, ½ tsp Salt
- Add the toasted katafi to the pistachio cream mixture and stir together until evenly distributed. Set aside while you prepare the chocolate.
- Melt your chocolate over a double boiler, or in the microwave in 30-second bursts. For the absolute best results, temper your chocolate. It's a lot easier than you think! I have a post all about it, and you don't even need a thermometer.450 g (16 oz) Chocolate
- Pour most of the melted chocolate into your molds and tilt it in every direction so the chocolate covers all sides of the mold. Then, tip the mold upside down over the chocolate bowl and shake it gently to remove all the excess chocolate. Put it in the fridge to set. If the chocolate is tempered, this should only take a minute or two, but it will take longer if it is not.
- Once the chocolate has set, fill the molds with the crunchy pistachio filling and push it into all the corners. Be careful not to overfill, or you won't be able to have a nice flat bottom on the chocolate bar.
- Pour the remaining chocolate over the top of the bars to seal it in, then use a bench scraper or spatula to run over the top of the mold and remove excess chocolate so you have nice clean edges. If the chocolate has cooled down too much, you can reheat it very gently, but be careful not to let it get too hot, or you might undo the tempering.
- Put the chocolate bars in the fridge to set completely before turning them out of the molds.


Debi says
So yummy!
I didn't have a chocolate mold so I used a parchment lined 8" square pan.
Thanks so much for the recipe!
Chester Runolfsdottir says
one of my hobbies is hiking. and when i'm hiking this works great.
Edwardo Zboncak says
This product works really well. It sympathetically improves my baseball by a lot.
Catana West says
Excellent recipe! So good!
Jules Grasekamp says
So happy to hear you enjoyed the Dubai chocolate Catana - thank you for trying my recipe!
Jules