
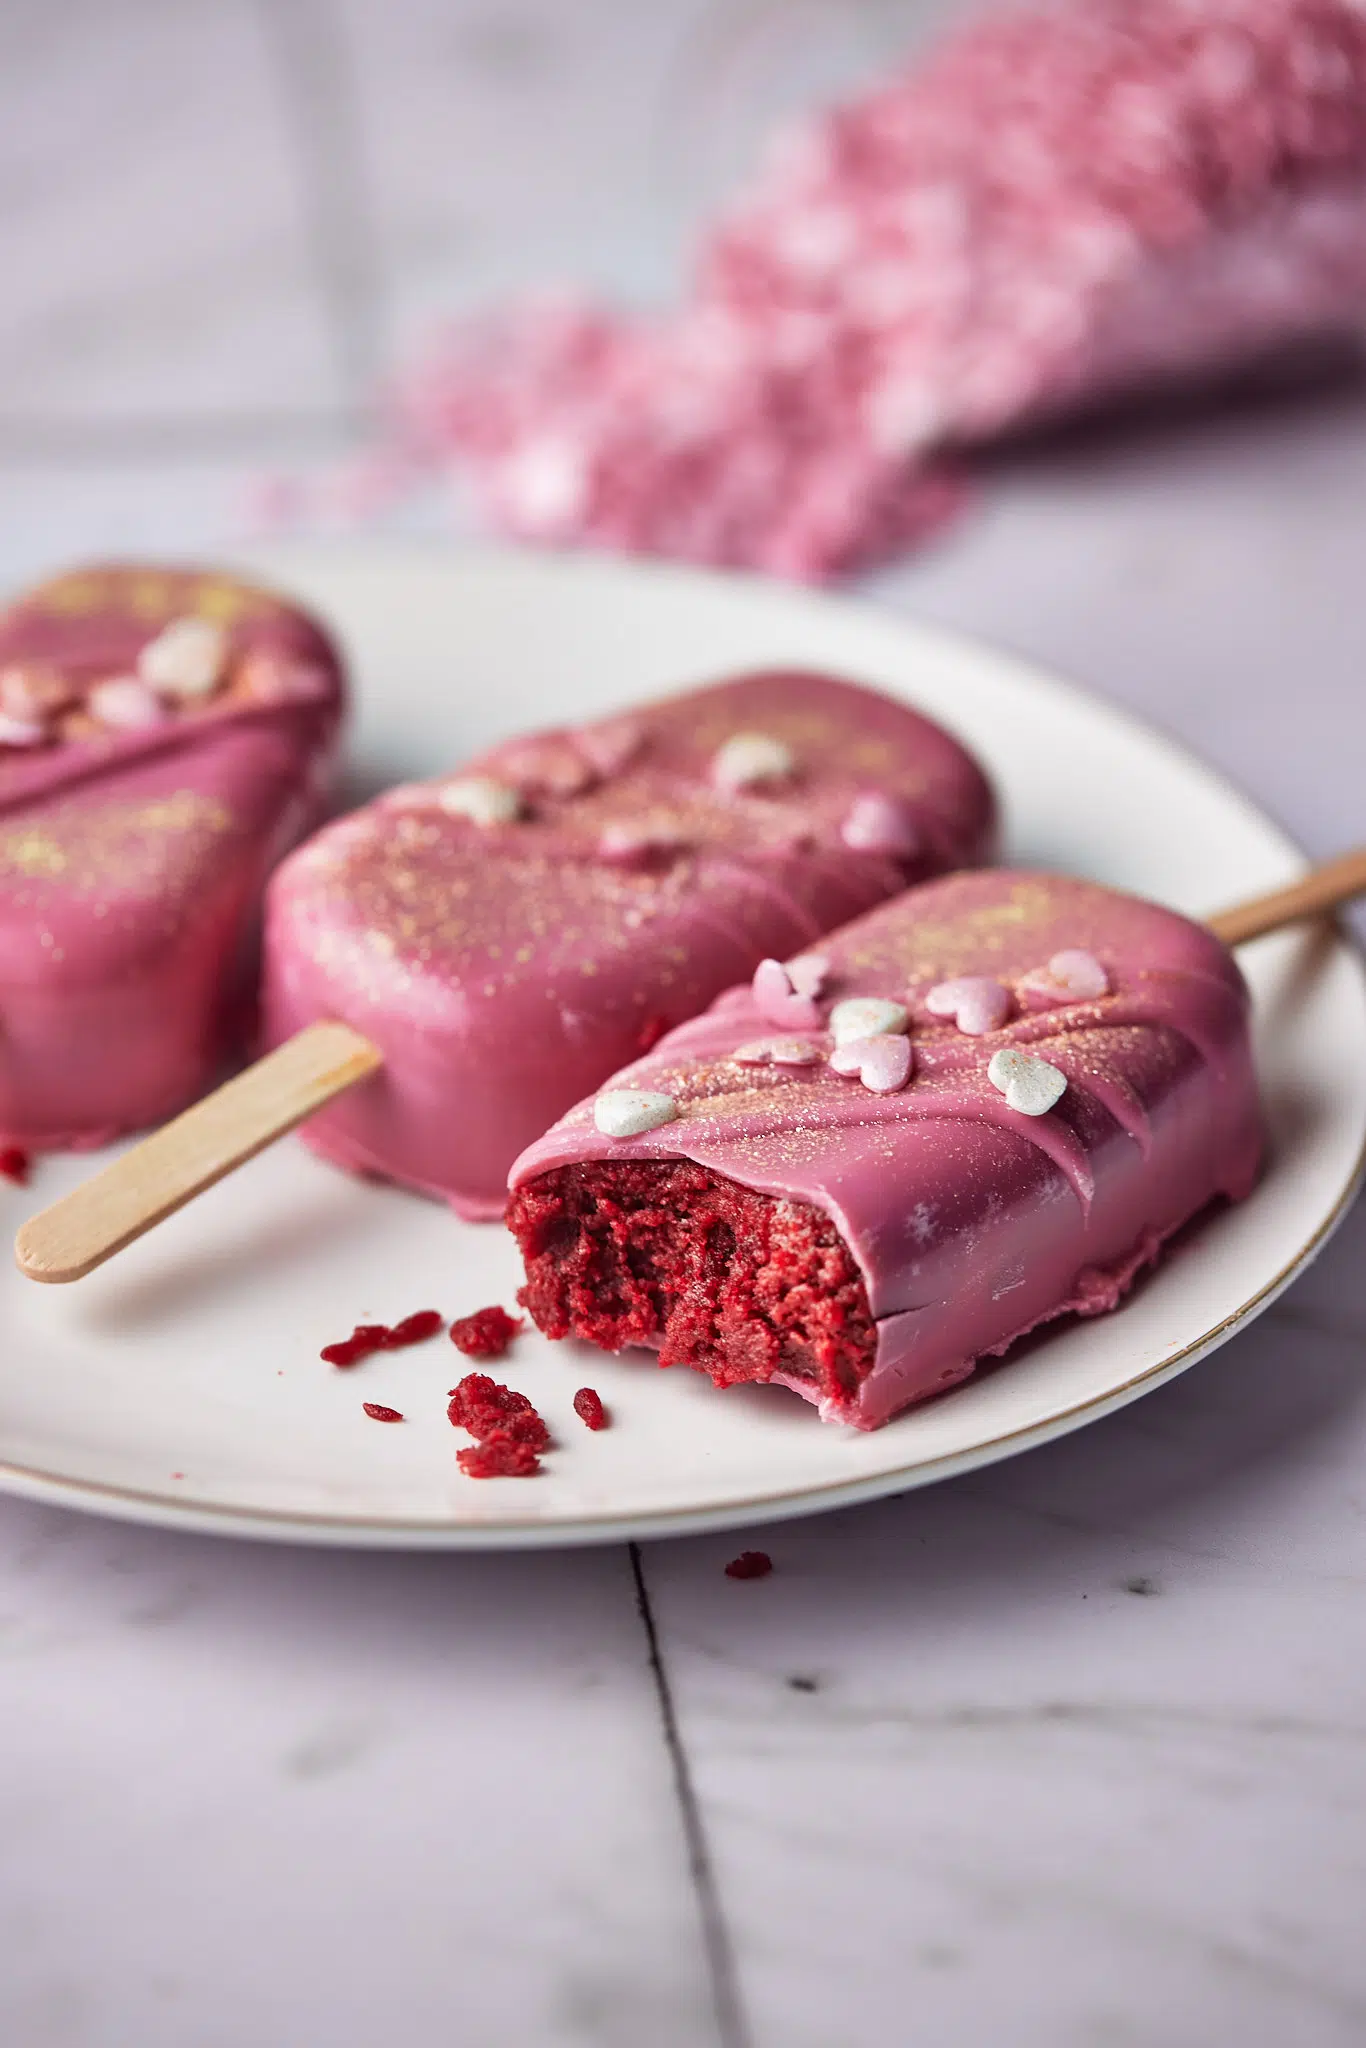
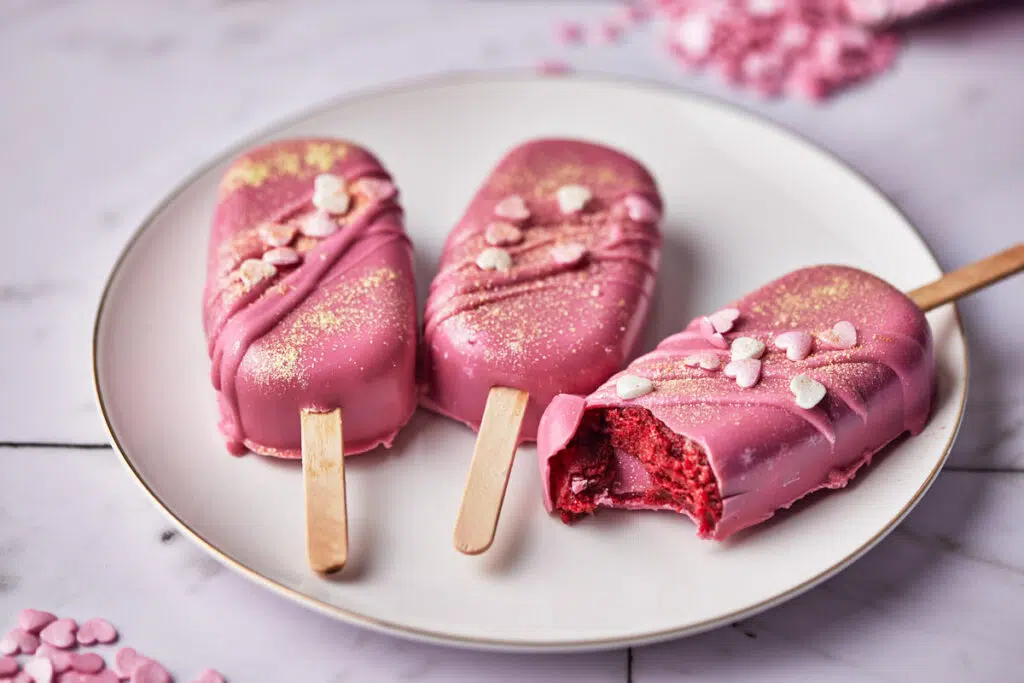
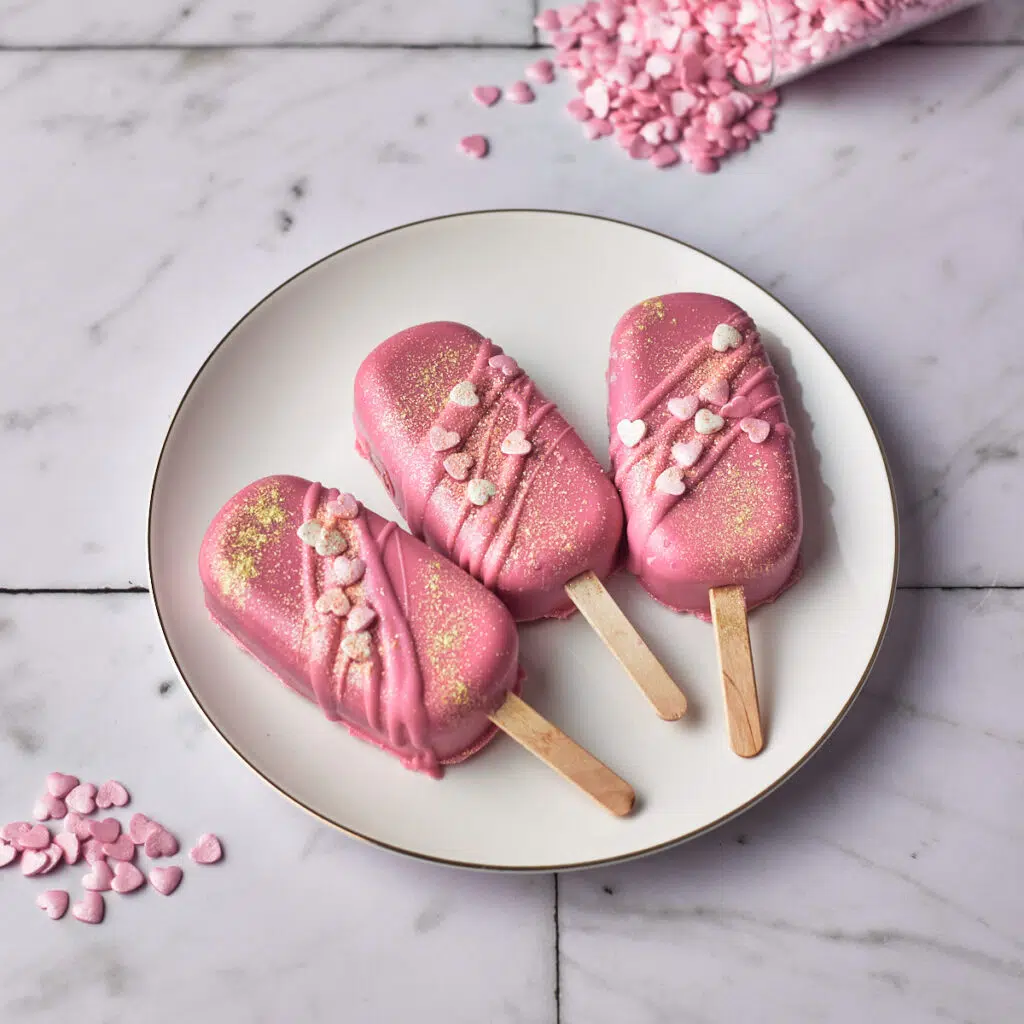
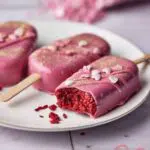
What better way to show your loved one they are special than with these homemade red velvet valentines cakesicles?! Delicious red velvet sponge mixed with cream cheese frosting, encased in pink candy melts and decorated with heart sprinkles and edible glitter!
Cakesicles are the perfect easy treat for every season and holiday right now, but I think they are best as a Valentines day treat.
I LOVE baking for Valentines Day, it's great to either bake something for your sweetheart or bake something together for a fun and cute date idea. Some of my favourite Valentines recipes are my Chocolate Strawberry Cupcakes and my Molten Chocolate Lava Cakes - which make for a very romantic dessert!
Jump to:
Easy alternatives to baking from scratch
You know I will always condone baking from scratch. But if baking is not your jam or you are looking for a super quick valentines treat to make, you can use a box cake mix or even just buy a ready-made cake and frosting. (This is likely the ONLY time you will see me recommend a box cake mix!)
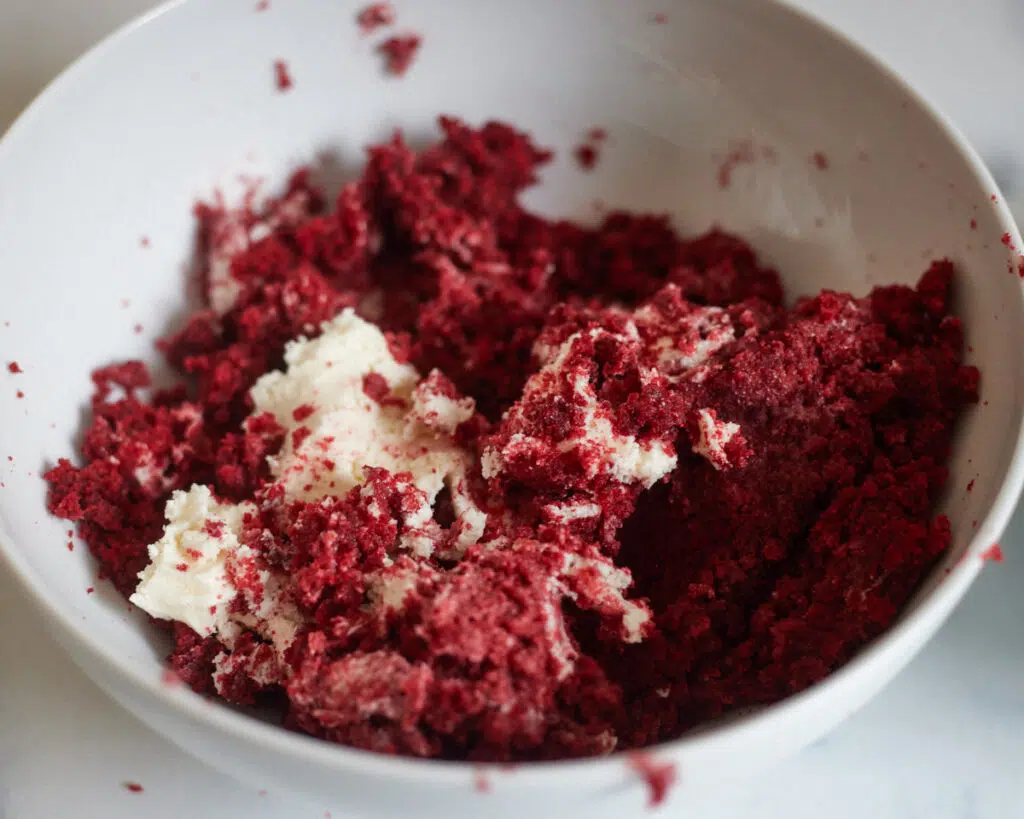
Cakesicles are in principle a very simple recipe and super easy to make. Essentially you just need 6 parts cake to one part frosting, (3 cups of cake crumbs for every ½ cup frosting) and everything gets smooshed together to make a rollable, shapable 'cake-pop' mix.
Buy cake and ready-made frosting, or just buy a whole frosted cake, scrape the frosting off and then add the appropriate amount back in. The ratio doesn't have to be super precise and will vary depending on what kind of cake you are using. You'll know it's right when you are just able to roll the cakesicle mixture into a ball and it holds its shape.
Candy Melts or Chocolate?
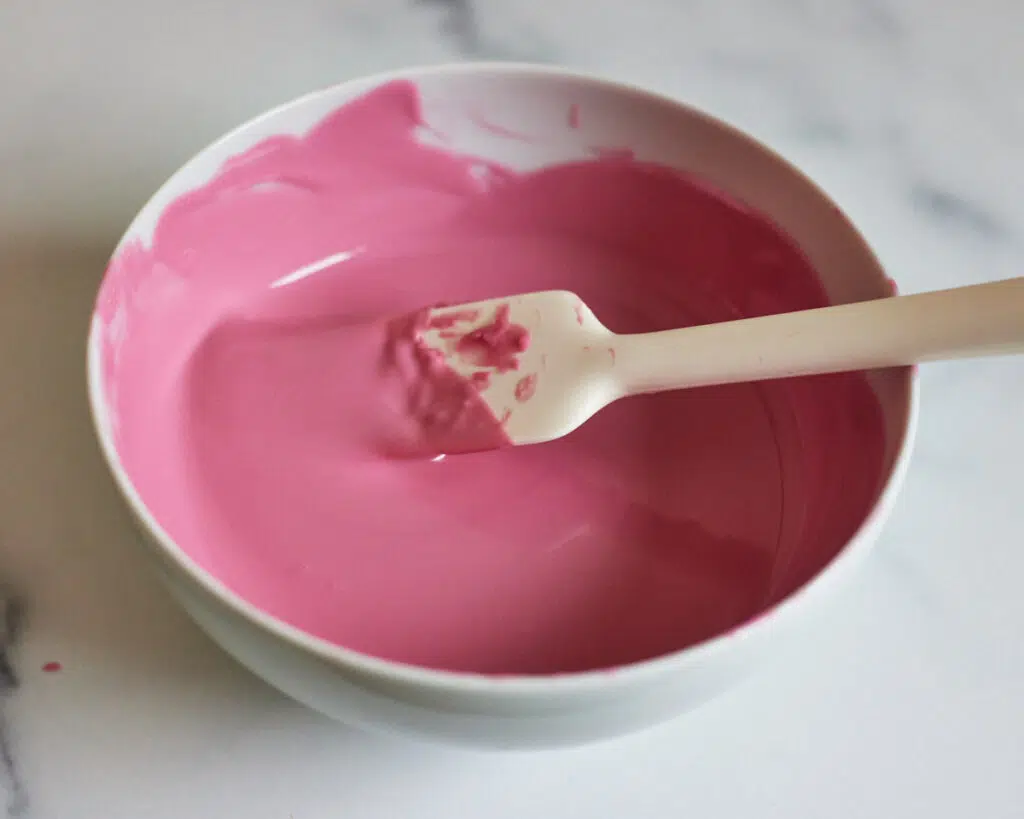
Candy Melts - Candy melts are ideal for cakesicles and cake pops as they are easy to melt, don't need to be tempered, and come in various fun colours, so you don't need to colour the chocolate yourself.
Chocolate - Chocolate also works beautifully for cakesicles, and has a higher quality taste as well, but you have to make sure you temper it properly. Don't be put off by this! Tempering chocolate is a lot easier than you think and you don't need a thermometer to do it at home. Check out my guide and video on how to easily temper chocolate.
You can use milk, dark, or white chocolate for cakesicles, though keep in mind that if you want to colour the chocolate, you will need to use white chocolate. To achieve the colour, just add a tiny drop of gel food colouring to your chocolate. You should use an oil-based food colouring such as Colour Mill to make sure your white chocolate doesn't seize, or if you have regular gel food colour, add a drop of flavourless oil (such as vegetable oil) to the chocolate along with the food colouring.
Equipment
Of course, if you want to make cakesicles, you will need a cakesicle mold! There are many different kinds available, but here are some things to look for:
- Silicone is best as it makes it MUCH easier to maneuver the cakesicles out of the mold without cracking the chocolate/candy melts
- Make sure the mold has a built-in slot for the popsicle stick to go through and that the slot fits the size of the popsicle sticks you have
- A large mold with multiple cavities might be appealing at first, but smaller ones will be easier to work with once they are full of cake! It's better to get two molds that make three cakesicles than one mold that makes six cakesicles.
- It's helpful if the mold has a little 'rest' for the end of the popsicle stick, this will hold it straight and stop it from falling into your chocolate as it sets.
You will also need popsicle sticks! Basic wooden ones are great, just make sure you get the right size for your popsicle mold.
If you plan to temper your chocolate, you might want a candy thermometer too, although you can easily temper chocolate in the microwave without a thermometer.
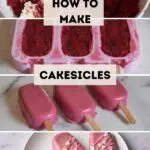
How to Make Cakesicles
Prepare your cakesicle mixture - whether you are baking your cakesicles from scratch, from a box, or just buying a ready-made cake - you want to prepare your cakesicle mixture before beginning the process. Take your cake and rub it between your fingers to make crumbs. Then add frosting and smoosh everything together with your hands. The perfect consistency should mean that you can easily roll the mixture into a ball and it holds its shape, I usually find this is about 6 parts cake to 1 part frosting, but you can add more or less frosting depending on what you need to get the consistency right. Check out my video in the recipe card at the bottom of this post to see what the perfect cakesicle consistency looks like.
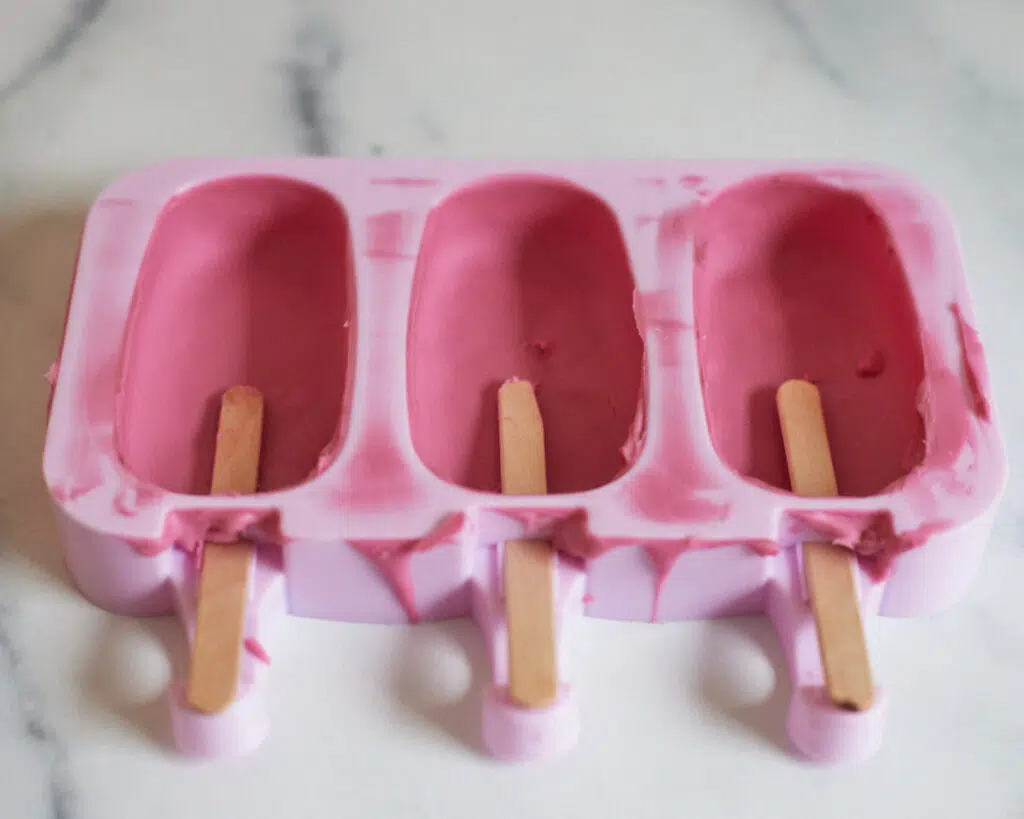
Melt your candy melts/chocolate - melt your candy melts as per package instructions, or if you are using chocolate, temper your chocolate. Pour into your cakesicle mold and gently push up the sides to make sure every part is coated thoroughly. Turn the mold upside down over a bowl and let any excess chocolate/candy melts run out, back into the bowl.
Insert popsicle sticks - it's important that you insert the popsicle sticks before the chocolate sets, it's best to do this right away after pouring out excess. If your mold has a guide for how far the popsicle sticks should go, use that, otherwise, make sure that at least half the popsicle stick is 'inside' the mold, so it will be able to support the weight of the cakesicle. Once sticks are inserted, put the mold in the fridge to set for a few minutes.
Fill your cakesicles - take your cakesicle mix and gently press it into the cakesicle molds, being careful not to crack the chocolate. Make sure you carefully push some of the mixture underneath the popsicle stick so every bit of the cavity is filled. Make sure the mixture does not bulge above the top of the mold, leave about 1-2mm of space.
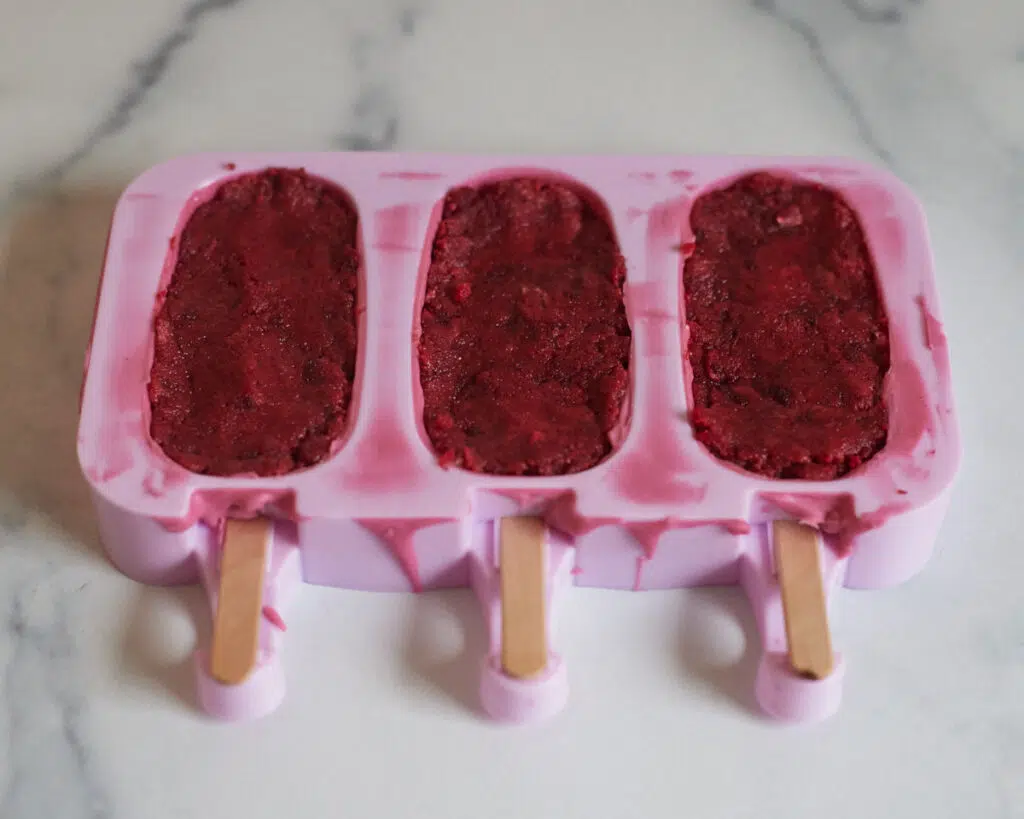
Seal the cakesicles - take the leftover chocolate/candy melts, reheat if needed, and pour over the back of the cakesicles. Don't worry if it isn't neat or if it goes over the edges, we can break off any excess later. Place back in the fridge to set for 10 minutes.
Unmold the cakesicles - once they have fully set, carefully remove the cakesicles from the mold. Be careful not to knock the popsicle sticks as you pull them out of the mold.
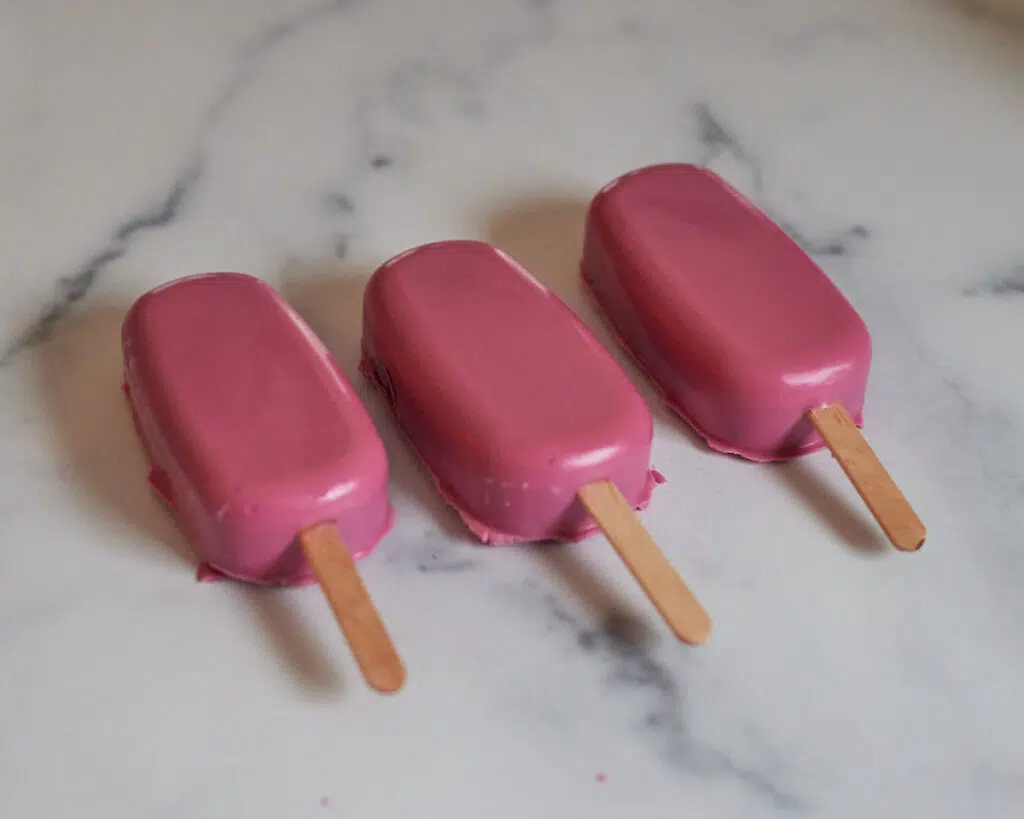
Decorate! - Use leftover candy melts/chocolate, sprinkles, edible glitter, or whatever you have lying around to decorate the Valentines cakesicles.

Variations
You can make these Valentines cakesicles with really any combination of cake, frosting and coating you can think of. Here are a few of my favourites:
- Triple Chocolate - chocolate cake crumbs with chocolate buttercream and a dark chocolate coating and chocolate chips
- Funfetti - vanilla cake crumbs mixed with buttercream frosting and sprinkles, coated in fun coloured candy melts and decorated with sprinkles
- Chocolate Orange - chocolate cake crumbs with orange flavoured frosting coated with milk chocolate
- Caramel - vanilla cake crumbs mixed with caramel buttercream and caramel sauce, coated in white chocolate and decorated with caramel
Decorating cakesicles for Valentines Day
The best part about decorating cakesicles is that you really can't go wrong! Whether you like them neat and perfect or messy and covered in sprinkle chaos - they still look awesome. To decorate your Valentines cakesicles exactly like mine, here's a step-by-step guide:
- Take some of the leftover candy melts or chocolate and use a piping bag or spoon to drizzle diagonal lines over a small area of each cakesicle
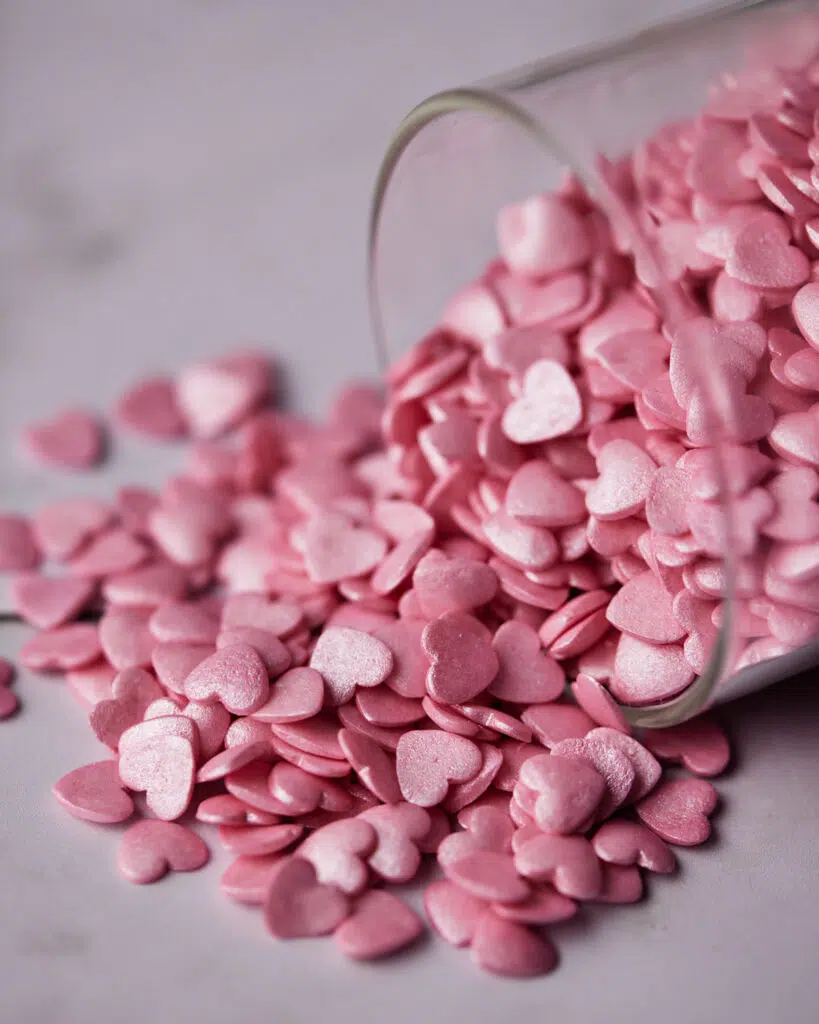
- Before it sets, add a few heart shaped sprinkles
- Lastly, dust with some edible glitter, I used gold edible glitter to make it pop against the pink
Keep in mind, you don't need these specific decorations to make beautiful cakesicles! Use whatever you have at home - sprinkles, chocolate chips, chocolate shavings, mini marshmallows - whatever you like!
How to store cakesicles
As this cakesicle recipe contains cream cheese, it needs to be stored in the fridge. Put your finished cakesicles in an air-tight container on top of paper towel, being sure to place paper towel in between each layer of cakesicles. This helps to prevent condensation from forming on the outer shell of the cakesicles, which can sometimes happen in the fridge. The cakesicles will keep like this for 5 days. Remove cakesicles an hour before serving for best flavour.
If you are using a variation of the recipe which does not contain an ingredient that needs to be refrigerated (e.g. vanilla cake with American buttercream frosting), then you don't need to put the cakesicles in the fridge. Store them the same way at room temp (but not somewhere warm or in direct sunlight). The cakesicles will be good at room temperature for 3 days.
Top tips
Make sure you put popsicle sticks in before the chocolate sets! I made this mistake the first time I made them and completely cracked the candy melts when trying to insert the popsicle sticks!
Make sure coating is thick enough - When coating the sides of the cakesicle mold, make sure there is a thick enough layer of chocolate or candy melts. If it is too thin, it is more likely to crack or break. The best way to do this is to either fill the mold entirely (if you have enough chocolate/candy melts), leave it for 30 seconds and then tip it upside down and pour away the excess. Alternatively, fill it about ⅓ full and then use a small spatula or spoon to gently push the chocolate or candy melts up the sides of the mold, wait for 30 seconds and then repeat before emptying the excess.
Red Velvet Valentines Cakesicles
Ingredients
- 150 g (1 ¼ cups) All-purpose Flour 150g
- 200 g (1 cup) Granulated Sugar 200g
- 1 tablespoon Cocoa Powder
- 1 teaspoon Salt
- 1 teaspoon Baking Soda
- 1 (1 Large) Egg
- 164 g (¾ cups) Vegetable Oil 164g / 180ml
- 120 g (½ cup) Buttermilk 120g / 120ml
- 1 tablespoon White Wine Vinegar
- 1 teaspoon Vanilla Extract
- ½ teaspoon Red Gel Food Colour
- 113 g (½ cup) Cream Cheese 113g (room temperature)
- 75 g (⅓ cup) Unsalted Butter 75g (room temperature)
- 480 g (4 cups) Powdered Sugar 480g
- 1 teaspoon Vanilla Extract
- 250 g Candy Melts OR Chocolate 250g
- Sprinkles
Equipment
Instructions
- Preheat oven to 325°F / 170°C and line a sheet pan with baking paper
- Lightly whisk the egg, buttermilk, oil and vanilla together until blended1 (1 Large) Egg, 120 g (½ cup) Buttermilk, 1 tsp Vanilla Extract, 164 g (¾ cups) Vegetable Oil
- Add the sugar, flour, cocoa powder and salt and mix for about a minute150 g (1 ¼ cups) All-purpose Flour, 200 g (1 cup) Granulated Sugar, 1 tbsp Cocoa Powder, 1 tsp Salt
- Add red food colouring and mix until the batter is the shade of red you want½ tsp Red Gel Food Colour
- In a small bowl, pour the white wine vinegar over the baking soda, quickly mix together and then pour into the batter. Mix the batter together1 tsp Baking Soda, 1 tbsp White Wine Vinegar
- Pour into a sheet pan and bake for 20 minutes or until a skewer comes out clean
- Cream together the cream cheese and butter until smooth113 g (½ cup) Cream Cheese, 75 g (⅓ cup) Unsalted Butter
- Add powdered sugar and vanilla and mix slowly until the powdered sugar is incorporated480 g (4 cups) Powdered Sugar, 1 tsp Vanilla Extract
- Turn the mixer on high and beat for 2-3 minutes until fluffy
- Rub the cooled cake between your fingers until it is all crumbs
- Add frosting and squish together with your hands to combine everything together. You want about ½ cup of frosting for every 3 cups of cake crumbs. Add more frosting if you need to get the perfect consistency. You'll know it's right when you can easily roll the mixture in a ball and it holds its shape.
- Melt candy melts or temper chocolate and pour into the cakesicle mold. Push the chocolate/candy melts up the side of the mold to make sure it is entirely coated250 g Candy Melts OR Chocolate
- Tip the mold upside down over the bowl to get rid of any excess
- Put popsicle sticks into the mold and then place in the fridge for a few minutes to set
- Once set, remove from the fridge and start gently pressing the cakesicle mix into the mold. Be sure to carefully push some underneath the popsicle stick so the entire cavity is filled. Be sure not to overfill, there should be no cakesicle mix bulging over the top of the mold. Aim to leave about 1-2mm of a gap at the top
- Check chocolate/candy melts and reheat if needed. Pour a thin layer over the back of the cakesicles to seal them. Slide a palette knife across the mold to smooth out the back and remove any excess. Place in the fridge for 10 minutes
- Gently unmold the cakesicles and decorate using leftover candy melts/chocolate, sprinkles, glitter or whatever you have lying around!Sprinkles
Nutrition
Notes
- If you don't want to make the cake and/or frosting from scratch, you can use a box mix or ready-made cake/frosting. The ratio of cake to frosting should be about 6 to 1 in volume, so 3 cups of cake (crumbled) to ½ cup of frosting. You may want to add more or less frosting to achieve the right consistency. The perfect consistency is reached when you can easily roll the cake/frosting mixture into a ball and it holds its shape.
- You can use candy melts or chocolate for the outer coating. If using chocolate, make sure you temper it. See my guide on how to easily temper chocolate.


rayshel watlington says
Hi! I may have missed it somewhere in the recipe...jw how many cakesickles this recipe makes? Thanks! ☺️
Jules Grasekamp says
Hi Rayshel,
No problem at all! It makes 16 cakesickles 🙂
You can always find the servings at the top of my recipe cards - hope this helps and happy baking!
Jules
rayshel watlington says
Thank you!
Willow says
Hello! What would be the best method of transporting these the day of if im giving them as a gift? Do they need to be refrigerated if not eaten immediately?
Jules Grasekamp says
Hi Willow,
You could put them in any cake box, it doesn't need to be airtight as the candy melts seal the moisture in.
They don't need to be put in the fridge immediately, they will be okay for a few hours. But after that they should go in the fridge because of the cream cheese. They will be good in the fridge for up to a week.
Jules
Willow says
Thank you so much for the information and quick response!
Jules Grasekamp says
You're welcome, I hope your friend loves them! 🙂
Jules